
Before we go to mass production, we decided to run boards in the environmental chamber again. This way we will test the actual hardware and software configuration which is going to be sold. You can have a look at our initial testing here.
Content
Hardware configuration
All of the modules used standard specification except of the temperature ranges for the key components as described below:
- 3x iMX6 TinyRex Max Module:
- 1GHz i.MX6 Quad 1GHz CPU – automotive temperature range (-40°C ~ 125°C)
- 4x 4Gb DDR3 Memory chips – industrial temperature range (-40°C ~ +95°C)
- 1GBps Ethernet PHY Tranciever KSZ9031RN – automotive temperature range (-40°C ~ +85°C)
- 3x iMX6 TinyRex Pro Module:
- 1GHz i.MX6 Dual 1GHz CPU – automotive temperature range (-40°C ~ 125°C)
- 4x 2Gb DDR3 Memory chips – industrial temperature range (-40°C ~ +95°C)
- 1GBps Ethernet PHY Tranciever KSZ9031RN – automotive temperature range (-40°C ~ +85°C)
- 3x iMX6 TinyRex Basic Module:
- 1GHz iMX6 Solo 1GHz CPU – extended temperature range (-20°C ~ +105°C)
- 2x 2Gb DDR3 Memory chips – industrial temperature range (-40°C ~ +95°C)
- 1GBps Ethernet PHY Tranciever KSZ9031RN – automotive temperature range (-40°C ~ +85°C)
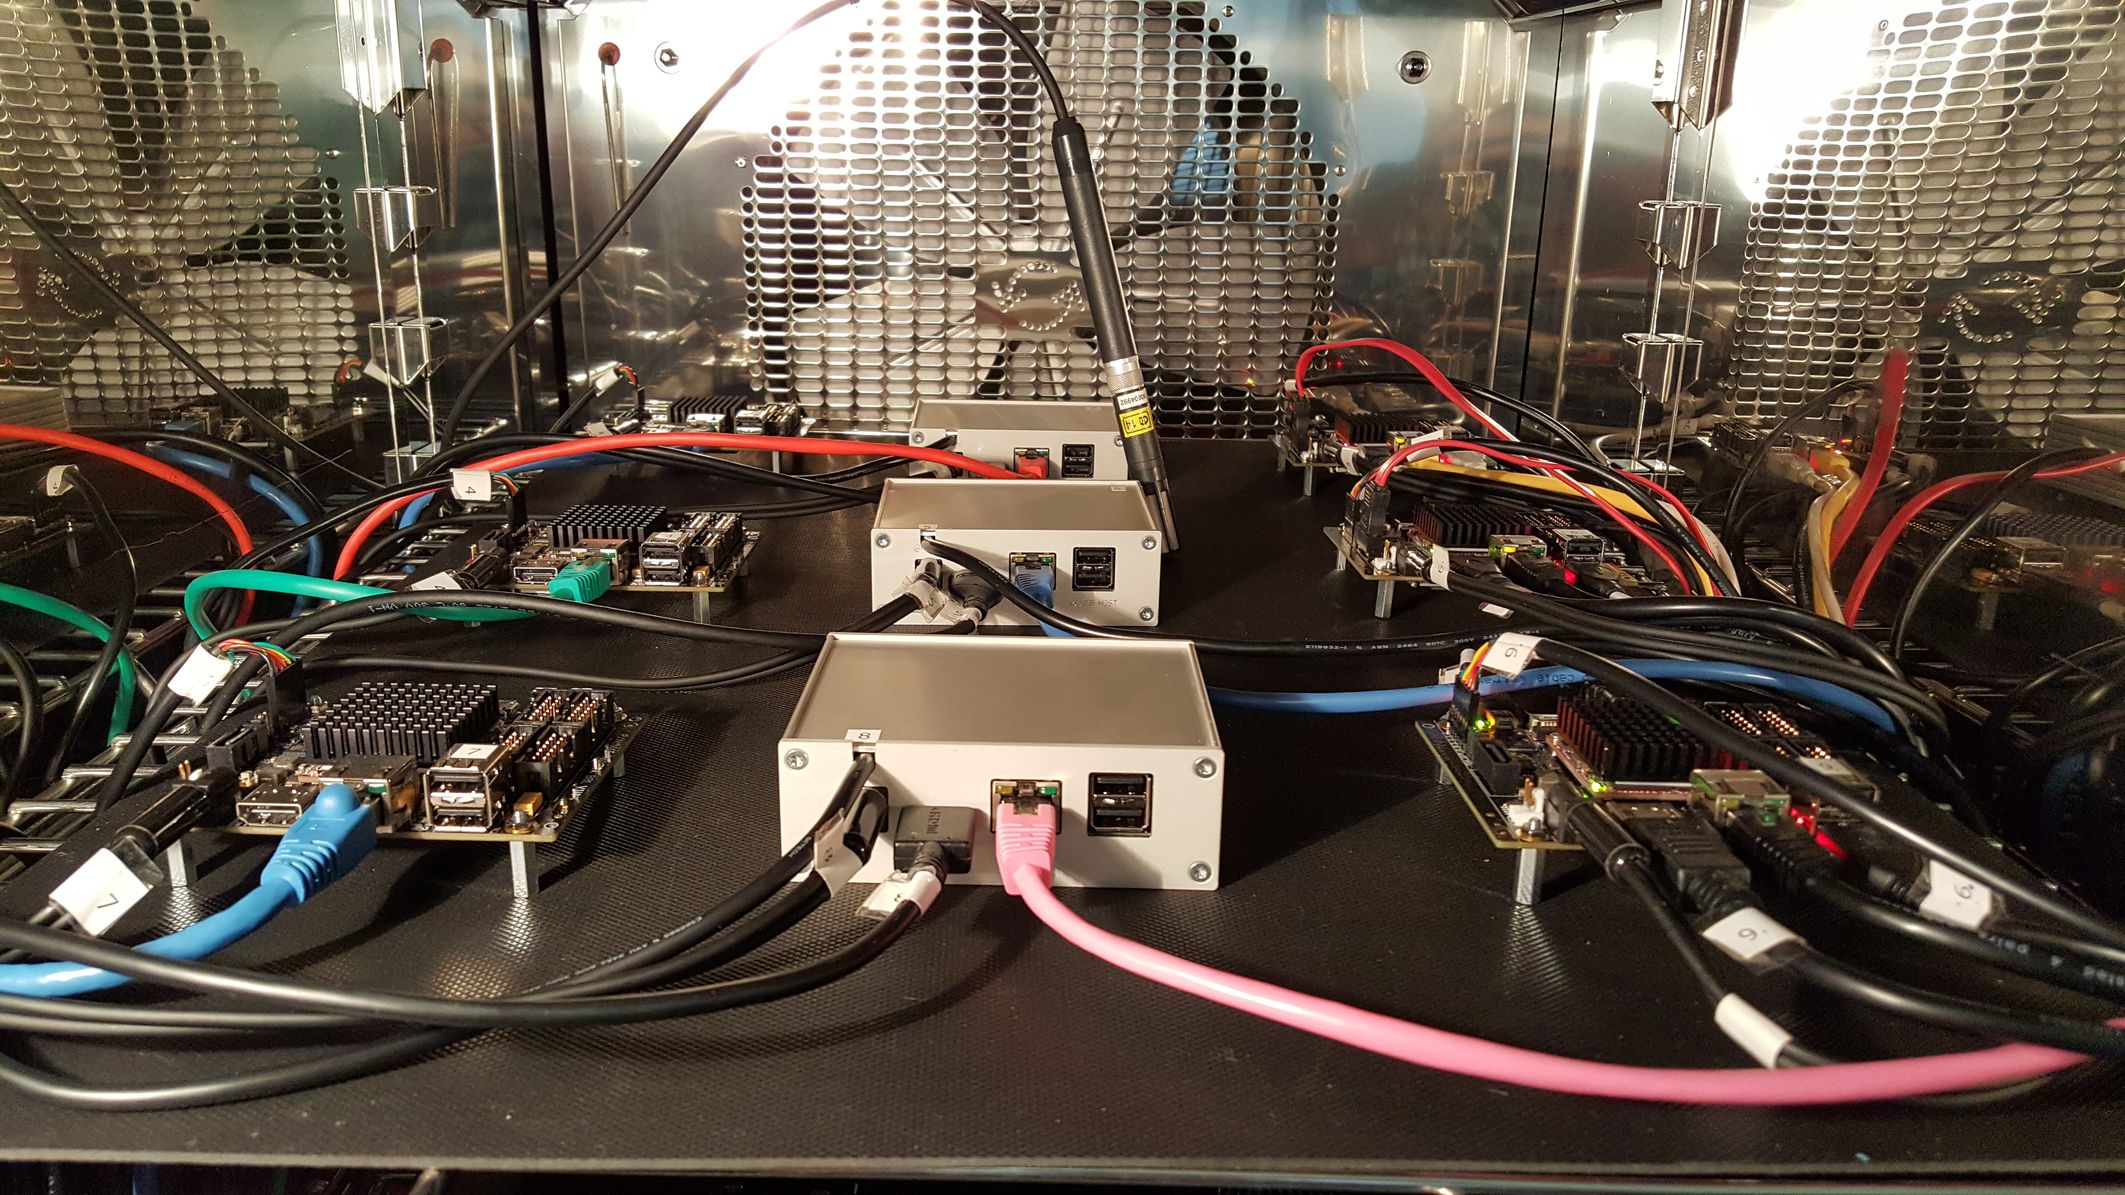
Every module was plugged into the standard configuration iMX6 TinyRex Baseboard Lite with extended temperature range (-20°C ~ +85°C). For most of the testings we used a standard heatsink which is delivered with every module (with size 35x35x10mm). Some of the board was mounted into this aluminum case.
Picture: Environmental chamber setup with boards prepared for testing
Test description
One of each version of TinyRex (one Max, one Pro and one Basic module) was running full peripheral test and stress all the peripherals in various temperatures. Rest of the boards where running CPU and memory test to check reliability and stability of the firmware.
Here are our configurations & software description:
- 3x iMX6 TinyRex peripheral stress testing
- 1 thread of extensive Memory stress test
- 1 thread of CPU stress test
- SATA stress test (applied for Max and Pro versions)
- HDMI signal (from other TinyRex board) connected to HDMI input circuitry
- HDMI signal is received and send to HDMI output connected to monitor
- copying a file from the first USB stick to SD card and vice versa
- copying a file from the second USB stick to SATA hard drive and vice versa (applied for Max and Pro versions)
- copying a file from the second USB stick to SD card and vice versa (applied for Basic version)
- pinging the host PC via Ethernet
- all the messages were printed out on the serial console through connected FTDI cable
- booting from SD card
- 2x iMX6 TinyRex Max Memory stress testing
- 4 threads of extensive Memory stress test
- 4 threads of CPU stress test
- reading CPU temperature via SSH Ethernet session
- serial FTDI cable used for displaying messages
- booting from SD card
- one set was mounted inside aluminium case
- 2x iMX6 TinyRex Pro Memory stress testing
- 2 threads of extensive Memory stress test
- 2 threads of CPU stress test
- reading CPU temperature via SSH Ethernet session
- serial FTDI cable used for displaying messages
- booting from SD card
- one set was mounted inside aluminium case
- 2x iMX6 TinyRex Basic Memory stress testing
- 1 threads of extensive Memory stress test
- 1 threads of CPU stress test
- reading CPU temperature via SSH Ethernet session
- serial FTDI cable used for displaying messages
- booting from SD card
- one set was mounted inside aluminium case
Notes: USB sticks and SATA hard drives were place outside of the environmental chamber. All the scripts running during the test and the board setup instructions can be found at the bottom of this page in Appendix : How to prepare the test.
The Results
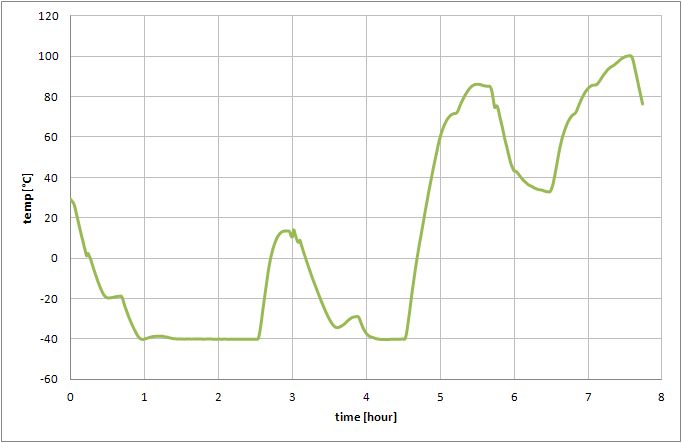
Picture: Temperature profile during the test
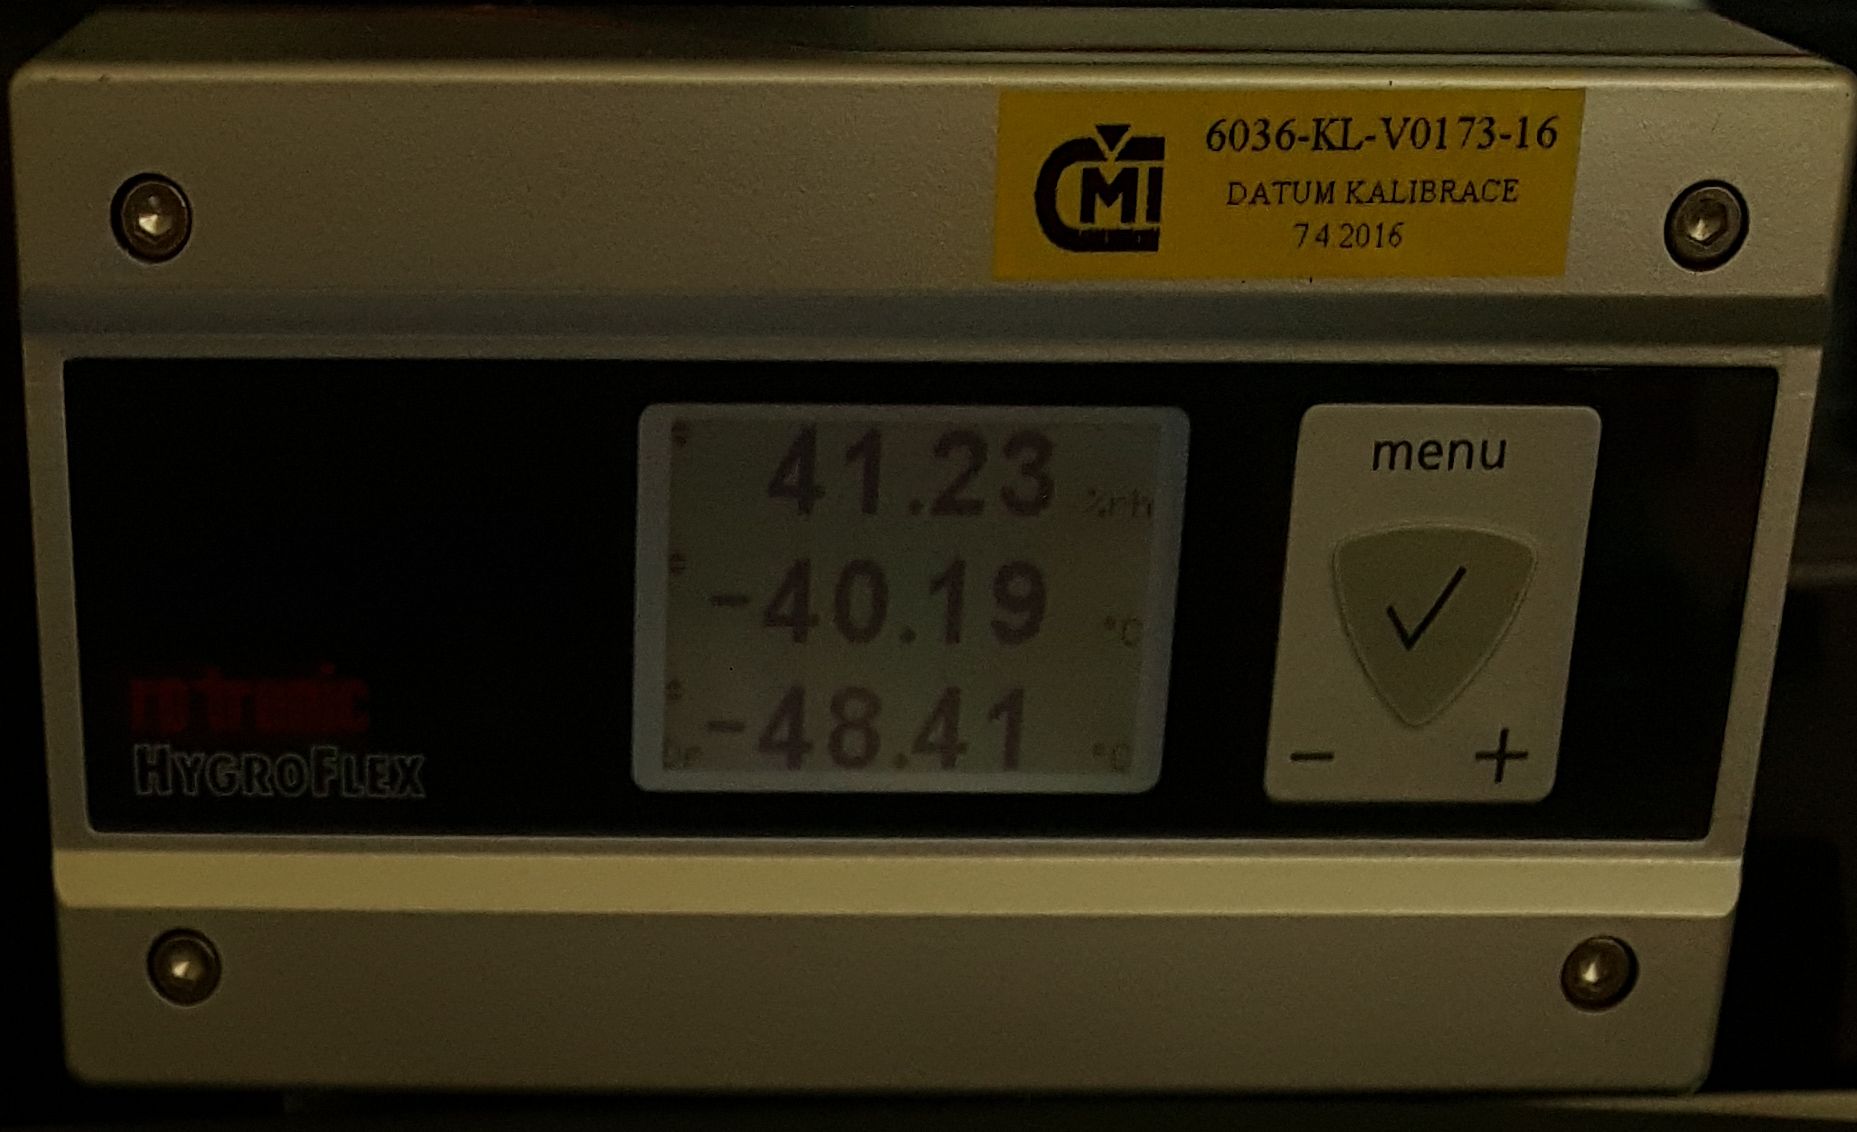
Running the boards at low temperature (-40°C) – PASS
Test description: At -40°C we were running the CPU, Memory and peripheral stress tests. All the tested sets were working OK during the whole time, although the components used at the iMX6 TinyRex Basic Module were only in -20°C ~ +105°C operating temperature range, and the iMX6 TinyRex Baseboard Lite components were only in -20°C ~ +85°C operating temperature range.
Picture: Zoom on the temperature chamber displaying the minimum temperature (First number shows relative humidity, second one the actual temperature and the last one the dew point).
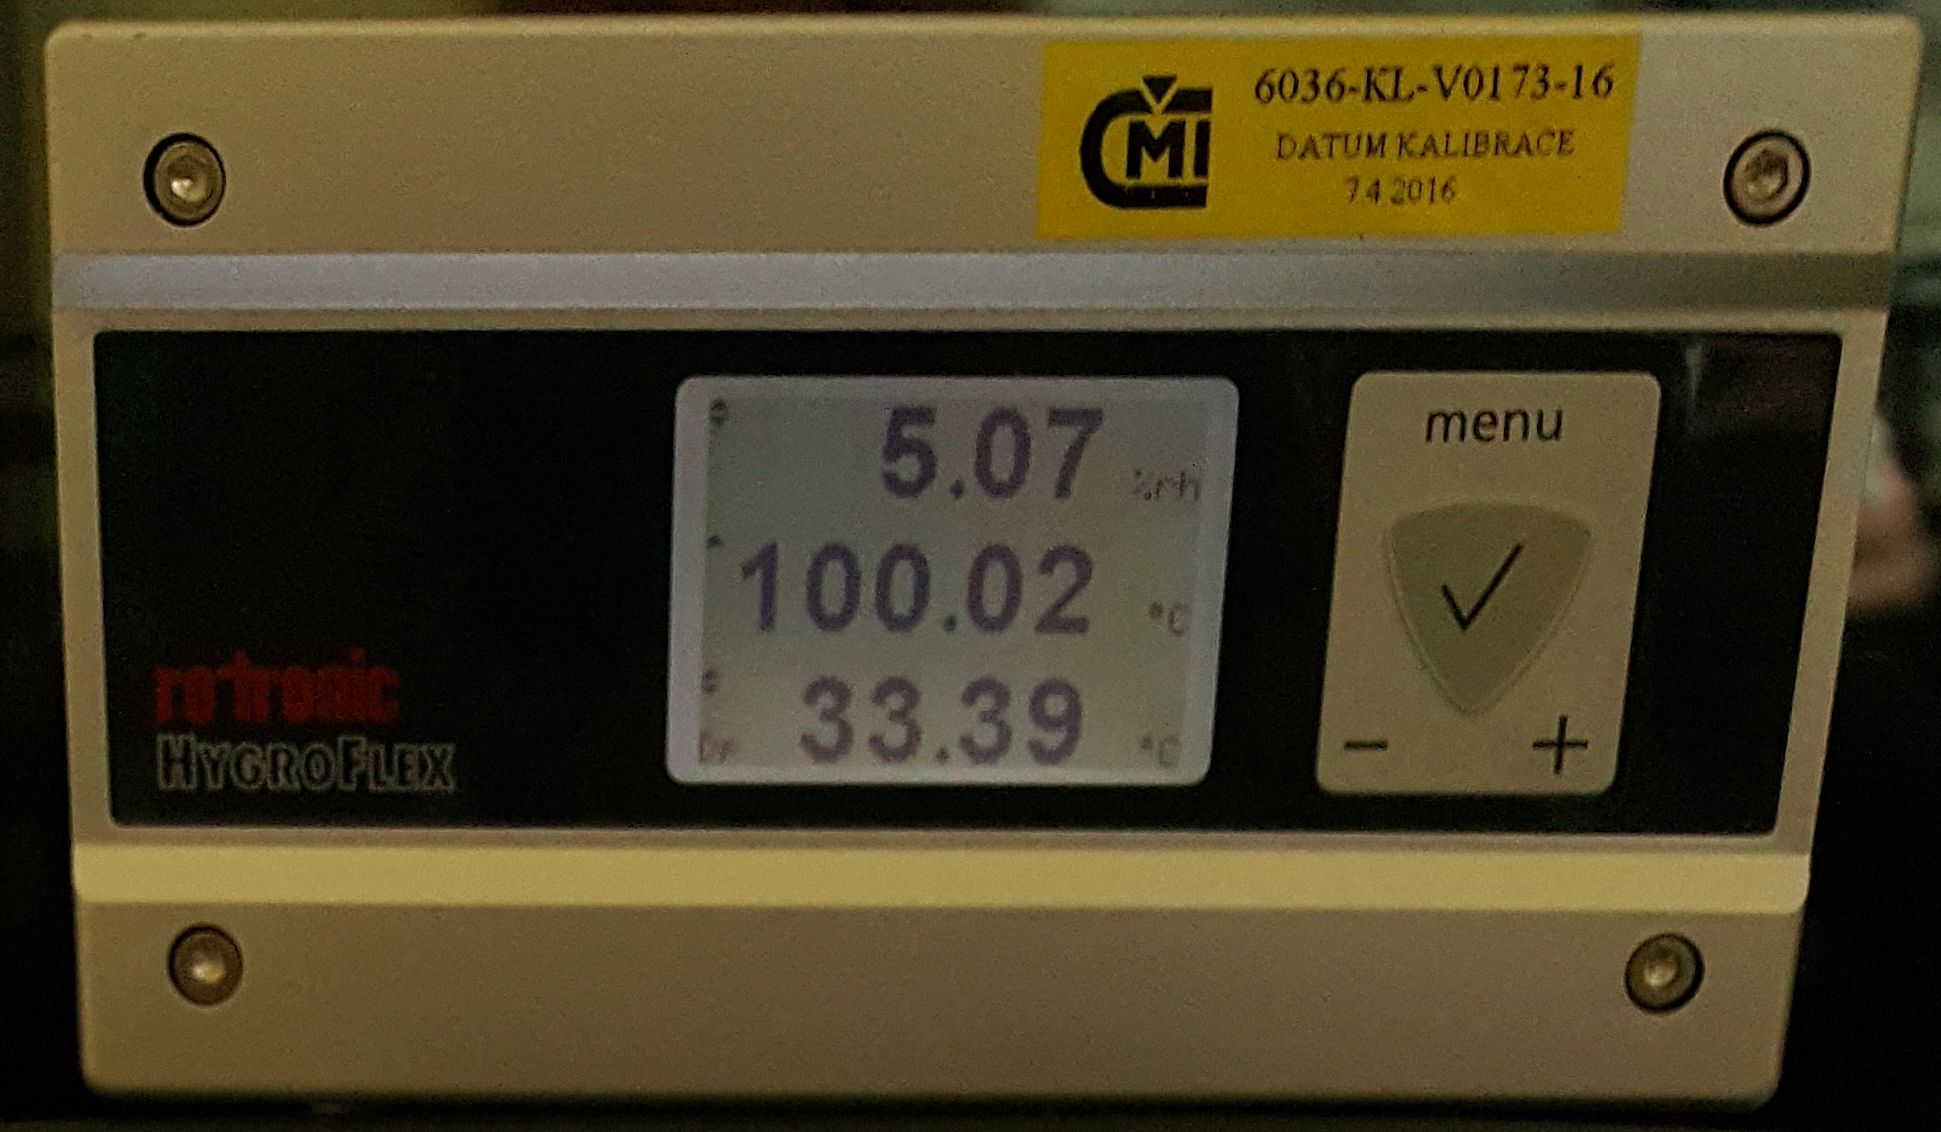
Running the sets at high temperatures (from +60°C to +100°C) – PASS
Test description: We were increasing ambient temperature (from 60°C up to 100°C) and we were running the CPU, Memory and peripheral stress tests. We stopped the test when the CPU lowered it’s frequency (it happened when CPU temperature reached 70°C-100°C). Components used at the iMX6 TinyRex Baseboard Lite were only in -20°C ~ +85°C operating temperature range.
Temperature stress test – quick temperature change from -40°C to -10°C and back – PASS
Test description: The ambient temperature went from -40°C to -10°C and back to -40°C. The boards were running the CPU, Memory and peripheral stress tests. All the boards were working perfectly.
Temperature stress test – quick temperature change from 90°C to 30°C and back – PASS
Test description: We were changing the ambient temperature from 90°C to 30°C and back to 90°C while running the CPU, Memory and peripheral stress tests. All boards were working fine.
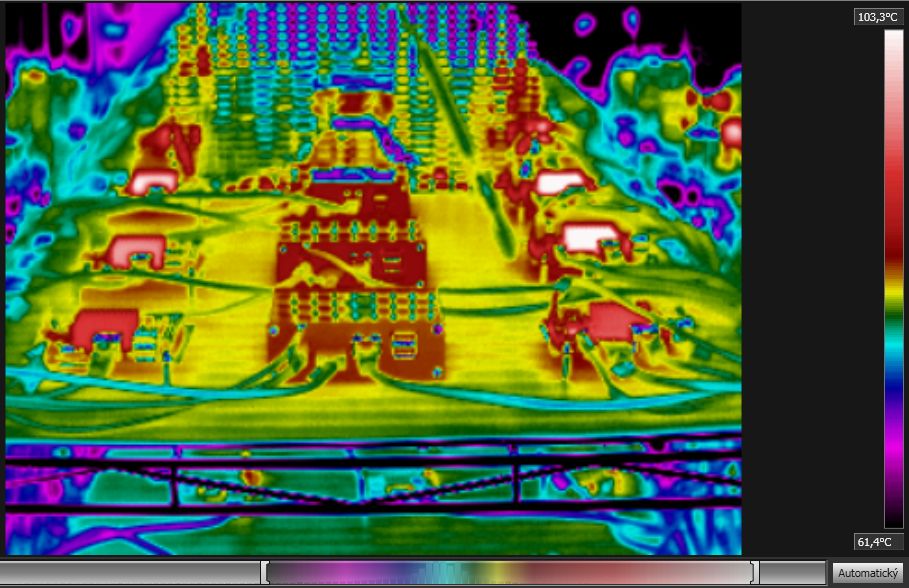
Picture: Thermo camera capture focused on boards at 85°C temperature within the chamber
Switch ON/OFF test – PASS
Test description: At temperatures from -30°C to -40°C we switched OFF the boards, left them OFF for at least 5 minutes (to cool them down completely) and then switched them ON to see if they boot up with no problems. Once booted up to the Linux, the boards were turned off again. All of the tested boards booted up successfully. Tested 3 times at -30°C, -35°C and -40°C.
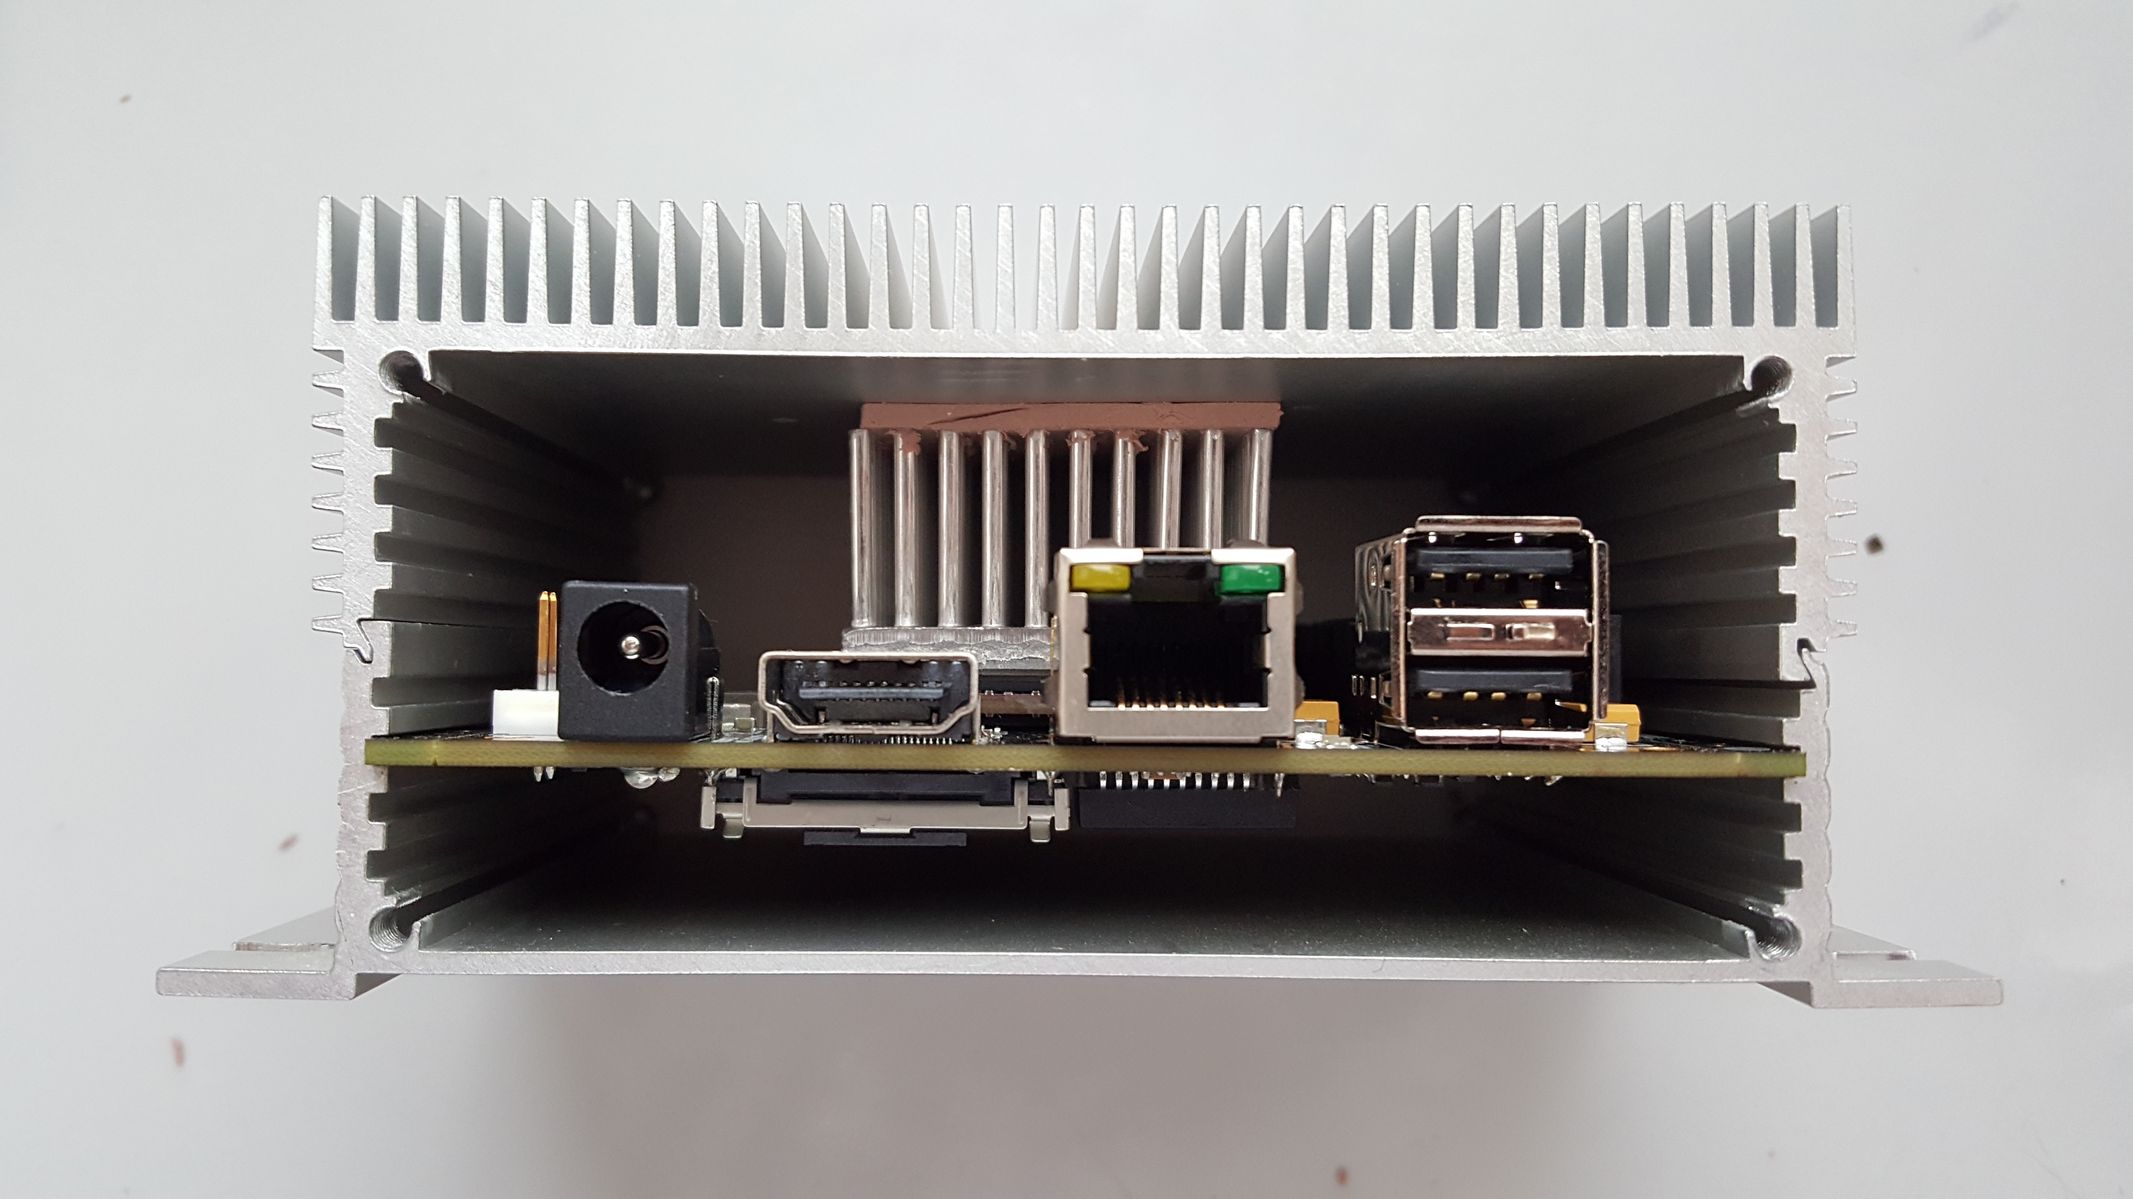
Cooling performance at high temperatures
Test description: We used different kind of heatsinks and various enclosures to see which has the best cooling ability. All these tests were done with Max boards which generates the most heat by itself. All setup reached temperature 85°C in the chamber. The board in enclosure with biggest height and cooling fins on top part reached +100°C.
|

|
Appendix
PC Setup
During the test we used DHCP and FTP servers on our control PC. The PC was also used during ethernet ping test and to control all the boards through SSH sessions + serial console. The control PC was using Windows 7 operating system.
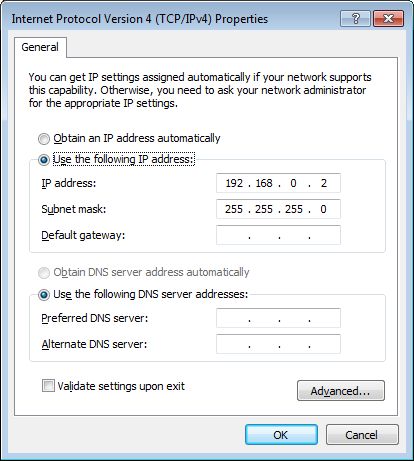
1. Network setup – PC
Disable the firewall (PC will not be connected to the internet) and setup static IP address: Press Windows button -> go to Control Panel -> Network and Internet -> Network and Sharing Center -> Change adapter settings (on the right side in the bar) -> double click on Local Area Connection -> Properties -> In tab Networking go to Internet Protocol Version 4 (TCP/IPv4) -> type the static IP address and subnet mask as shown below:
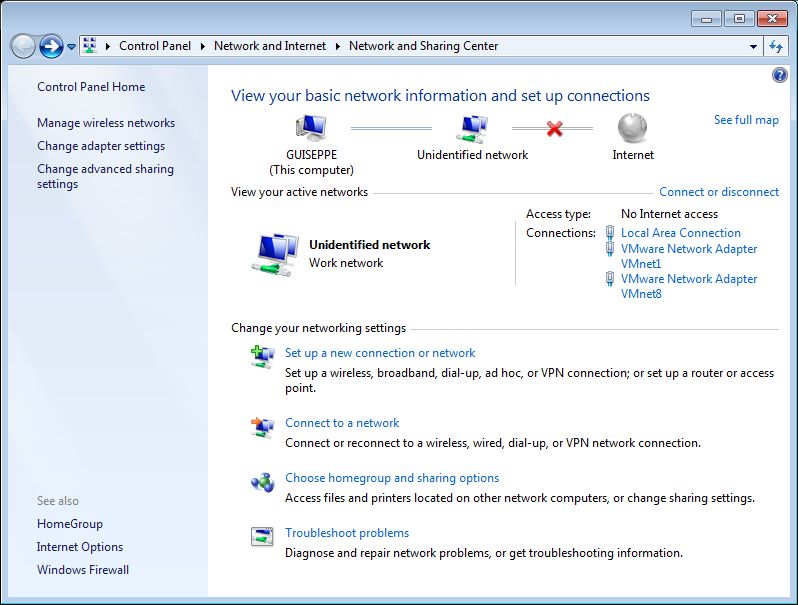
The iMX6 TinyRex boards and Control PC are connected to a Gigabit Ethernet Switch. Connect the PC to the switch and turn the switch on. To be able to download the files from FTP server we need to enable the sharing option first. This can be done by setting up the network as a “work network”. You can change it in Control Panel -> Network and Internet -> Network and Sharing Center -> Click to Choose homegroup and sharing options
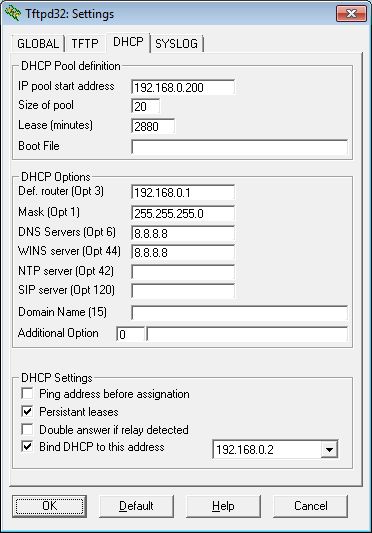
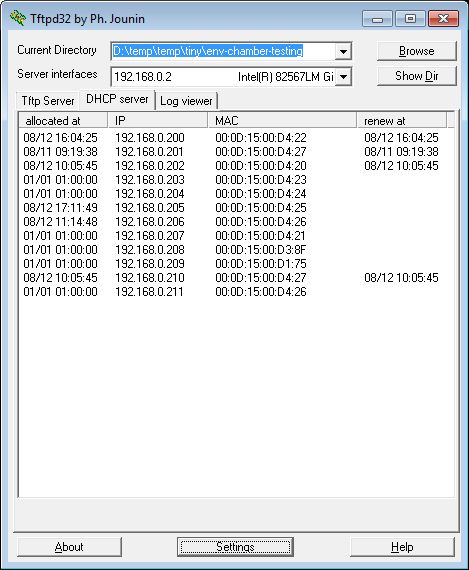
2. Setting up the TFP and DHCP servers
As TFTP and DHCP server we used Tftpd32 software. For more details about DHCP configuration, see the screenshots below:
 |
 |
3. SSH and Serial console
To control the iMX6 TinyRex boards, open TeraTerm serial console and run SSH client to read temperatures. Open one Teraterm and one SSH per board. For the boards with peripheral test, open an extra SSH client to see if any errors occurred.

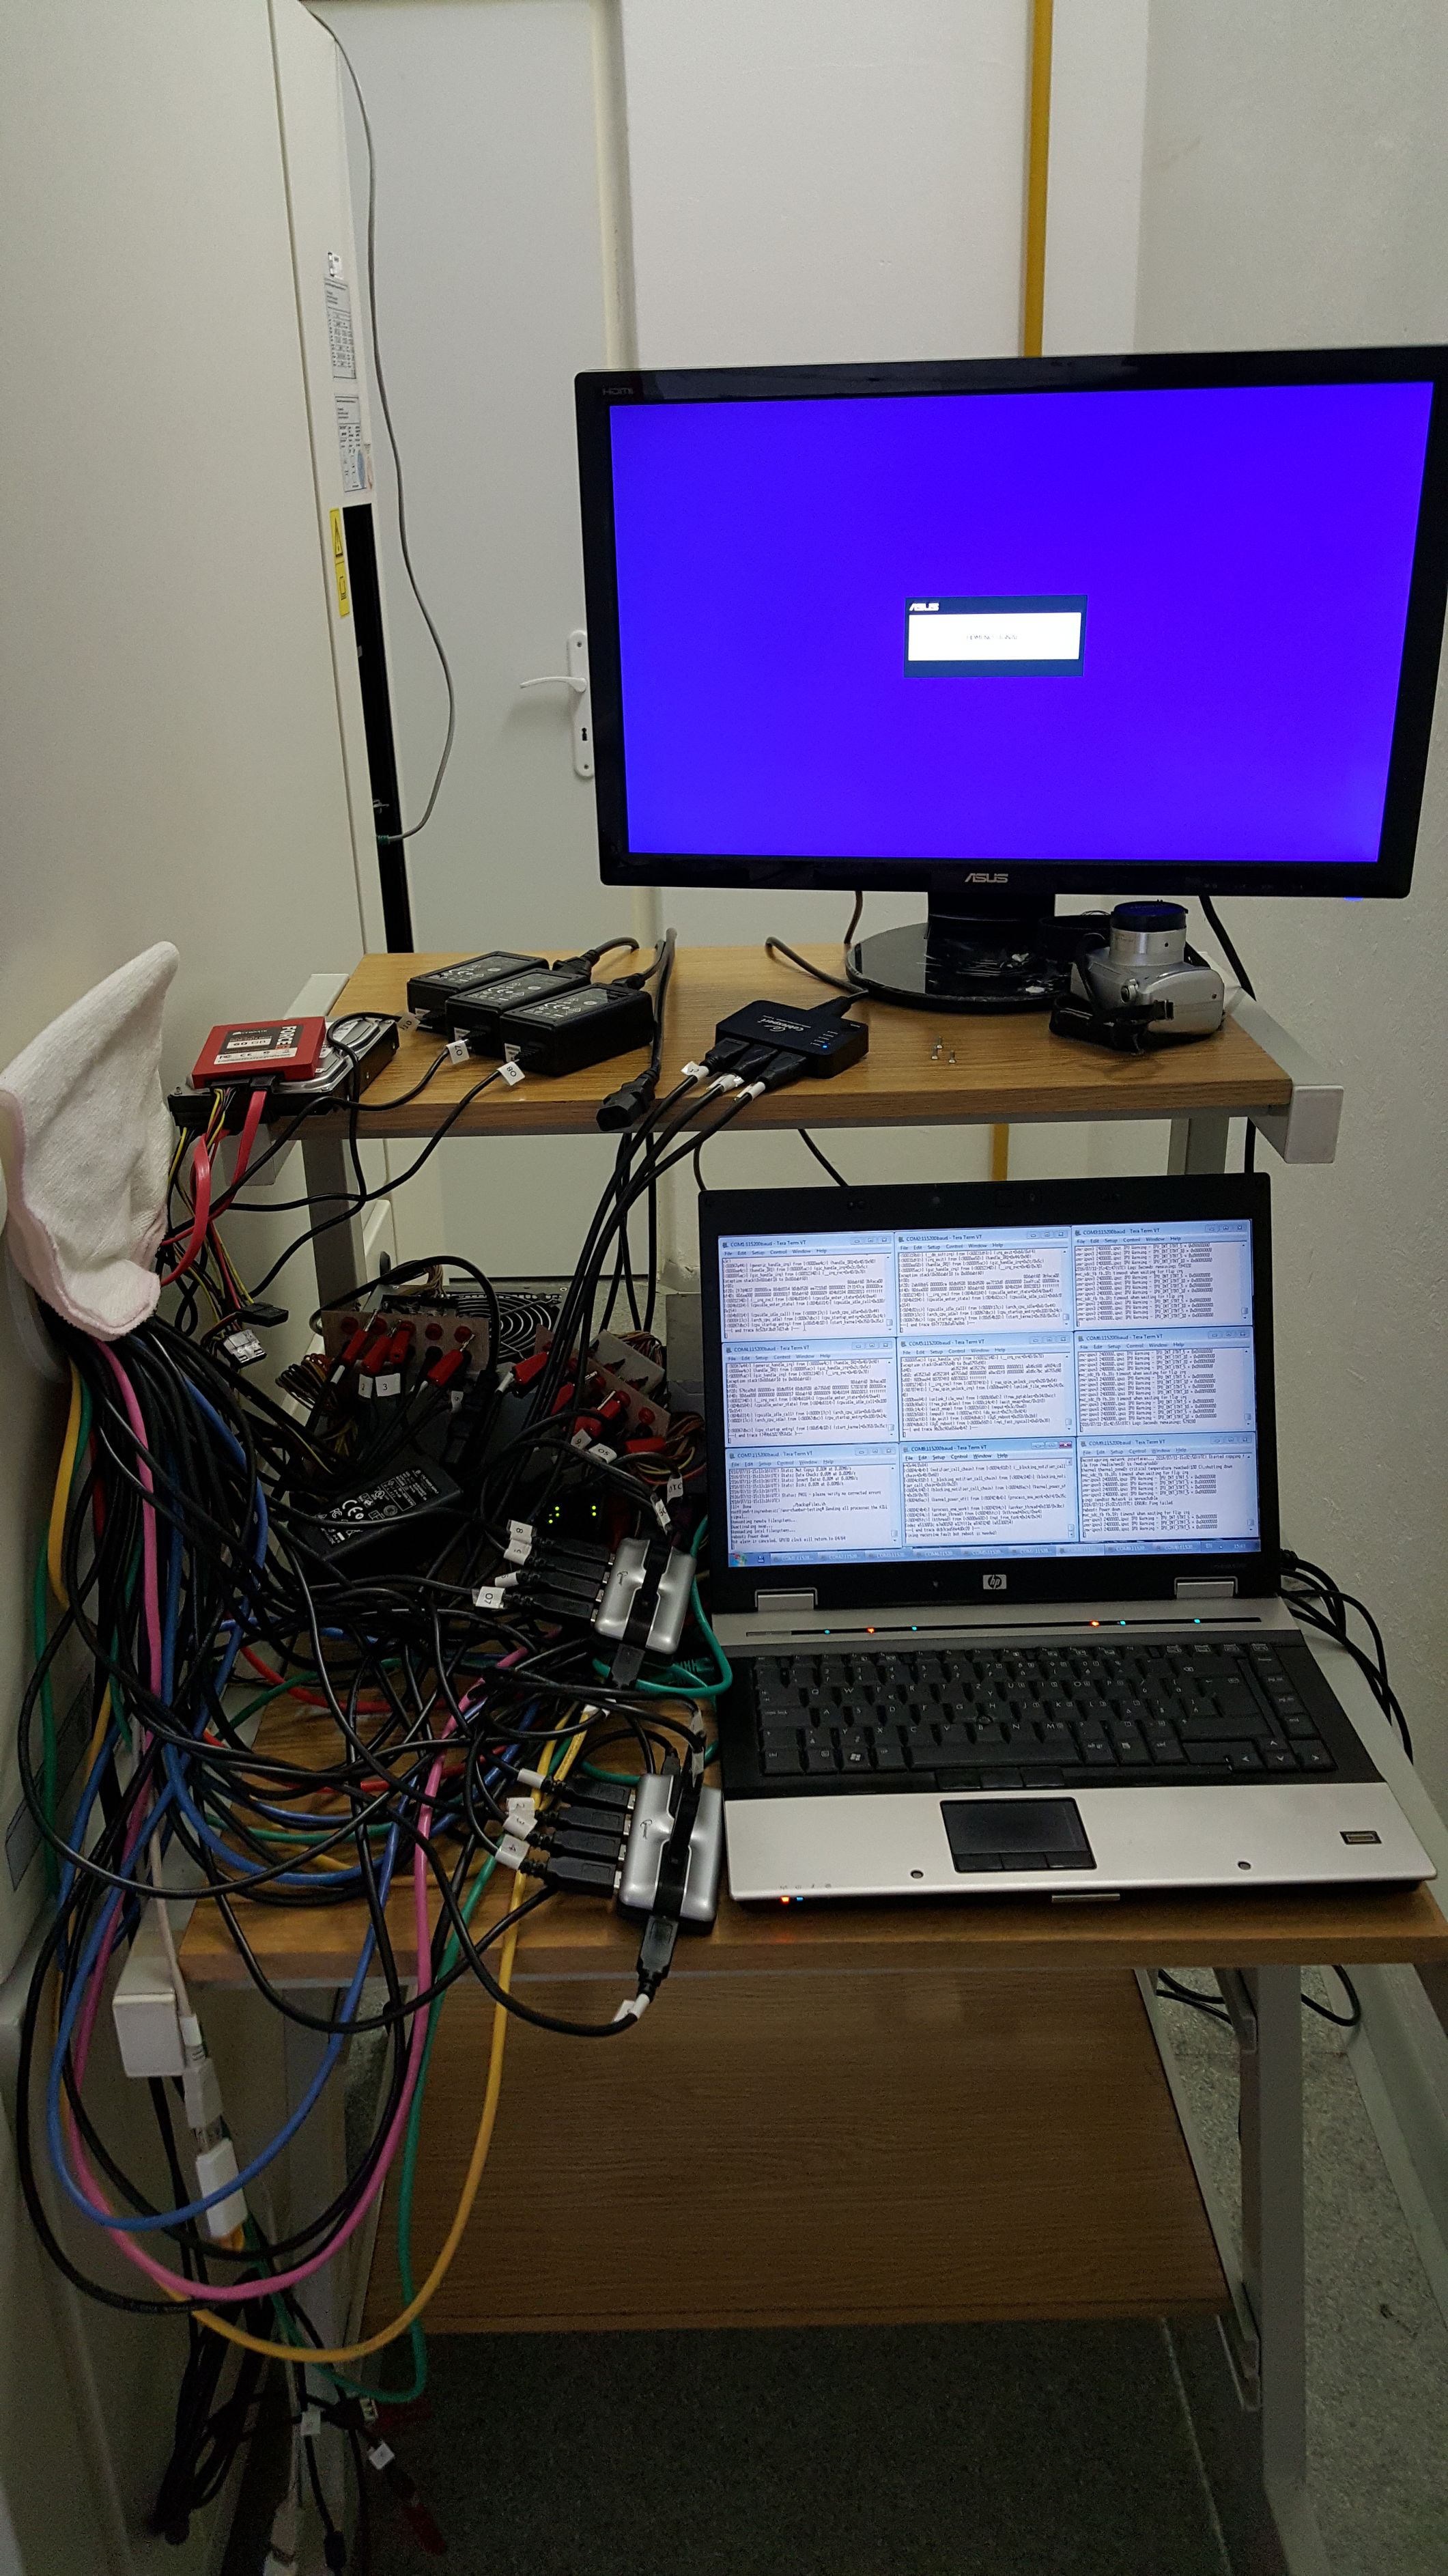
Picture: The setup of the environmental chamber cables and out-of-chamber equipment.
How to prepare and start the test
1. Boot device & Software
For all board we used SD cards as a booting device. U-boot settings were not adjusted and we use a default configuration. The only change compared to standard software package was use of a multimedia filesystem. To prepare a fresh SD card you can use files from this repository. Here is an example for Max module SD card:
git clone https://github.com/voipac/imx6tinyrex_bin_linux
cd imx6tinyrex_bin_linux/
sudo ./fsl-sdcard-partition.sh -max /dev/mmcblk0
2. Download stressapptest package
We prepared a preistalled file of stressapptest which we used during the testing. Place this file into the same directory, where you will store testing script:
wget http://www.imx6rex.com/download/software/imx6_tinyrex_module_&_baseboard_lite/others/stressapptest
3. Setup CRON
To be able to check the CPU temperature every minute, we setup a cron job.
Note: Be sure your filesystem has cron package preinstalled.
To setup a cron tab we will open the file containing all cron jobs. If you run the crontab for the first time you may need to select the text editor.
sudo crontab -e
Paste following line to the end of this file:
* * * * * { echo -n $(date +%Y/%m/%d-%T); echo -n "("; echo -n $(date +%Z); echo -n ") "; cat /sys/devices/virtual/thermal/thermal_zone0/temp; } >> ~/testing-env-chamber/cpu-temp.log
We will use the same time format as stressapptest. We will get the current CPU temperature and save it into the log file. Note: The ‘%’ sign has a special purpose in the cron file. When using it in the date command you need to use backslash before the ‘%’.
4. Update time after the board was brought up
If you are using timeserver on your master PC, you can use automatic a Linux feature for obtaining server date:
ntpdate 192.168.0.2
You can also adjust date manually (use format MMDDhhmmYYYY e.g. 07th of July 2016 4:27 pm):
date 071116272016
5. Show the CPU temperature in SSH
Open one SSH client per board where we will show CPU temperature. We use tail command to show the last part of the log file, which is filled up through the CRON job we setup in previous steps:
tail -F cpu-temp-measuring.log
6. Error checking during peripheral test
To immediately see if any error occurred during peripheral test, we open a new SSH client and run the following command:
tail -f env-chamber-testing.log | grep -i "error"
7. Play video file for peripheral test
To be able to test HDMI Input during the peripheral testing we played a video file from boards which were running memory stress tests. Open another SSH session and run infinite loop:
while [ true ]; do gst-play-1.0 /media/ploughing.mp4; done
8. Start the stress test
Do not forget to navigate into the directory, where you stored stressapptest feature. Then you can run it.
Stress command for Max:
./stressapptest -s 600000 -M 1000 -m 4 -C 4 -W -l ~/env-chamber-testing/stressapptest.log --printsec 100
Stress command for Pro:
./stressapptest -s 600000 -M 700 -m 2 -C 2 -W -l ~/env-chamber-testing/stressapptest.log --printsec 100
Stress command for Basic:
./stressapptest -s 600000 -M 150 -m 1 -C 1 -W -l ~/env-chamber-testing/stressapptest.log --printsec 100
9. Start peripheral test
Before you run the test be sure everything is plugged in. To find out where the devices are mounted you can use:
fdisk -l
Now you can run the test. As a first parameter we will use board option (-max, -pro or -basic). As other parameters use device names in following order: first USB stick, second USB, SD card and SATA drive (if used). We will also write all the logs into one log file.
Example for Max:
./tiny-rex-v1i1-peripheral-test.sh -max sdb1 sdc1 mmcblk2p2 sda2 2>&1 | tee -i trx-env-chamber-testing.log
Example for Pro:
./tiny-rex-v1i1-peripheral-test.sh -pro sdb1 sdc1 mmcblk2p2 sda1 2>&1 | tee -i trx-env-chamber-testing.log
Example for Basic:
./tiny-rex-v1i1-peripheral-test.sh -basic sda1 sdb1 mmcblk2p2 2>&1 | tee -i trx-env-chamber-testing.log
Here you can find the complete test:
#!/bin/sh

# iMX6 TinyRex environmental chamber peripheral test

mountDevice() {
  mount /dev/$1 /media/$2
  cat /etc/mtab | grep -F "/dev/$1 /media/$2"
  if [ "$?" -eq "0" ]; then
    echo "$2 mounted"
  else
    echo "$2 not mounted"; exit 2
  fi
}

# prepare files
cd ~/
mkdir -p env-chamber-testing/
cd env-chamber-testing/

touch trx-env-chamber-testing.log
touch trx-cpu-temp.log

tinybasic=0
tinypro=0
tinymax=0
case $1 in
  -basic)  tinybasic=1 ;;
  -pro)  tinypro=1 ;;
  -max)  tinymax=1 ;;
  *)
esac

# mount devices
mountDevice $2 usb0
mountDevice $3 usb1
mountDevice $4 mmc0
if [ "${tinypro}" -eq "1" ] || [ "${tinymax}" -eq "1" ]; then
  mountDevice $5 sata
fi

updateLogFiles() {
  # obtain board ID from IP address - be sure addresses are allocated based on MAC
  boardID=$(/sbin/ip -o -4 addr list eth0 | awk '{print $4}' | cut -d/ -f1 | cut -d'.' -f4 | cut -d'2' -f2);
  # be sure time server is running on DHCP server
  currentTime=`date +%Y-%m-%d.%H:%M`

  mv trx-env-chamber-testing.log trx-board-$boardID-env-chamber.log.$currentTime
  mv trx-cpu-temp.log trx-board-$boardID-env-cpu-temp.log.$currentTime
}

finish_test_now() {
  echo "$(date +\%Y/\%m/\%d-\%T)($(date +\%Z)) Ctrl+C Detected: End of the test"
  precced=0;
  #kill -INT $vid_pid $str_pid $log_pid;
  sleep 3;
  test_status=`cat trx-env-chamber-testing.log | grep -i "error" | grep -v -e "0 errors" -e "no corrected errors"`
  if [ -z "$test_status" ]
  then
    echo "*********TEST PASS*********"
  else
    echo "*********TEST FAIL*********"
	echo "List of detected errors:"
    cat trx-env-chamber-testing.log | grep -i "error" | grep -v -e "0 errors" -e "no corrected errors" -e "List of detected errors:"
  fi
  updateLogFiles
  exit;
}

# kill all processes if Ctrl+C is detected
trap finish_test_now 2

# play a video stream from HDMI input - testing also HDMI output
gst-launch -q imxv4l2src ! autovideosink &

# stressapptest - one thread CPU, one thread memory, sata thread (if possible)
if [ "${tinybasic}" -eq "1" ]; then
  ./stressapptest -s 600000 -M 100 -m 1 -C 1 --printsec 10 &
  str_pid=$!
fi
if [ "${tinypro}" -eq "1" ]; then
  ./stressapptest -f /media/sata/tmp-file1 -s 600000 -M 200 -m 1 -C 1 --printsec 10 &
  str_pid=$!
fi
if [ "${tinymax}" -eq "1" ]; then
  ./stressapptest -f /media/sata/tmp-file1 -s 600000 -M 500 -m 1 -C 1 --printsec 10 &
  str_pid=$!
fi
echo "$(date +\%Y/\%m/\%d-\%T)($(date +\%Z)) Starting stressapptest with PID: " $str_pid

proceed=1
file1="blackbird.wav"
file2="blackbird2.wav"

cp1_from="/media/mmc0/"
cp1_to="/media/usb0/"

cp2_from="/media/sata/"
cp2_to="/media/usb1/"

#copy files in case they are missing
cp /media/$file1 $cp1_from$file1
cp /media/$file1 $cp1_to$file1
cp /media/$file2 $cp2_from$file2
cp /media/$file2 $cp2_to$file2

while [ $proceed -eq 1 ]
do

  ping -q -c1 192.168.0.2 >> trx-env-chamber-testing.log
  if [ $? -ne 0 ]
  then
	echo "$(date +\%Y/\%m/\%d-\%T)($(date +\%Z)) ERROR: Ping failed"
  fi

  cp1_done=`ps | grep $cp1_pid | grep cp`
  if [ -z "$cp1_done" ]; then # copy finished
    if cmp -s $cp1_from$file1 $cp1_to$file1; then
      echo "$(date +\%Y/\%m/\%d-\%T)($(date +\%Z)) PASS: Copying file from $cp1_from to $cp1_to successful"
    else
      echo "$(date +\%Y/\%m/\%d-\%T)($(date +\%Z)) ERROR: Difference between files on $cp1_from and $cp1_to detected"
    fi
    cp1_temp=$cp1_from # swap destinations
    cp1_from=$cp1_to
    cp1_to=$cp1_temp

    rm $cp1_to$file1 # remove destination file

    cp $cp1_from$file1 $cp1_to$file1 &
    cp1_pid=$!
    echo "$(date +\%Y/\%m/\%d-\%T)($(date +\%Z)) Started copying file from $cp1_from to $cp1_to"
  fi

  cp2_done=`ps | grep $cp2_pid | grep cp`
  if [ -z "$cp2_done" ]; then # copy finished
    if cmp -s $cp2_from$file2 $cp2_to$file2; then
      echo "$(date +\%Y/\%m/\%d-\%T)($(date +\%Z)) PASS: Copying file from $cp2_from to $cp2_to successful"
    else
      echo "$(date +\%Y/\%m/\%d-\%T)($(date +\%Z)) ERROR: Difference between files on $cp2_from and $cp2_to detected"
    fi
    cp2_temp=$cp2_from # swap destinations
    cp2_from=$cp2_to
    cp2_to=$cp2_temp

    rm $cp2_to$file2 # remove destination file

    cp $cp2_from$file2 $cp2_to$file2 &
    cp2_pid=$!
    echo "$(date +\%Y/\%m/\%d-\%T)($(date +\%Z)) Started copying file from $cp2_from to $cp2_to"
  fi

done