
On this page you can find all the information about environmental chamber testing of the OpenRex board.
Content
Test preparation
It is very important to run the exact same setup for environmental chamber testing in your lab for couple of days. Use exactly the same boards, boards setup, cables, PCs and all other things. The main reason to do this is to minimize possible issues with software, firmware or connections – everything which can cause problem apart from hardware itself. You will not have much time to fix there issues during the testing.
The next very important thing is to make as many notes as possible during the testing. Always add board number and date to the message. This will help you to memorize everything and you will not miss any important detail when you will be making a report.
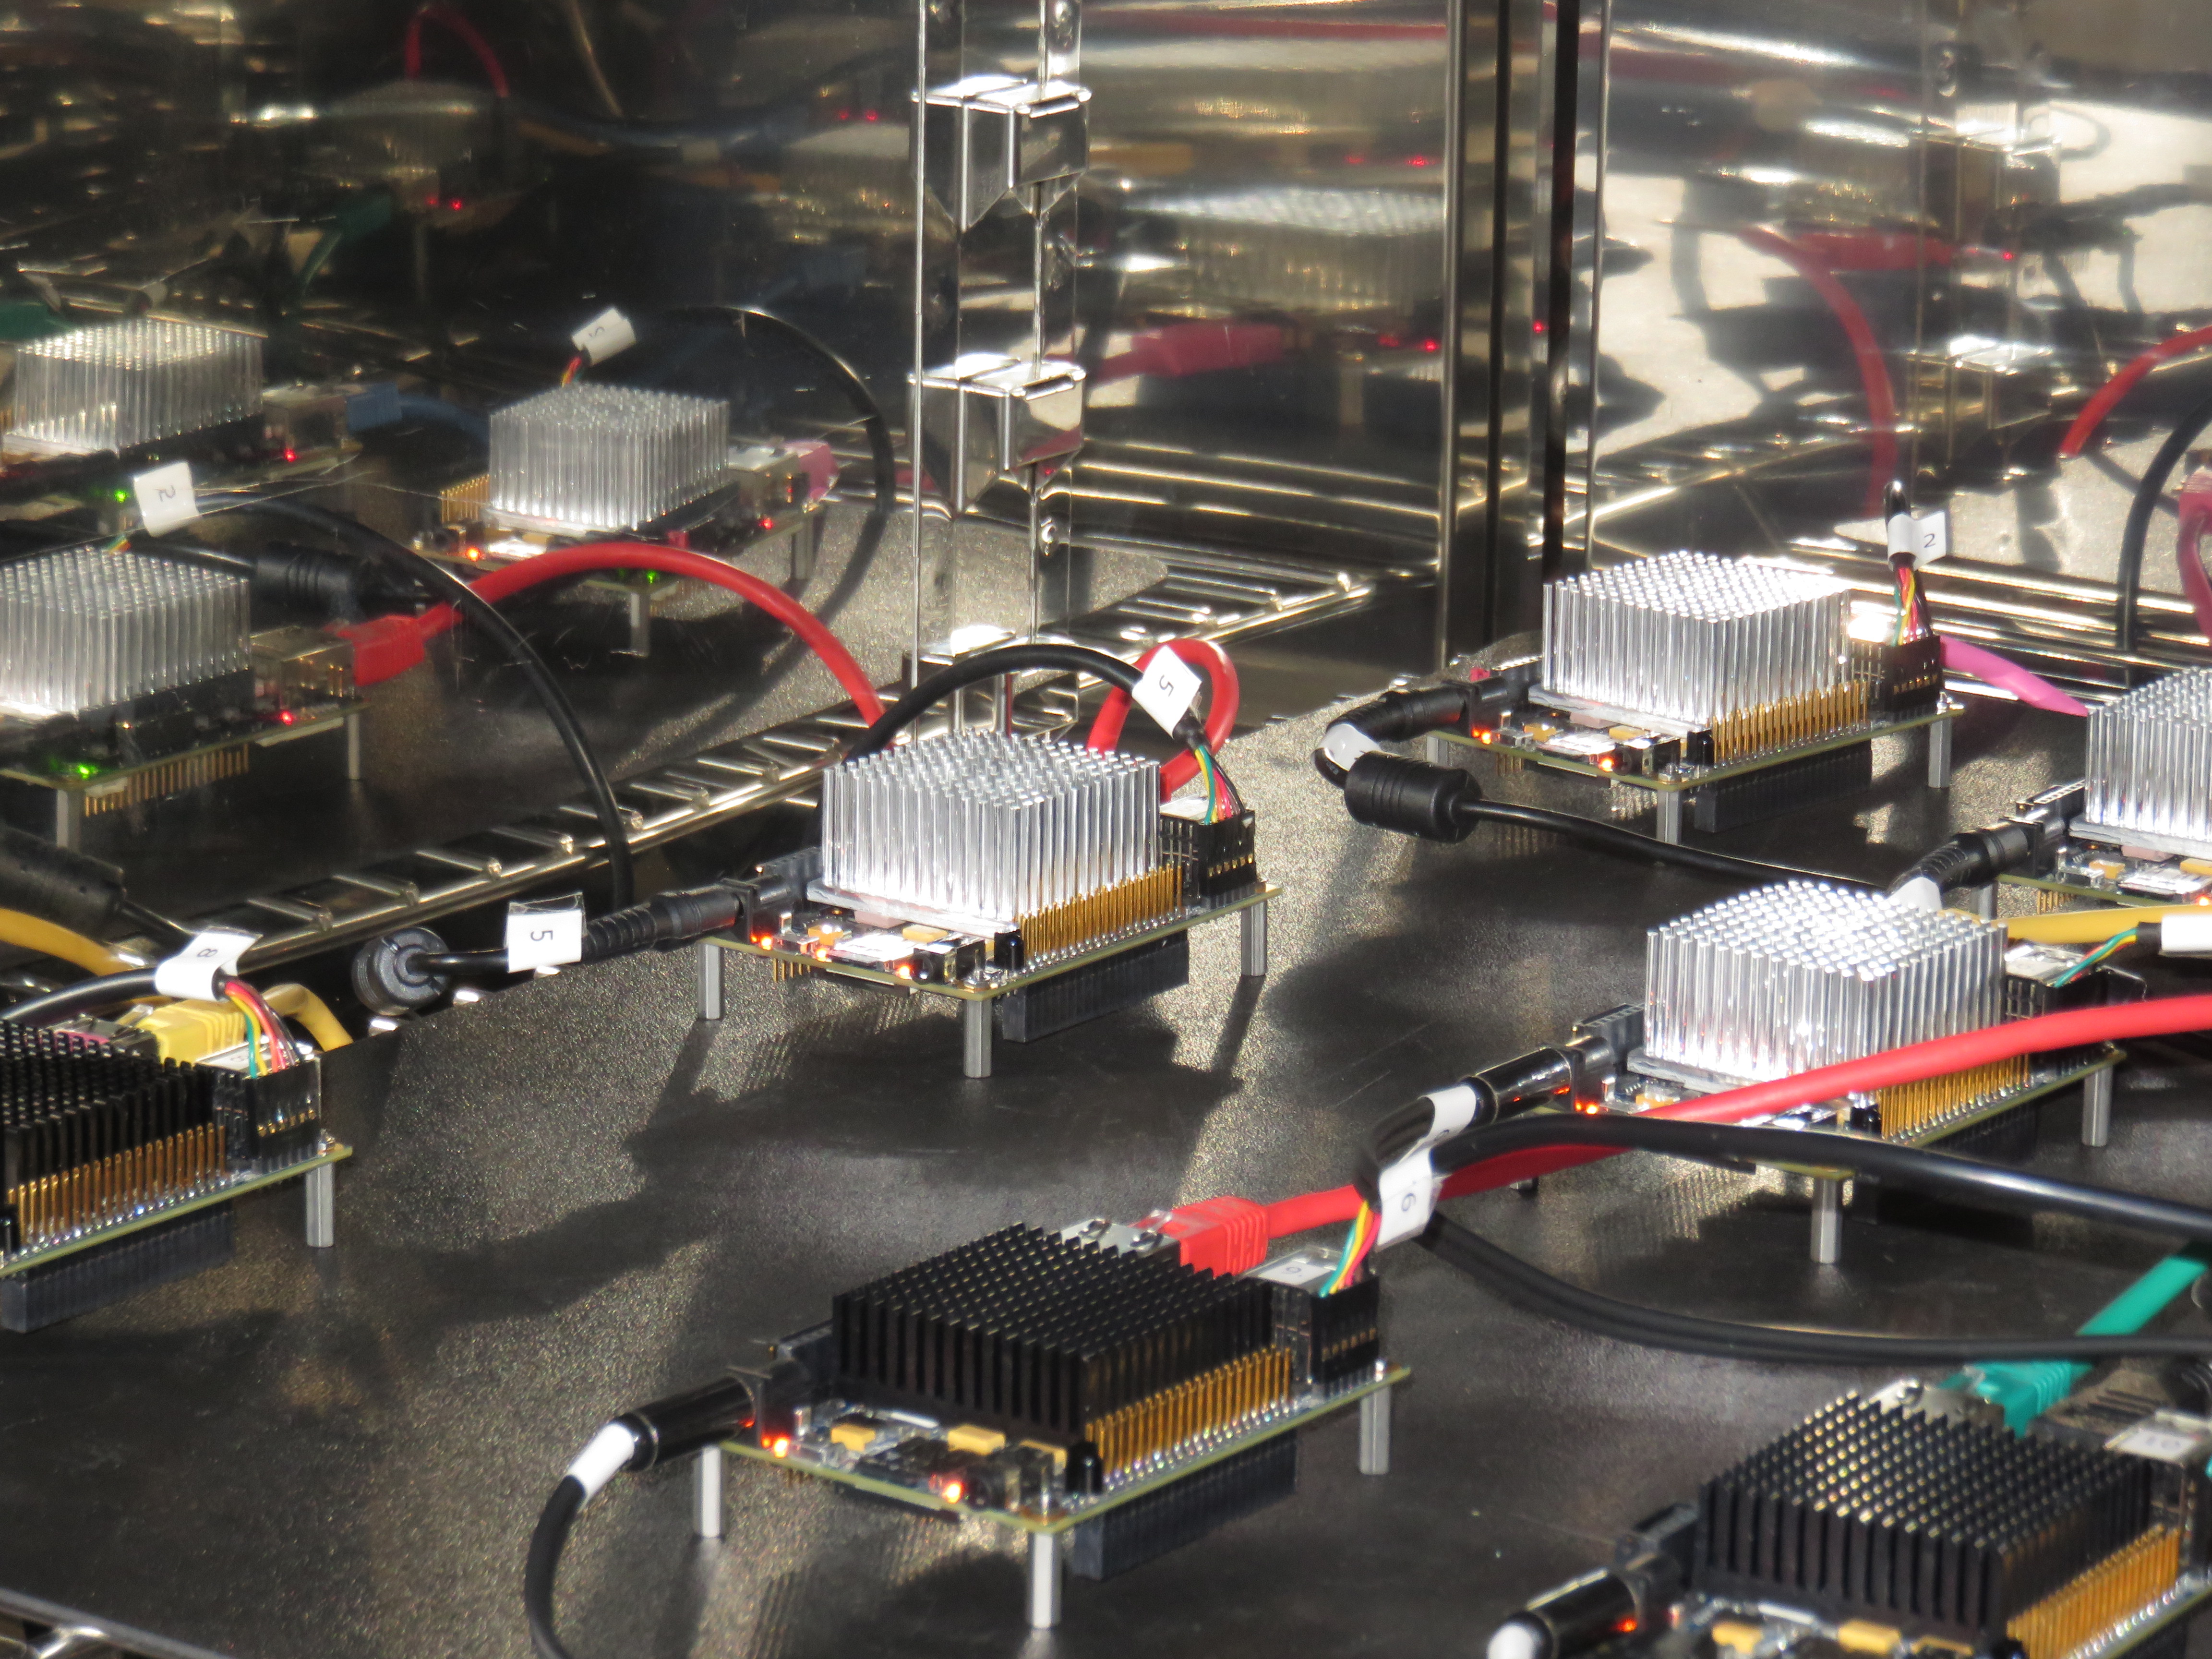
Very useful thing is to mark all the boards, all important cables and assigned numbers by software. In most case you will need to run 6-10 boards to test all the peripherals properly. A lot of boards means a lot of cables and a possible mess with all the testing staff.
These are the most crucial hardware parts, which you may need to mark:
- Boards – place the sticker on visible spot (e.g. USB or Ethernet connector). Use simple numbering (e.g. 1, 2, 3…)
- Serial consoles – mark both sides of the cable
- Adapters or power cables – if you need to reset one board, you will know which one
- USB sticks and hard drives – if there is problem with e.g. USB stick you need to know which to replace (use marking like 1-USB1, 1-USB2, 2-USB1…)
Also software should have the correct numbering:
- IP addresses – this way you can very fast check which board is having a possible problem. Use DHCP server which will assign same IP for one MAC address (e.g. board with mark 1 will always have IP address 168.192.0.201)
Be aware: In some situation DHCP server can assign a different IP address. Your SSH connection will not work but Ethernet is still working fine. Check LED status of the router and DHCP server application in this case. - Name of the log files – differentiate between the log files (this is already done in our testing script)
- Serial console ports – plug them the way that system will assing the same number as the board number is (e.g. in Linux control PC you will use directory “/dev/ttyUSB1″ as a serial port for board number 1)
- Visual arrangement of serial and SSH consoles – the way the board are placed inside the chamber
- 4x OpenRex Quad boards
- 1GHz i.MX6 Quad 1GHz CPU – automotive temperature range (-40°C ~ 125°C)
- 4x 4Gb DDR3 Memory chips – industrial temperature range (-40°C ~ +95°C)
- 1GBps Ethernet PHY Transceiver KSZ9021RNI – automotive temperature range (-40°C ~ +85°C)
- 5x OpenRex Solo boards
- 1GHz iMX6 Solo 800MHz CPU – industrial temperature range (-40°C ~ +105°C)
- 2x 2Gb DDR3 Memory chips – industrial temperature range (-40°C ~ +95°C)
- 1GBps Ethernet PHY Transceiver KSZ9021RNI – automotive temperature range (-40°C ~ +85°C)
- 3x OpenRex peripheral stress testing
- booting device:
- SATA hard drive (QUAD boards)
- USB memory stick (SOLO boards)
- 1 thread of extensive Memory stress test
- 1 thread of CPU stress test
- SATA stress test (only applied for QUAD boards)
- video playing via HDMI output
- copying a file from the first USB stick to SD card and vice versa
- copying a file from the second USB stick to SATA hard drive and vice versa (only applied for QUAD boards)
- copying a file from the second USB stick to SD card (only applied for SOLO boards)
- pinging the host PC via Ethernet
- all the messages were printed out on the serial console through connected FTDI cable
- 3x OpenRex QUAD Memory stress testing
- 4 threads of extensive Memory stress test
- 4 threads of CPU stress test
- testing Ethernet using SSH connection for temperature readout
- booting from SD card
- 3x OpenRex SOLO Memory stress testing
- 1 thread of extensive Memory stress test
- 1 thread of CPU stress test
- testing Ethernet using SSH connection for temperature readout
- booting from SD card
Hardware configuration
For board we use two different heatsinks. We don’t see any big differences between them. We tried also running the boards with heatsink from standard OpenRex kit.
Test description
One of the QUAD boards and two SOLO boards were running full peripheral test to check functionality of all the peripherals in different temperature range. Rest of the boards (three QUAD and three SOLO OpenRex boards) were running CPU and Memory test to check reliability and stability of the memory layout and memory settings. This includes extensive Fly-By Topology testing and also checking two memory configuration for SOLO boards).
Here are our configurations & software description:
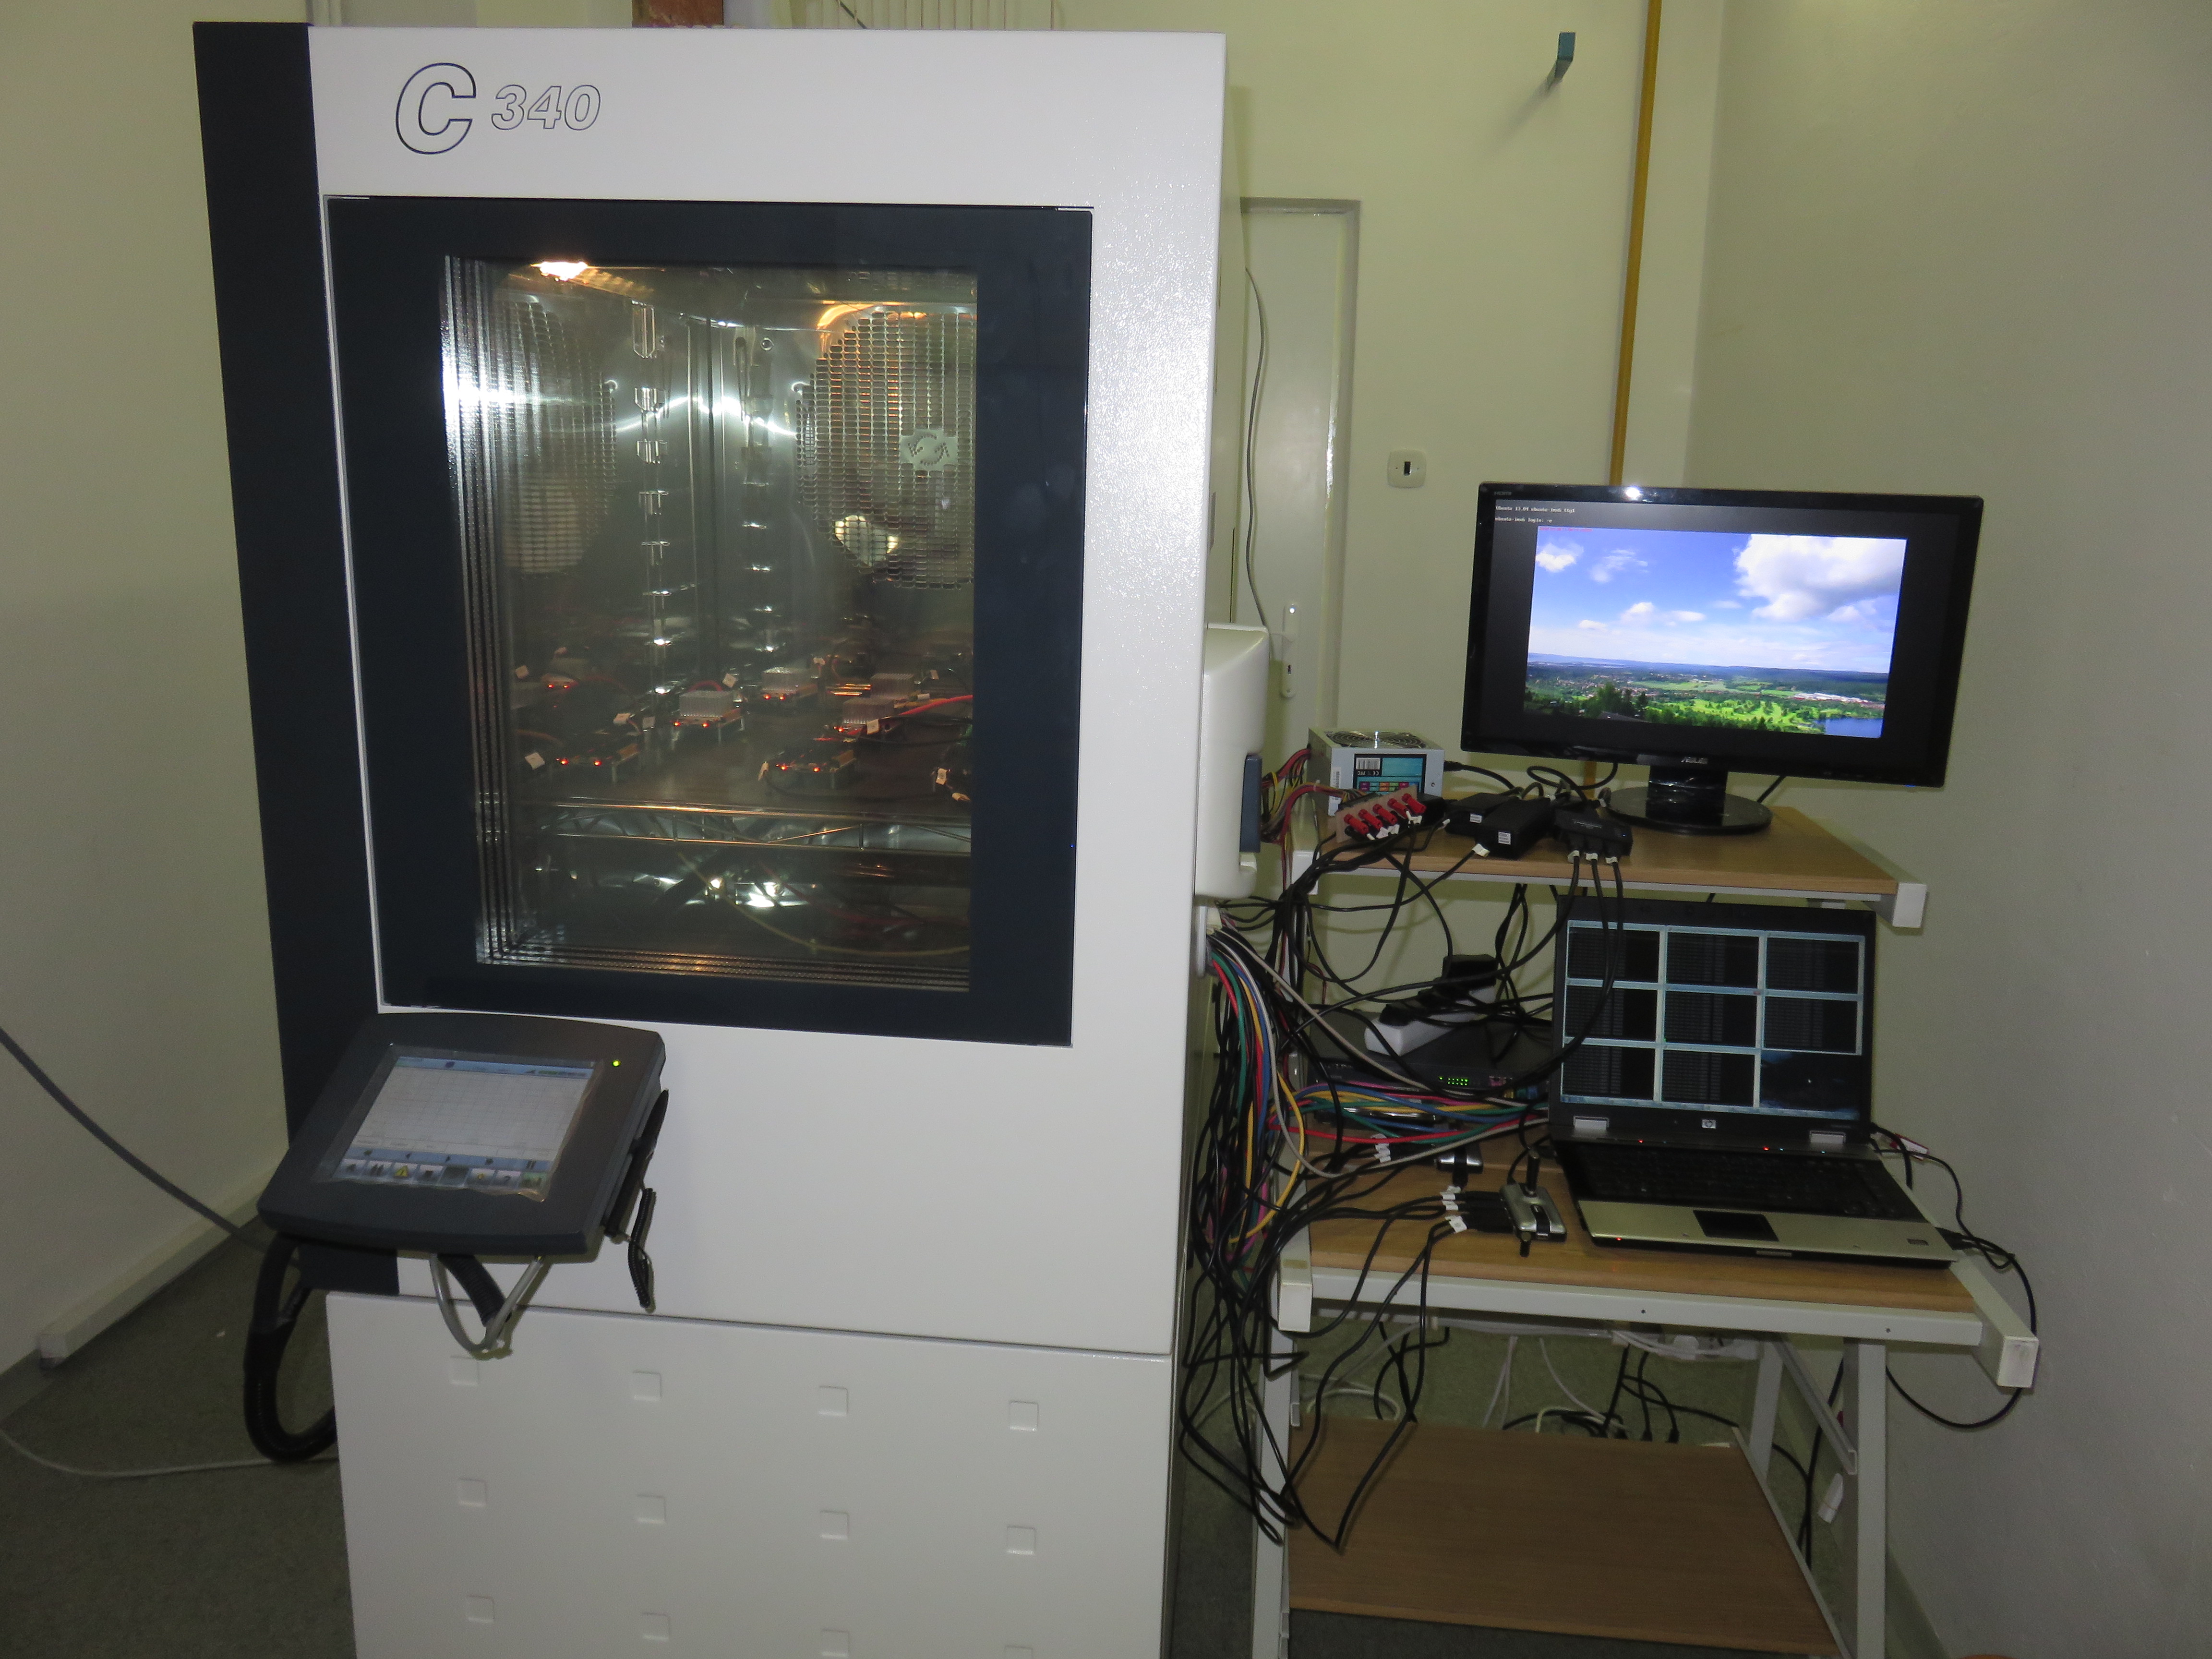
Notes: USB sticks and SATA hard drives were place outside of the environmental chamber. All the scripts running during the test and the board setup instructions can be found at the bottom of this page in Appendix : How to prepare the test.
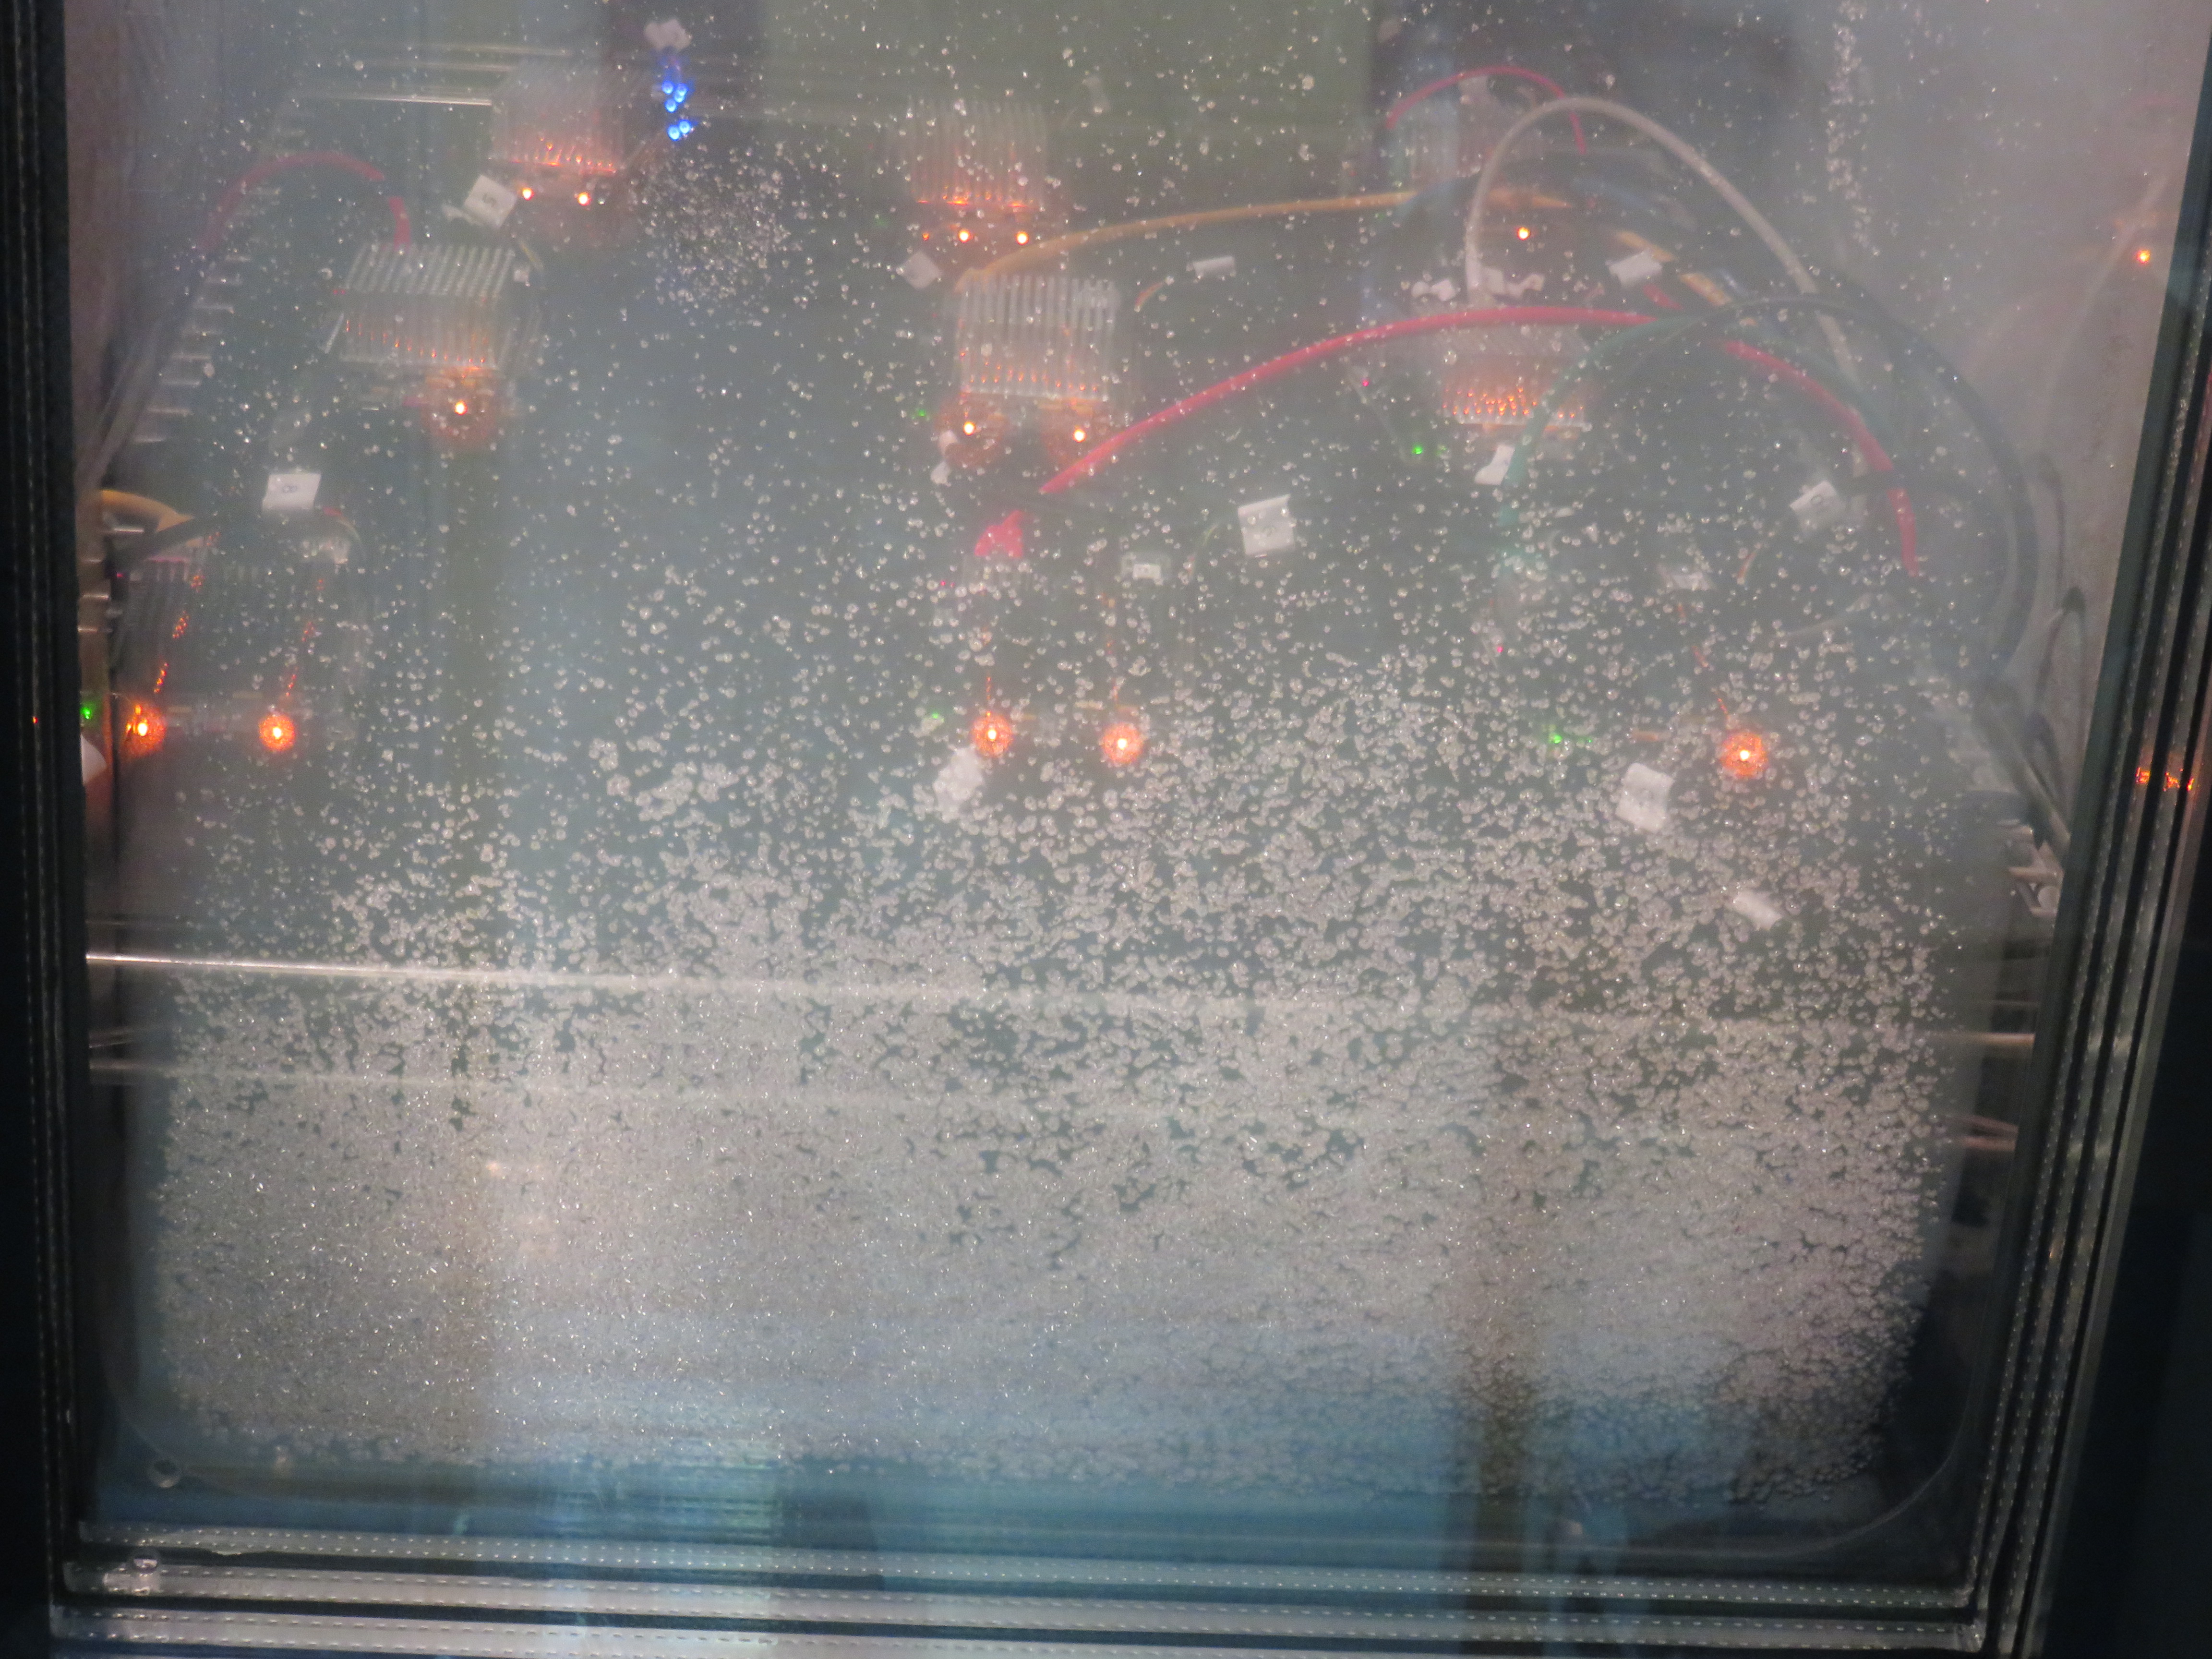
The Results
To run different kind of scenarios, we were changing the temperature of the chamber quite a lot:
Running the boards at -60°C and -40°C – PASS
Test description: At -40°C we were running the CPU, Memory and peripheral stress tests. Then we lowered the temperature down to -60°C. All memory and stress tests were working OK during the whole time.
Important Note: We were having some problems with Ethernet in this range of temperatures when using KSZ9031 PHYs. Based on the Micrel confirmation, that KSZ9031RN chips have a silicon issue, we used KSZ9021RN instead. After the change we did not see any issue and all the boards were working perfect at low temperatures.
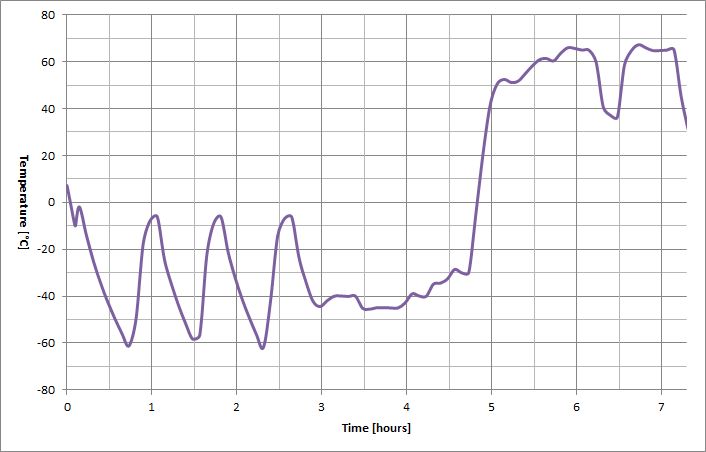
Running the boards at +65°C – PASS
Test description: We increased the ambient temperature (to 55°C, 60°C, 65°C) and we were running the CPU, Memory and peripheral stress tests. Even at 65°C processors were running at full speed (frequency haven’t been lowered down to cool down the CPU). To go even higher, we would need to use a bigger and massive heatsink.
Here you can see a temperature readout from boards when running at 65°C.
We tested the boards with a small heatsink which is part of our standard OpenRex kit. Also with this setup we were able to reach temperatures above 65°C. The temperature inside the CPU was approximately 30°C higher compared to temperature in the chamber.
Switch ON/OFF test – PASS
Test description: At temperatures -30°C, -35°C, -40°C and -45°C we switched OFF the boards, left them OFF for at least 5 minutes (to cool them down completely) and then switched them ON to see if they boot up with no problems. Once booted up to the Linux, the boards were turned off again. All of the tested boards booted up successfully. Tested at least one time for every temperature.
Changing temperature profile – PASS
Test description: We were changing the temperature in cycles: from -60°C to -10°C, back to -60°C and for higher temperatures 65°C and 40°C as well. This way we tested that there is no memory problem at any particular temperature.
Appendix
PC Setup
During the test we used DHCP and FTP servers on our control PC. The PC was also used during ethernet ping test and to control all the boards through SSH sessions + serial console. The control PC was using Windows 7 operating system.
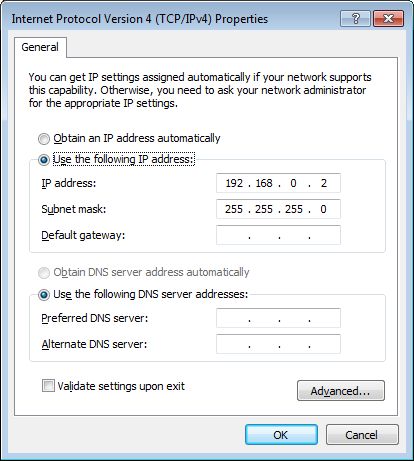
1. Network setup – PC
Disable the firewall (PC will not be connected to the internet) and setup static IP address: Press Windows button -> go to Control Panel -> Network and Internet -> Network and Sharing Center -> Change adapter settings (on the right side in the bar) -> double click on Local Area Connection -> Properties -> In tab Networking go to Internet Protocol Version 4 (TCP/IPv4) -> type the static IP address and subnet mask as shown below:
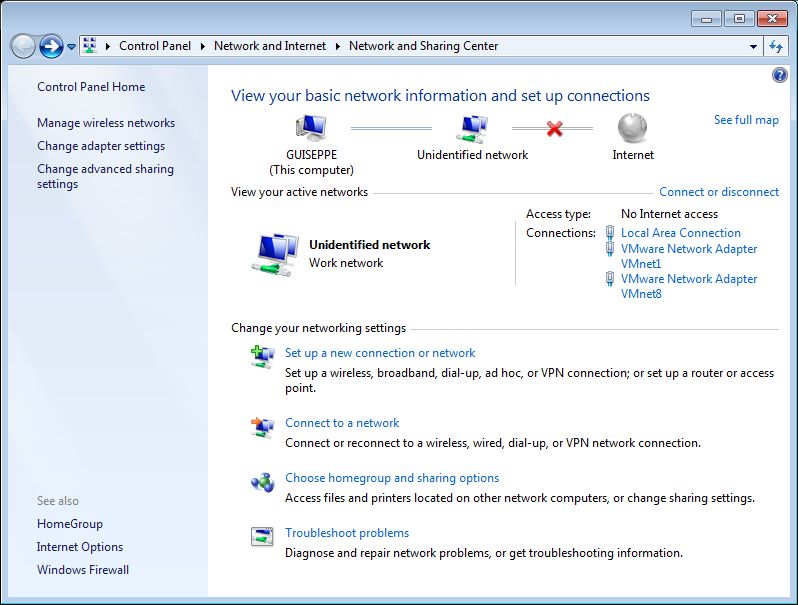
The OpenRex boards and the control PC are connected to a Gigabit Ethernet Switch. Connect the PC to the switch and turn the switch on. To be able to download the files from FTP server we need to enable the sharing option first. This can be done by setting up the network as a “work network”. You can change it in Control Panel -> Network and Internet -> Network and Sharing Center -> Click to Choose homegroup and sharing options
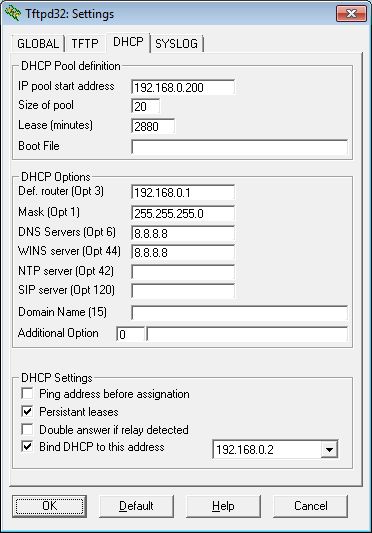
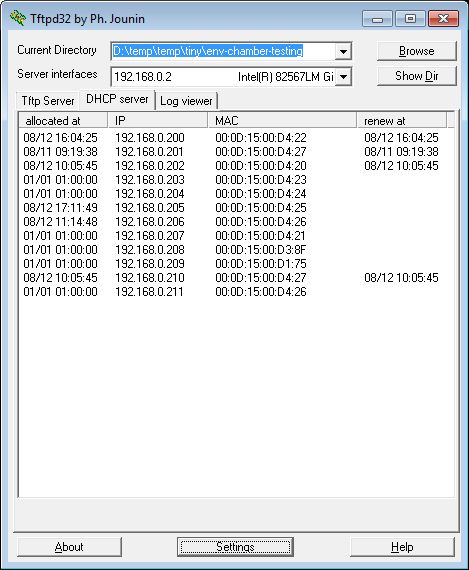
2. Setting up the TFP and DHCP servers
As TFTP and DHCP server we used Tftpd32 software. For more details about DHCP configuration, see the screenshots below:
 |
 |
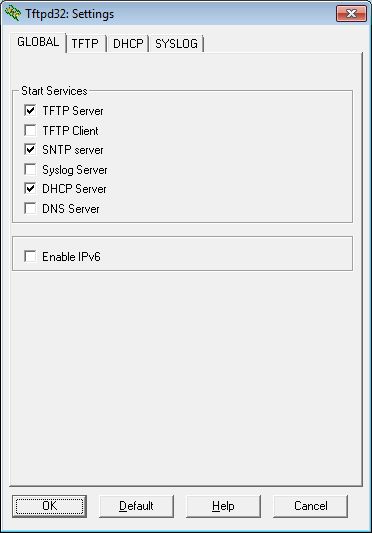
3. Start time server
To assign correct time for all the boards we used Time server feature in Tftpd32. Go to “Settings” and be sure that “SNTP server” is checked.
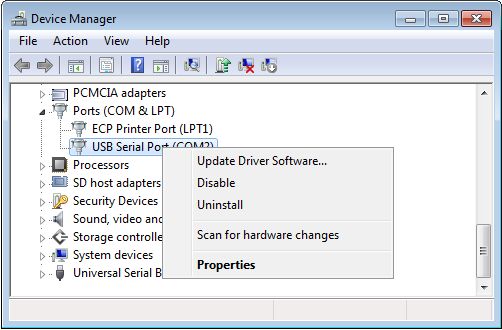
4. Assign custom COM port names
As we mentioned before, it is useful to have the same number for board and also for the serial port. To do so plug in the first FTDI cable and go to your control PC, select Start, right click on Computer and select Properties. Now click on the Device Manager in the top right corner. When you roll the item Ports (COM & LPT), you should see the USB port. Now right click and select Properties:
Select the Port Settings tab and click on Advanced…:
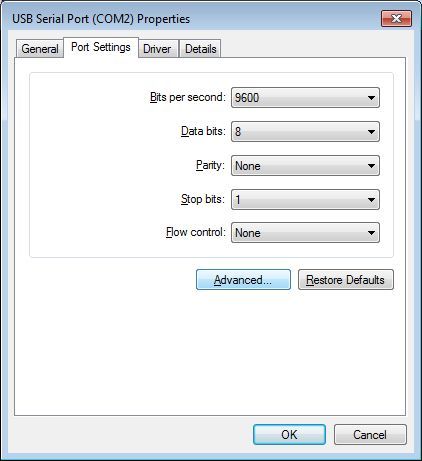
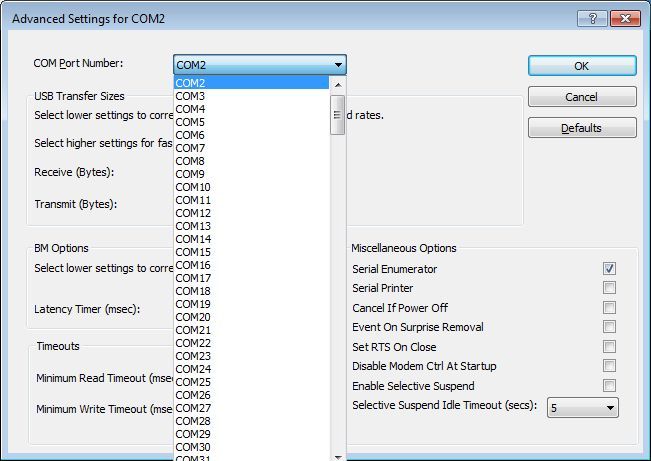
Now select from the COM Port Number (which is not in use):
Now you can plug another serial cable and repeat the process if needed. After you do this for all cables restart your computer.
5. SSH and Serial console
To control the OpenRex boards, open TeraTerm serial console and run SSH client to read temperatures. Open one Teraterm and one SSH per board. For the boards with peripheral test, open an extra SSH client to see if any errors occurred.

How to prepare and start the test
1. Create a fresh SD card
Follow the process described in How to start with Software page. At the end you should have an SD card which is almost ready to be used for the testing.
Note: When you will be creating SD card for Solo board, do not forget to update all the commands to use files imx6s directory.
For testing we will replace the default Yocto filesystem for our modified Ubuntu filesystem. Download it:
cd
mkdir -p work-temp
wget http://www.imx6rex.com/rex-uploads/imx6rex-xubuntu-13-04-production-04-AUG-2014.tar -P ~/work-temp
Now you can replace it (be sure you use correct partition of SD card – we will use /dev/sdb as in original How to start page):
sudo mount /dev/sdb2 /media/fedevel/
cd /media/fedevel/
sudo rm -r /media/fedevel/*
sudo tar -pxvzf ~/work-temp/imx6rex-xubuntu-13-04-production-04-AUG-2014.tar
cd
sudo umount /media/fedevel
2. Boot device & Software
Before we boot, stop U-boot and update this line:
setenv mmcargs 'setenv bootargs console=${console},${baudrate} root=${mmcroot} ${video_args} ip=dhcp'
saveenv
We used different boot device (SATA, SD, USB or even network) for different tests:
- Memory test for Quad Module
U-boot is flashed into SPI Memory. Linux Kernel and dtb file are stored on an SD card as well as filesystem. For all our testing we used our modified Ubuntu filesystem. - Memory test for Solo Module
Files compiled for OpenRex Solo version are stored on same devices as for Quad boards. - Peripheral test
U-boot and Linux Kernel files are in the same location as for Memory tests. For filesystem storage we use different options. Update it in uboot:setenv mmcroot '/dev/sda1 rootwait rw' saveenv
- Quad boards are using SATA hard drive
- Solo boards are using USB sticks
3. Create new directories and copy test file
cd /media
wget http://www.imx6rex.com/download/files-from-internet/openrex/vi1i/software/blackbird.wav
cp blackbird.wav blackbird2.wav
# prepare directories
cd /home/ubuntu/
mkdir -p openrex/
cd openrex/
mkdir -p env-chamber-testing/
cd env-chamber-testing/
touch orx-env-chamber-testing.log
touch orx-cpu-temp.log
# setup local time
ln -sf /usr/share/zoneinfo/Europe/Bratislava /etc/localtime
4. Setup CRON
To be able to check the CPU temperature every minute, we setup a cron job. Before we do so, we need to install postfix package (for Ubuntu file systems):
sudo apt-get install postfix
During the installation select “Local only option”. To setup a cron tab, we will open the file containing all cron jobs. If you run the crontab for the first time you may need to select the text editor.
sudo crontab -e
Paste following line to the end of this file:
* * * * * { echo -n $(date +\%Y/\%m/\%d-\%T); echo -n "("; echo -n $(date +\%Z); echo -n ") "; cat /sys/devices/virtual/thermal/thermal_zone0/temp; } >> /home/ubuntu/openrex/env-chamber-testing/orx-cpu-temp.log
We will use the same time format as stressapptest. We will get the current CPU temperature and save it into the log file. Note: The ‘%’ sign has a special purpose in the cron file. When using it in the date command you need to use backslash before the ‘%’.
5. Show the CPU temperature in SSH
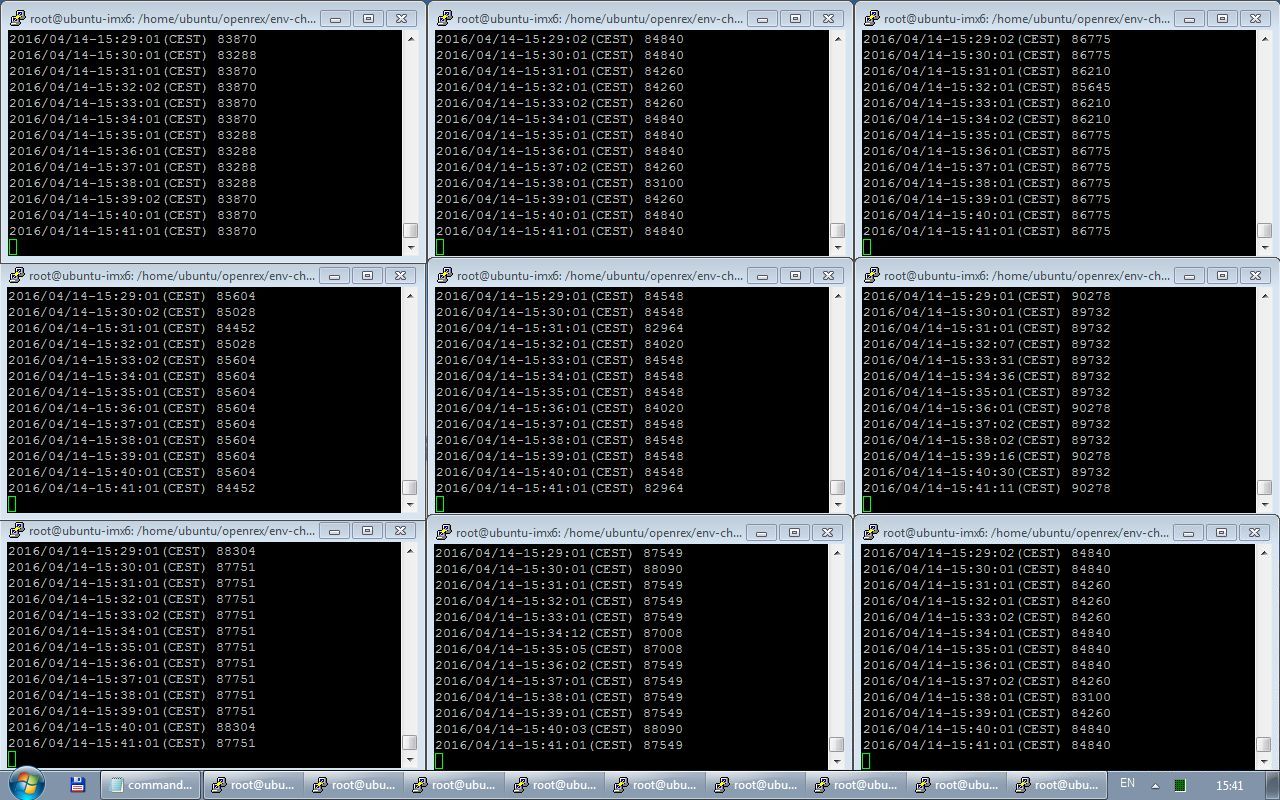
Open one SSH client per board where we will show CPU temperature. This way we will also know that the board is still alive. We use tail command to show the last part of the log file, which is filled up through the CRON job we setup in previous steps:
cd /home/ubuntu/openrex/env-chamber-testing/
tail -f orx-cpu-temp.log
6. Error checking during peripheral test
To immediately see if any error occurred during peripheral test, we open a new SSH client and run the following command:
cd /home/ubuntu/openrex/env-chamber-testing/
tail -f orx-env-chamber-testing.log | grep -i "error"
7. Copy the script file
You can download it using these commands:
cd /home/ubuntu/openrex/env-chamber-testing/
wget http://www.imx6rex.com/download/software/openrex/others/files/openrex-env-chamber-test.sh
chmod 777 openrex-env-chamber-test.sh
You can find the complete script on the bottom of this page.
8. Prepare script for backup log files (memory test only)
To store the older files automatically, download this script:
cd /home/ubuntu/openrex/env-chamber-testing/
wget http://www.imx6rex.com/download/software/openrex/others/files/backupFiles.sh
chmod 777 backupFiles.sh
And this is inside the script:
#!/bin/sh

# obtain board ID from IP address - be sure addresses are allocated based on MAC
boardID=$(/sbin/ip -o -4 addr list eth0 | awk '{print $4}' | cut -d/ -f1 | cut -d'.' -f4 | cut -d'2' -f2);
currentTime=`date +%Y-%m-%d.%H:%M`

mv stressapptest.log orx-board-$boardID-stressapptest.log.$currentTime
mv orx-cpu-temp.log orx-board-$boardID-env-cpu-temp.log.$currentTime

touch stressapptest.log
touch orx-cpu-temp.log
9. Start the stress test
Before we run the test, we will setup time given by SNTP server. We will also go to testing directory:
ntpdate 192.168.0.2
cd /home/ubuntu/openrex/env-chamber-testing/
- Quad Peripheral test
Before you run the test be sure everything is plugged in. To find out where the devices are mounted you can use:fdisk -l
Now you can run the test. As the first parameter use version of the CPU – use “quad”. Then use device names in following order: first USB stick, second USB, SD card and SATA hard drive. We will also write all the logs into one log file:
./openrex-env-chamber-test.sh -quad sdb1 sdc1 mmcblk1p2 sda1 2>&1 | tee -i orx-env-chamber-testing.log
- Solo Peripheral test
We are using the same script as for Quad Testing. We will just use “solo” parameter and we will not use SATA location (for Solo we will use only four parameters). Here is an example:./openrex-env-chamber-test.sh -solo sda1 sdb1 mmcblk1p2 2>&1 | tee -i orx-env-chamber-testing.log
- Quad Memory testing
For Quad testing run stressapptest with these parameters:./backupFiles.sh & stressapptest -s 600000 -M 1000 -m 4 -C 4 -W -l /home/ubuntu/openrex/env-chamber-testing/stressapptest.log --printsec 100
- Solo Memory testing
You can use stressapptest with these parameters:./backupFiles.sh & stressapptest -s 600000 -M 150 -m 1 -C 1 -W -l /home/ubuntu/openrex/env-chamber-testing/stressapptest.log --printsec 100
10. Testing script
#!/bin/sh

# OpenRex environmental chamber testing script

# Example QUAD: ./openrex-env-chamber-test.sh -quad sdb1 sdc1 mmcblk0p1 sda1 2>&1 | tee -i orx-env-chamber-testing.log
# Example SOLO: ./openrex-env-chamber-test.sh -solo sda1 sdb1 mmcblk0p1 2>&1 | tee -i orx-env-chamber-testing.log

mountDevice() {
  mount /dev/$1 /media/$2
  cat /etc/mtab | grep -F "/dev/$1 /media/$2"
  if [ "$?" -eq "0" ]; then
    echo "$2 mounted"
  else
    echo "$2 not mounted"; exit 2
  fi
}

# prepare files if needed
touch orx-env-chamber-testing.log
touch orx-cpu-temp.log

echo -e '\033[9;0]' > /dev/tty1 # disable blanking the display

imx6solo=0
imx6quad=0
case $1 in
  -solo)  imx6solo=1 ;;
  -quad)  imx6quad=1 ;;
  *)
esac

# mount devices
mountDevice $2 usb0
mountDevice $3 usb1
mountDevice $4 mmc0
if [ "${imx6quad}" -eq "1" ]; then
  mountDevice $5 sata
fi

updateLogFiles() {
  # obtain board ID from IP address - be sure addresses are allocated based on MAC
  boardID=$(/sbin/ip -o -4 addr list eth0 | awk '{print $4}' | cut -d/ -f1 | cut -d'.' -f4 | cut -d'2' -f2);
  # be sure time server is running on DHCP server
  currentTime=`date +%Y-%m-%d.%H:%M`

  mv orx-env-chamber-testing.log orx-board-$boardID-env-chamber.log.$currentTime
  mv orx-cpu-temp.log orx-board-$boardID-env-cpu-temp.log.$currentTime

  touch orx-env-chamber-testing.log
  touch orx-cpu-temp.log
}

finish_test_now() {
  echo "$(date +\%Y/\%m/\%d-\%T)($(date +\%Z)) Ctrl+C Detected: End of the test"
  precced=0;
  #kill -INT $vid_pid $str_pid;
  sleep 3;
  test_status=`cat orx-env-chamber-testing.log | grep -i "error" | grep -v -e "0 errors" -e "no corrected errors"`
  if [ -z "$test_status" ]
  then
    echo "*********\nTEST PASS\n*********"
  else
    echo "*********\nTEST FAIL\n*********\n"
    echo "List of detected errors:"
    cat orx-env-chamber-testing.log | grep -i "error" | grep -v -e "0 errors" -e "no corrected errors" -e "List of detected errors:"
  fi
  updateLogFiles
  exit;
}

# kill all processes if Ctrl+C is detected
trap finish_test_now 2

# stressapptest - one thread CPU, one thread memory
if [ "${imx6solo}" -eq "1" ]; then
  stressapptest -s 600000 -M 100 -m 1 -C 1 --printsec 10 &
  str_pid=$!
fi
if [ "${imx6quad}" -eq "1" ]; then
  stressapptest -f /media/sata/tmp-file1 -s 600000 -M 500 -m 1 -C 1 --printsec 10 &
  str_pid=$!
fi
echo "$(date +\%Y/\%m/\%d-\%T)($(date +\%Z)) Starting stressapptest with PID: " $str_pid

# play a video file in an infinite loop
echo 0 > /sys/class/graphics/fb0/blank
mplayer -vo fbdev2:/dev/fb0 -quiet -vf scale -zoom -loop 0 -xy 1024 /home/ubuntu/Clouds.avi < /dev/null &
vid_pid=$!
echo "$(date +\%Y/\%m/\%d-\%T)($(date +\%Z)) Starting video file playback with PID: " $vid_pid

proceed=1
file1="blackbird.wav"
file2="blackbird2.wav"

cp1_from="/media/mmc0/"
cp1_to="/media/usb0/"

cp2_from="/home/ubuntu/"
cp2_to="/media/usb1/"

#copy files in case they are missing
cp /media/$file1 $cp1_from$file1
cp /media/$file1 $cp1_to$file1
cp /media/$file2 $cp2_from$file2
cp /media/$file2 $cp2_to$file2

while [ $proceed -eq 1 ]
do

  ping -q -c1 192.168.0.2 >> orx-env-chamber-testing.log
  if [ $? -ne 0 ]
  then
    echo "$(date +\%Y/\%m/\%d-\%T)($(date +\%Z)) ERROR: Ping failed"
  fi

  cp1_done=`ps cax | grep $cp1_pid | grep cp`
  if [ -z "$cp1_done" ]; then # copy finished
    if cmp -s $cp1_from$file1 $cp1_to$file1; then
      echo "$(date +\%Y/\%m/\%d-\%T)($(date +\%Z)) PASS: Copying file from $cp1_from to $cp1_to successful"
    else
      echo "$(date +\%Y/\%m/\%d-\%T)($(date +\%Z)) ERROR: Difference between files on $cp1_from and $cp1_to detected"
      cp /media/$file1 $cp1_to$file1
      echo "$(date +\%Y/\%m/\%d-\%T)($(date +\%Z)) File copied from /media/ to $cp1_to"
    fi
    cp1_temp=$cp1_from # swap destinations
    cp1_from=$cp1_to
    cp1_to=$cp1_temp

    rm $cp1_to$file1 # remove destination file

    cp $cp1_from$file1 $cp1_to$file1 &
    cp1_pid=$!
    echo "$(date +\%Y/\%m/\%d-\%T)($(date +\%Z)) Started copying file from $cp1_from to $cp1_to"
  fi

  cp2_done=`ps cax | grep $cp2_pid | grep cp`
  if [ -z "$cp2_done" ]; then # copy finished
    if cmp -s $cp2_from$file2 $cp2_to$file2; then
      echo "$(date +\%Y/\%m/\%d-\%T)($(date +\%Z)) PASS: Copying file from $cp2_from to $cp2_to successful"
    else
      echo "$(date +\%Y/\%m/\%d-\%T)($(date +\%Z)) ERROR: Difference between files on $cp2_from and $cp2_to detected"
      cp /media/$file2 $cp2_to$file2
      echo "$(date +\%Y/\%m/\%d-\%T)($(date +\%Z) File copied from /media/ to $cp2_to"
    fi
    cp2_temp=$cp2_from # swap destinations
    cp2_from=$cp2_to
    cp2_to=$cp2_temp

    rm $cp2_to$file2 # remove destination file

    cp $cp2_from$file2 $cp2_to$file2 &
    cp2_pid=$!
    echo "$(date +\%Y/\%m/\%d-\%T)($(date +\%Z)) Started copying file from $cp2_from to $cp2_to"
  fi

done