
Content
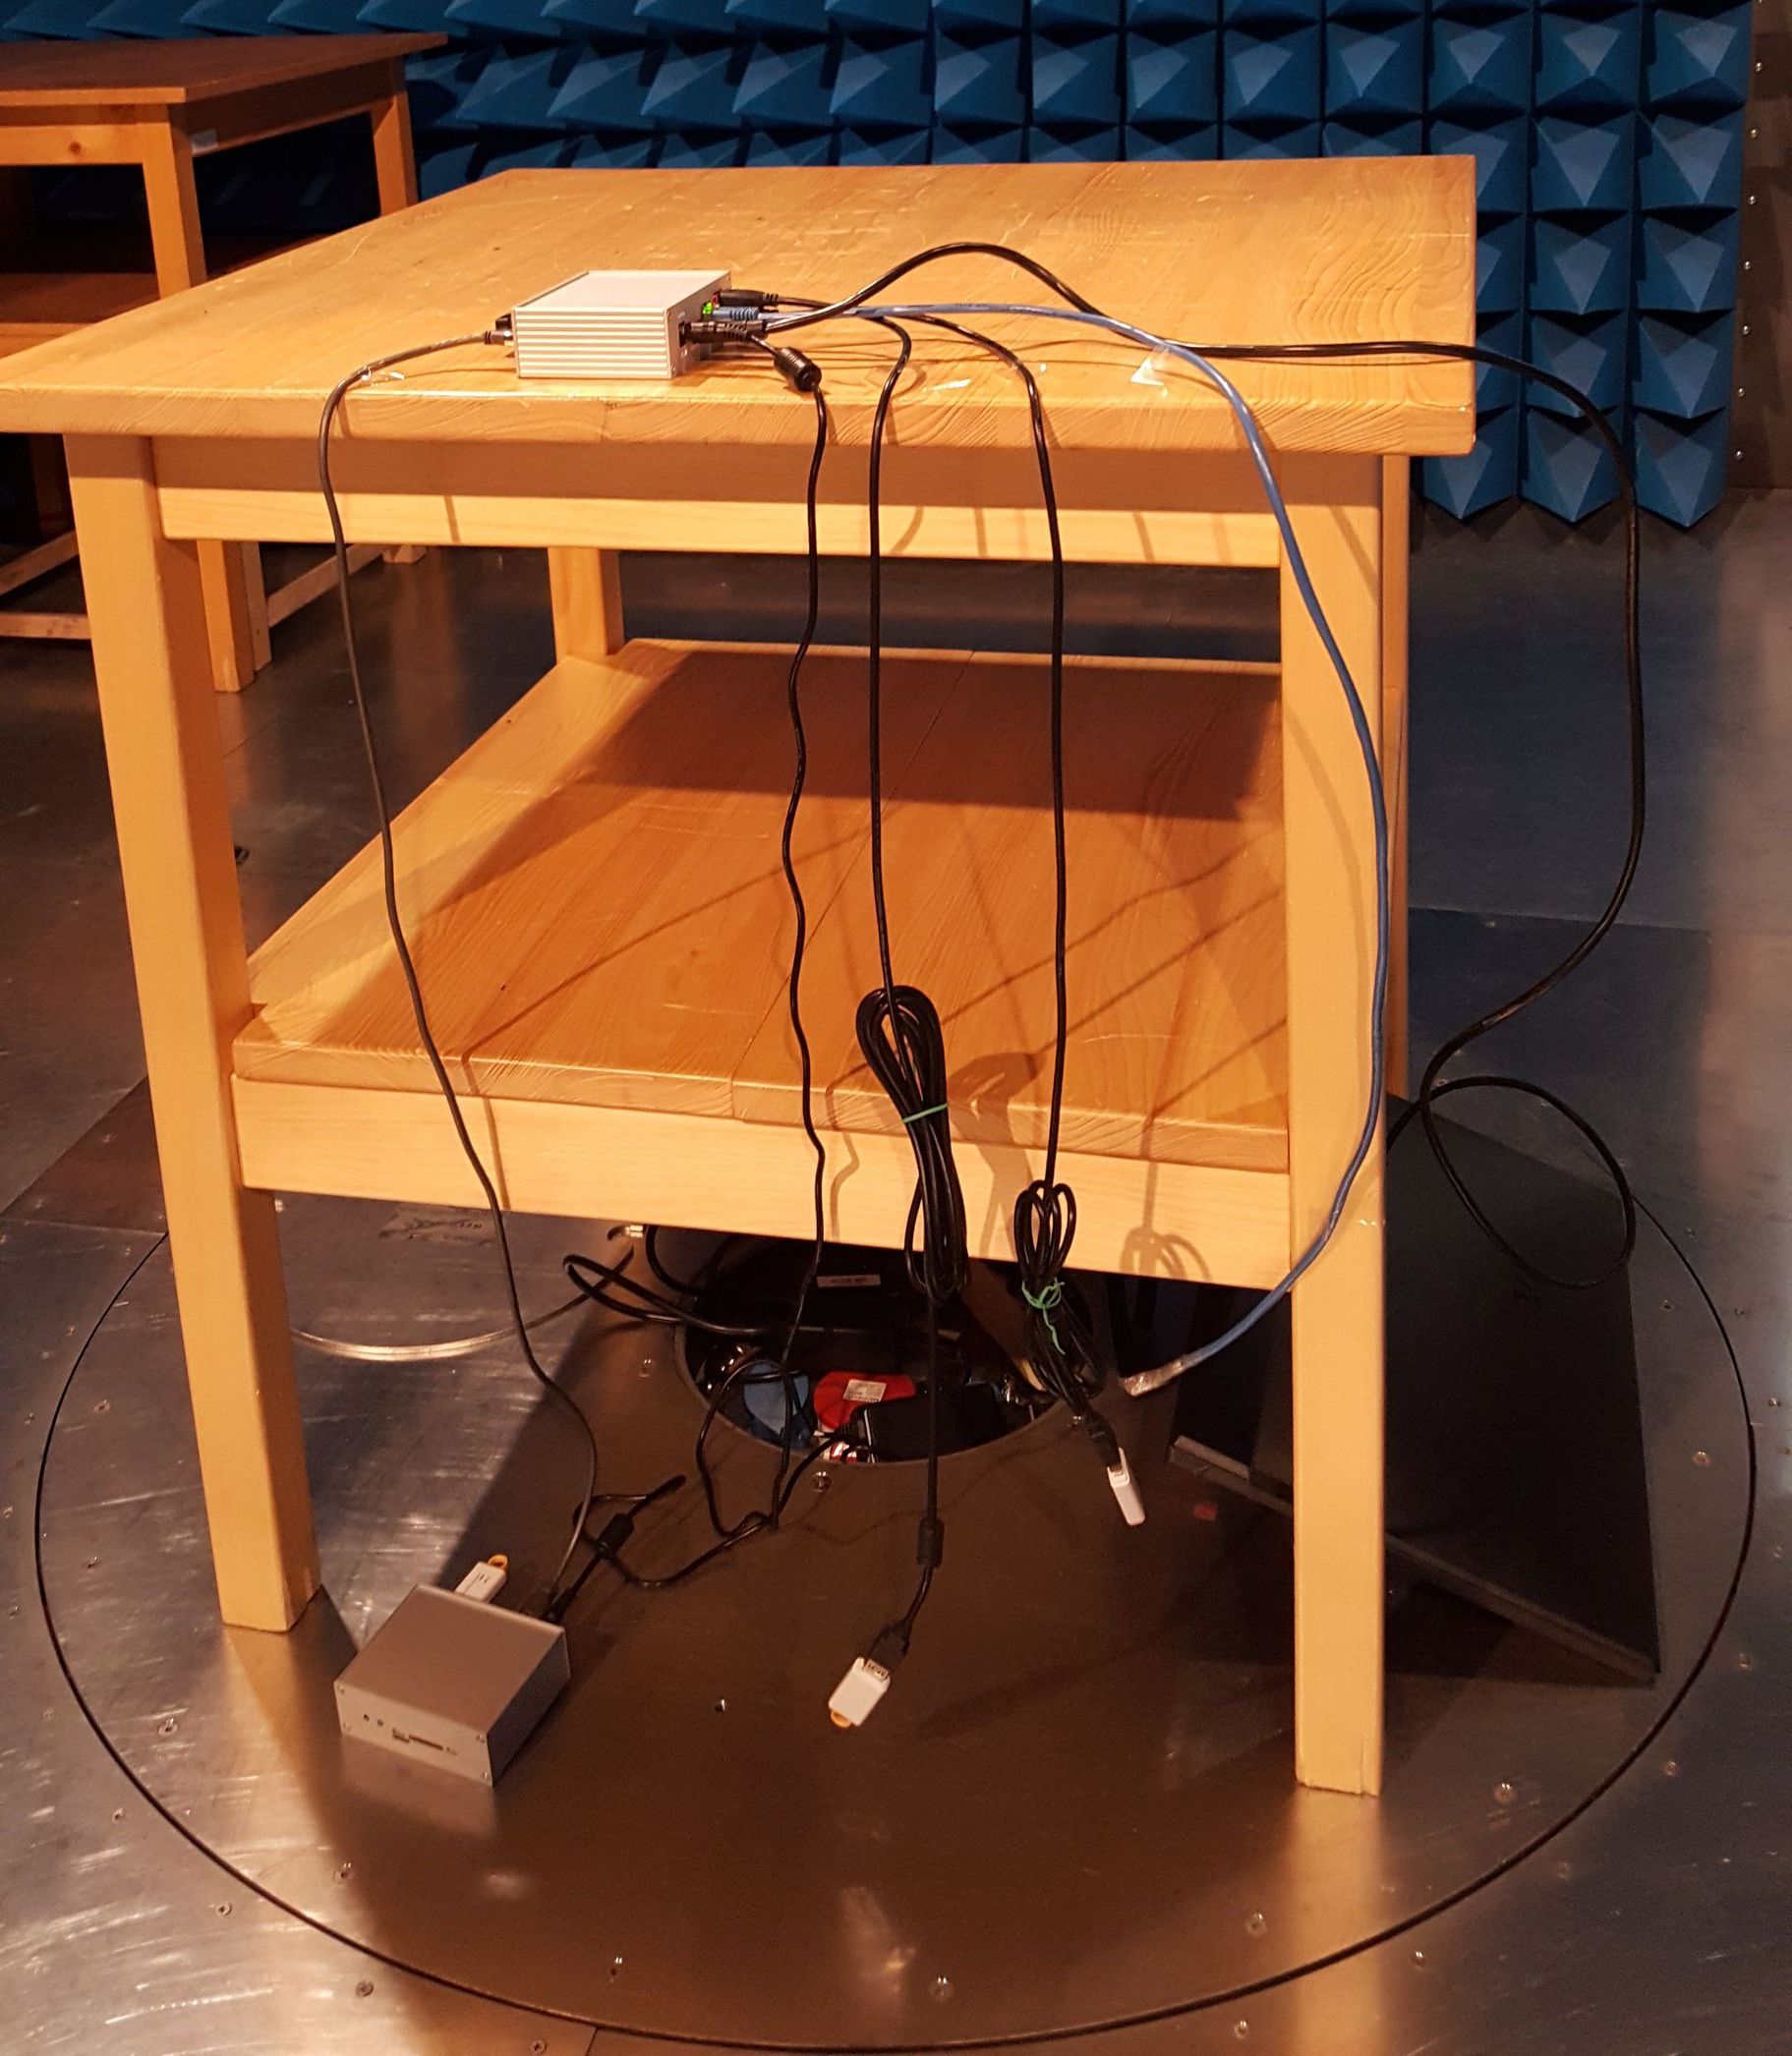
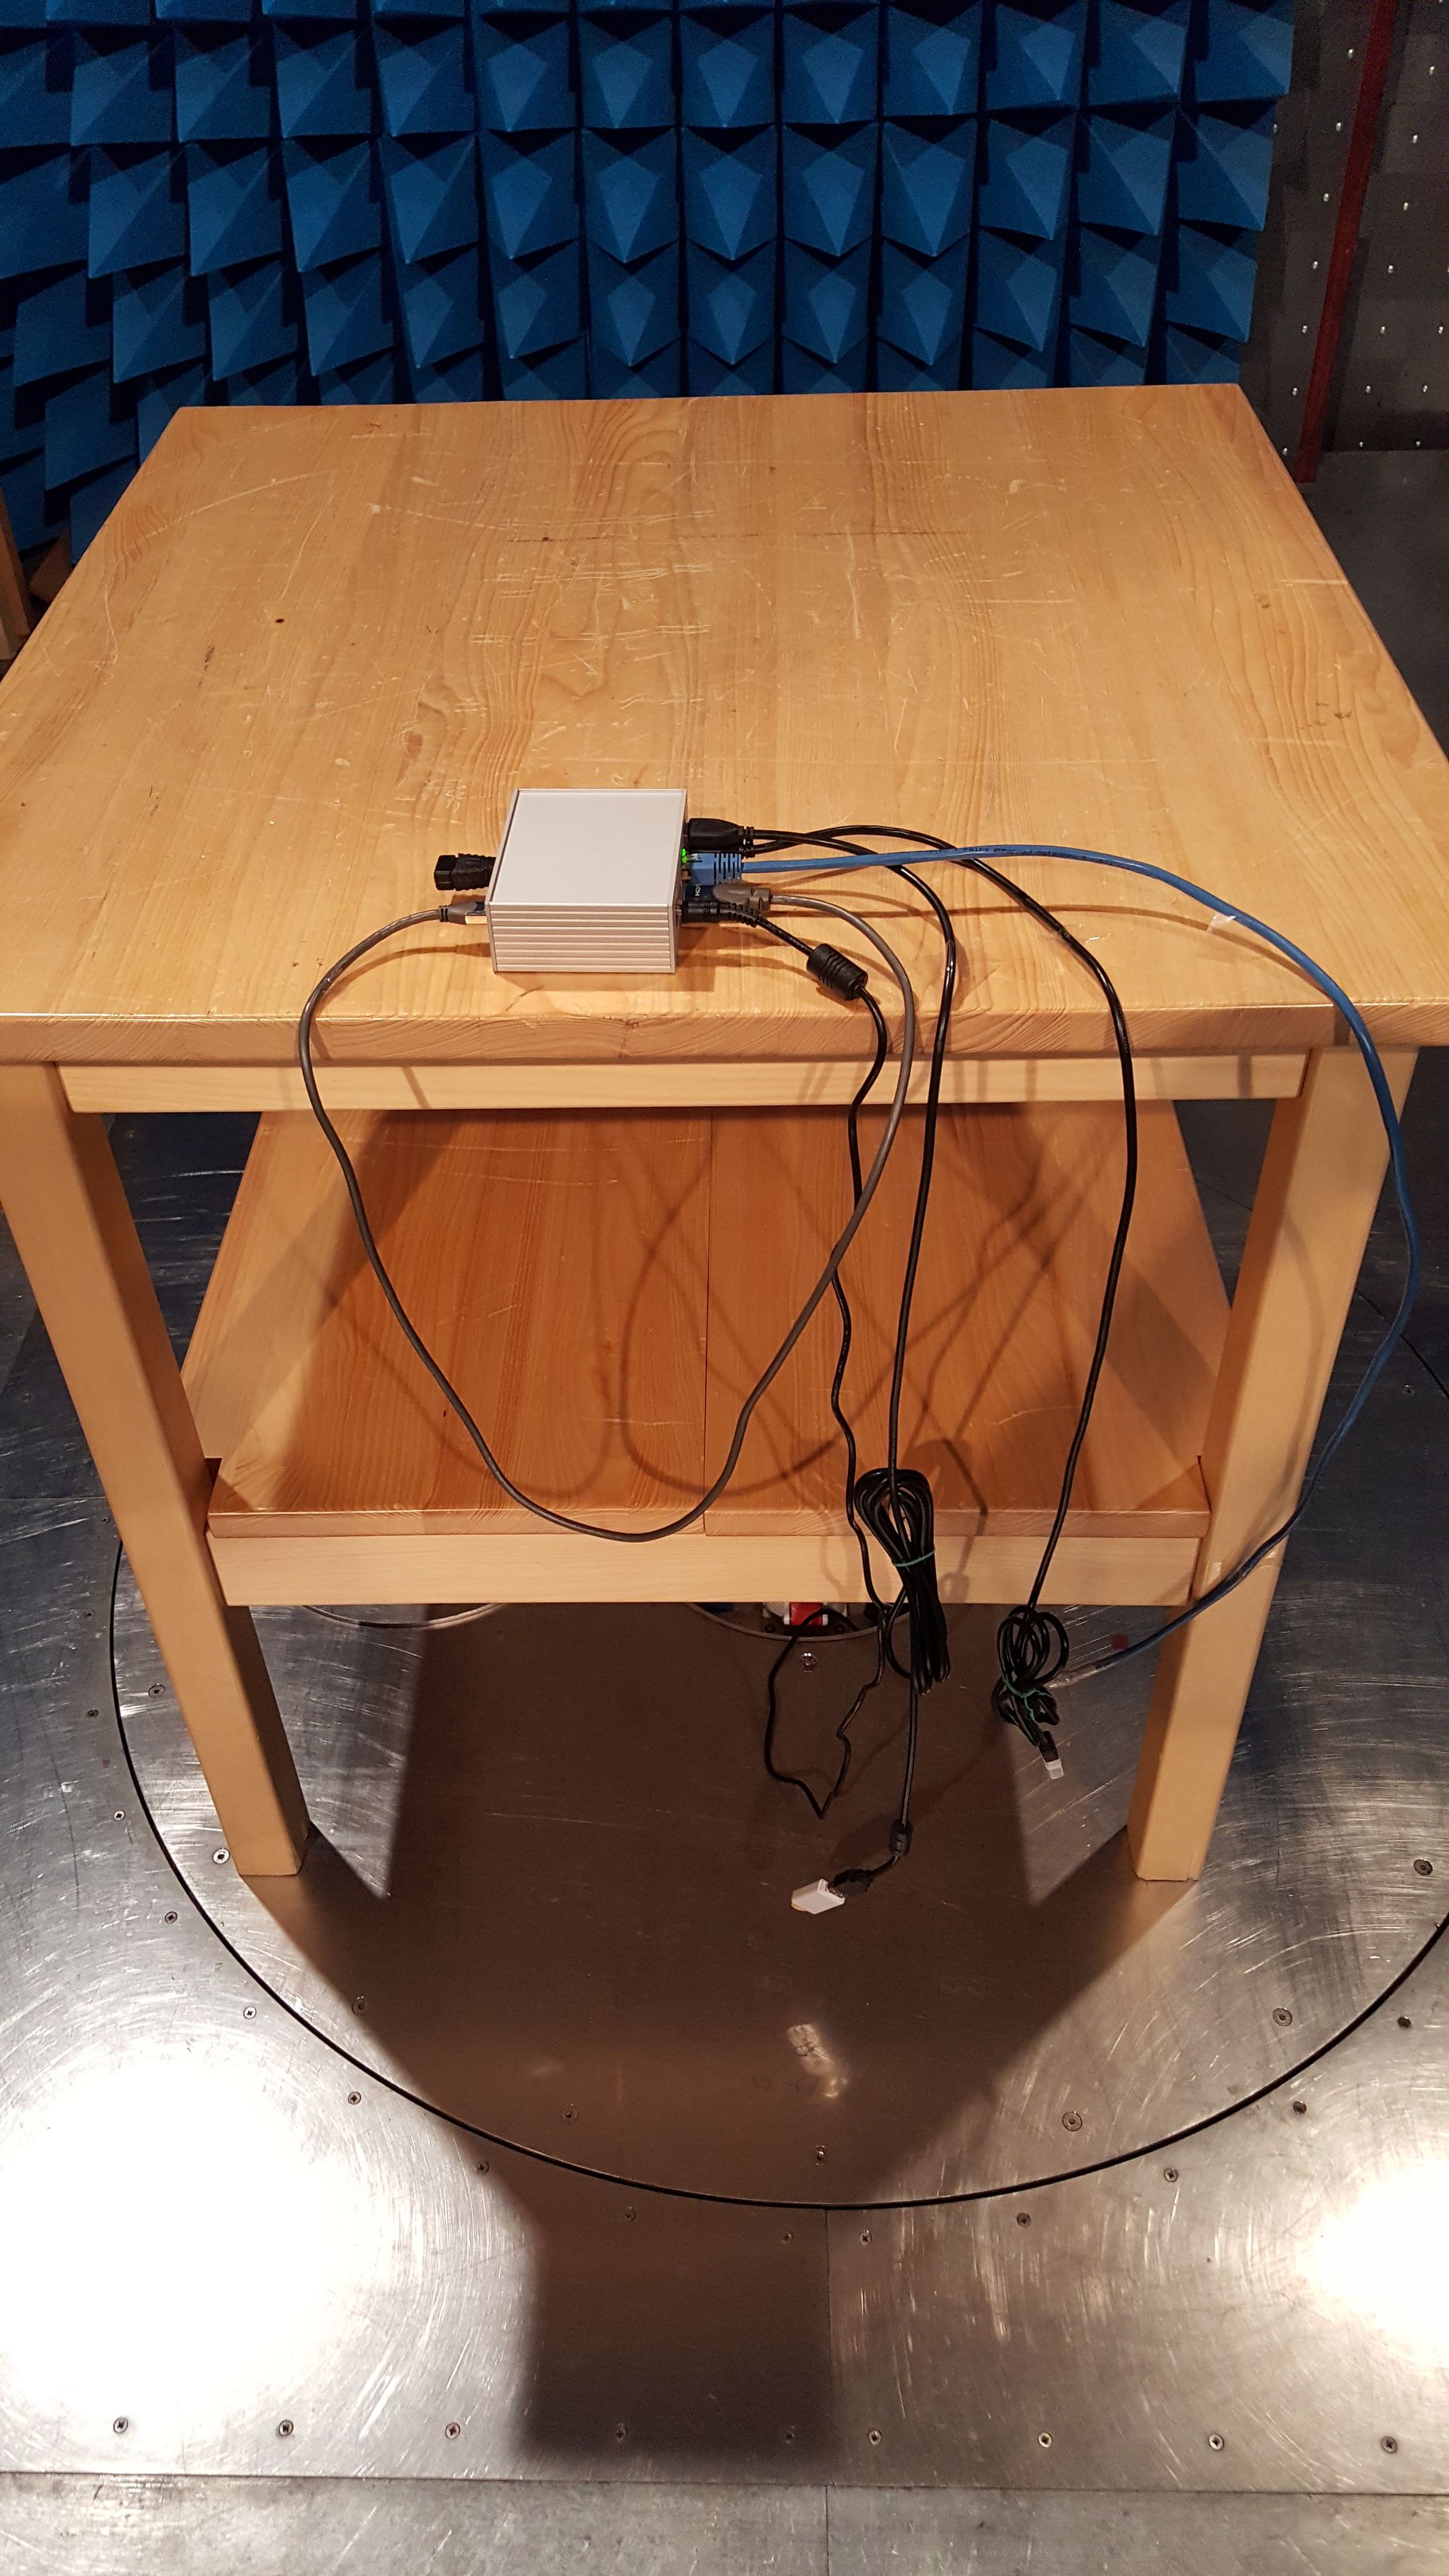
Hardware configuration
Connected cables & devices- Power jack: we used this +5V power adapter
- SD card (Sandisk) preloaded with Filesystem, used for booting and for read/write test
- 1m CAT-5E Ethernet: loopback cable connected. Forced to 100Mb and used for ping test or to control the board via SSH session.
- one of two HDMI option was used:
- HDMI loopback: when HDMI input is tested using loopback connection, HDMI input is connected to its HDMI output via a shielded 1m HDMI micro to HDMI cable
- HDMI input source and monitor used: into HDMI input using HDMI Micro cable is plugged a video source (from another TinyRex board) and board is connected to monitor through 1.8m HDMI cable, monitor is plugged into mains but not turned on. Both monitor and the second TinyRex lay on the floor to minimize its affect on results.
- 2x USB memory stick: each USB memory stick is connected through a 2m long USB extension cable. Both USB memory sticks are used during the read/write test.
- Wifi PCIE mini card: inserted, but not actively used. No antennas connected.
- Debug cable: FTDI TTL-3V3 UART to USB cable, used only to setup the board, not used and not plugged in during the measurements

Test description
The main purpose of testing was to measure Radiated emission of iMX6 TinyRex production batch when the board run under heavy load. Following tests were running during the measurement:- CPU stress test
- Memory stress test
- HDMI input (receiving a 720p 3Mbps video stream)
- HDMI output (received HDMI stream is forwarded to HDMI output)
- SD card test (read & write)
- 2x USB test (USB memory stick read & write)
- SATA stress test (read & write) (if applicable)
- Ethernet ping (and Ethernet SSH session)
The results
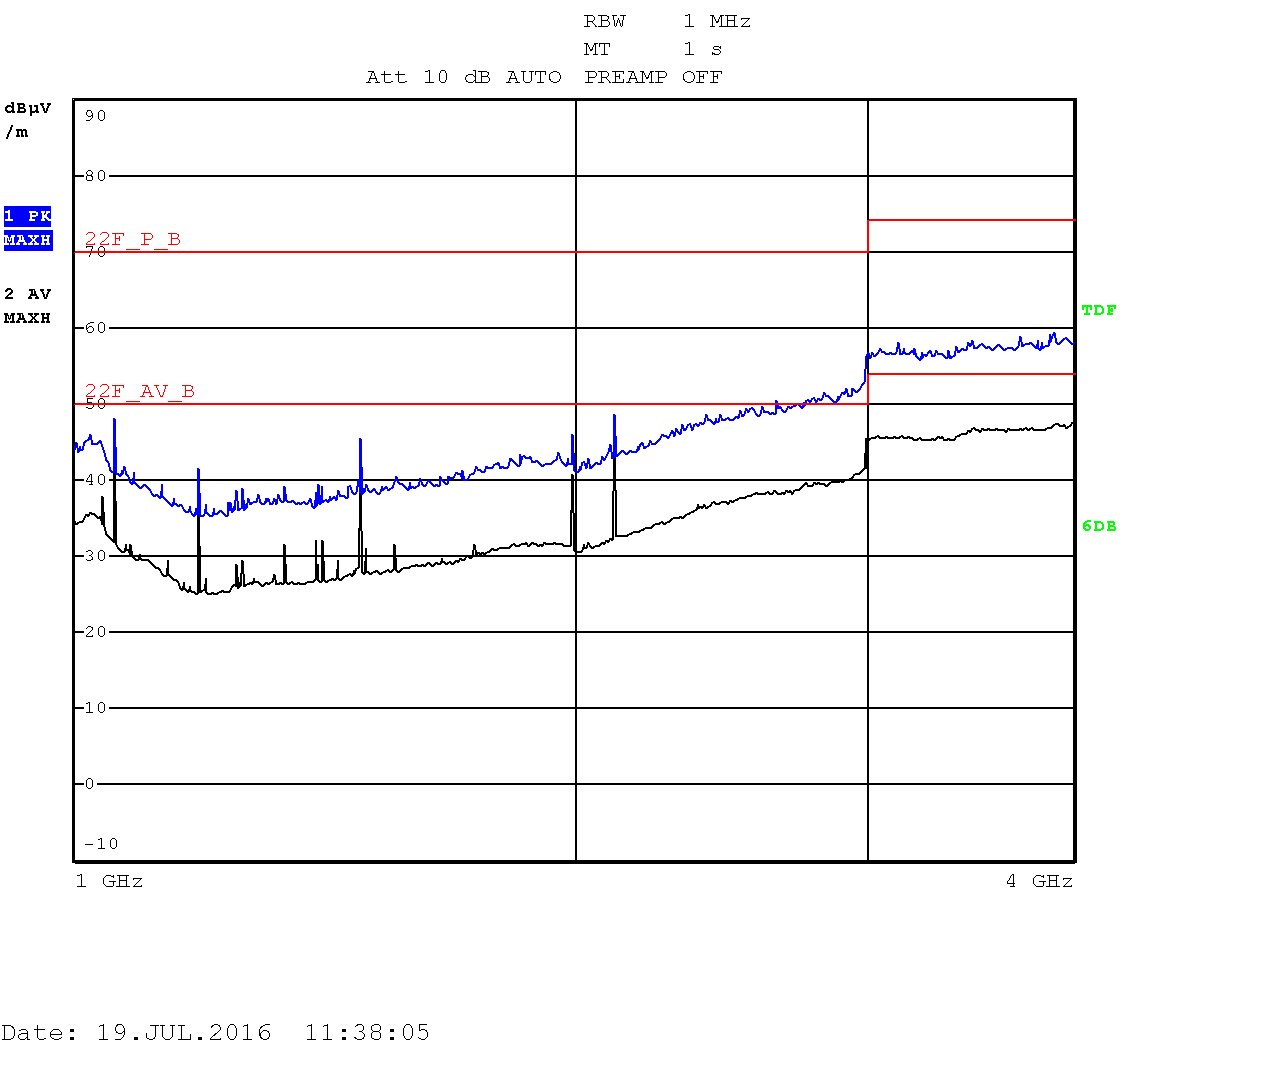
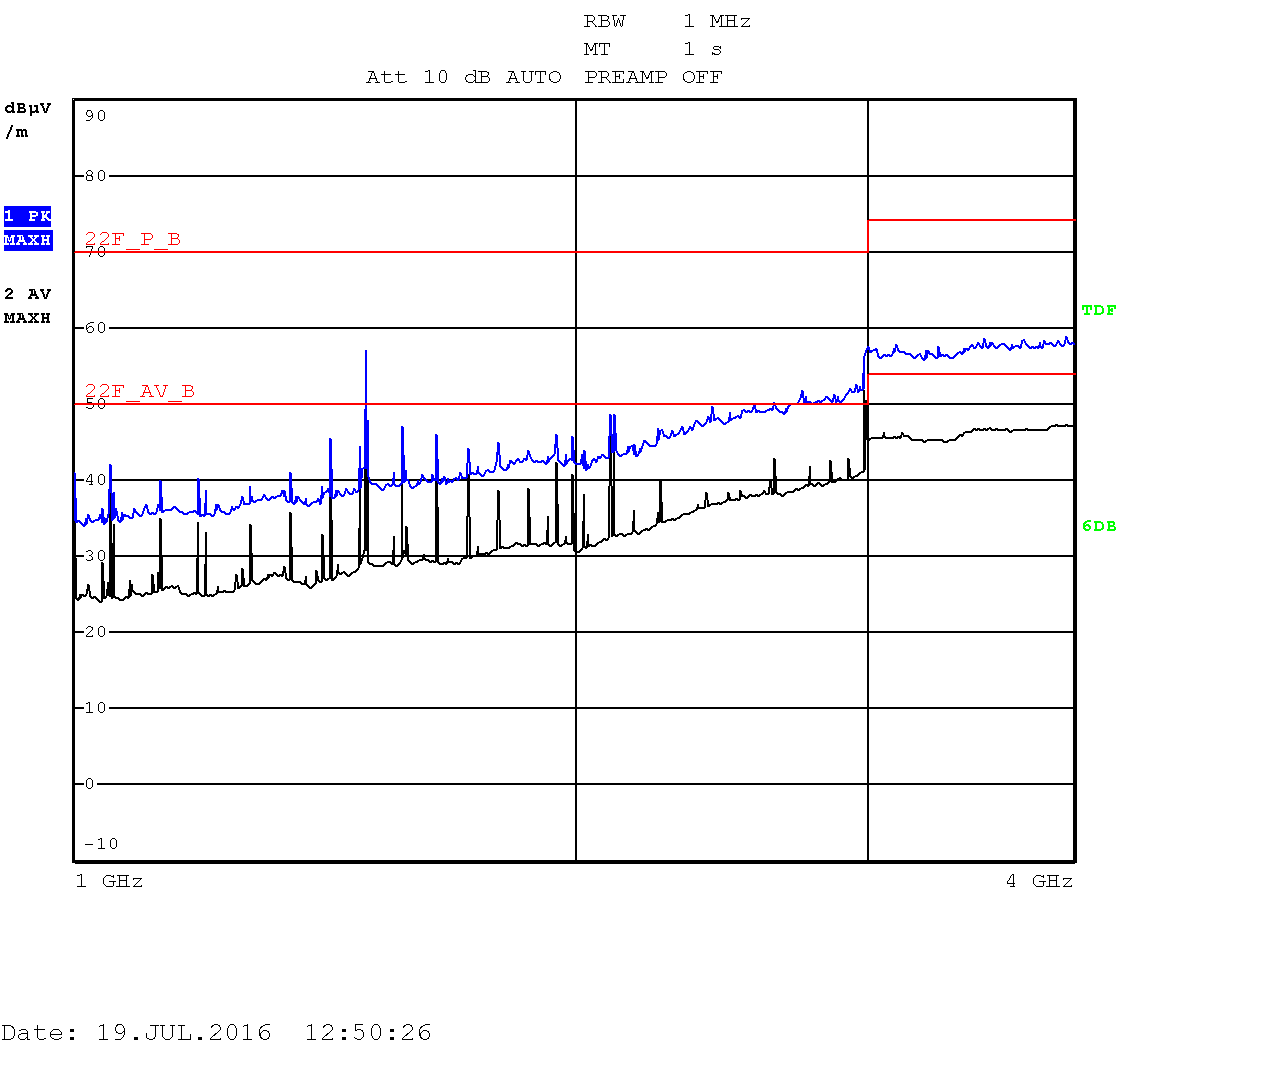
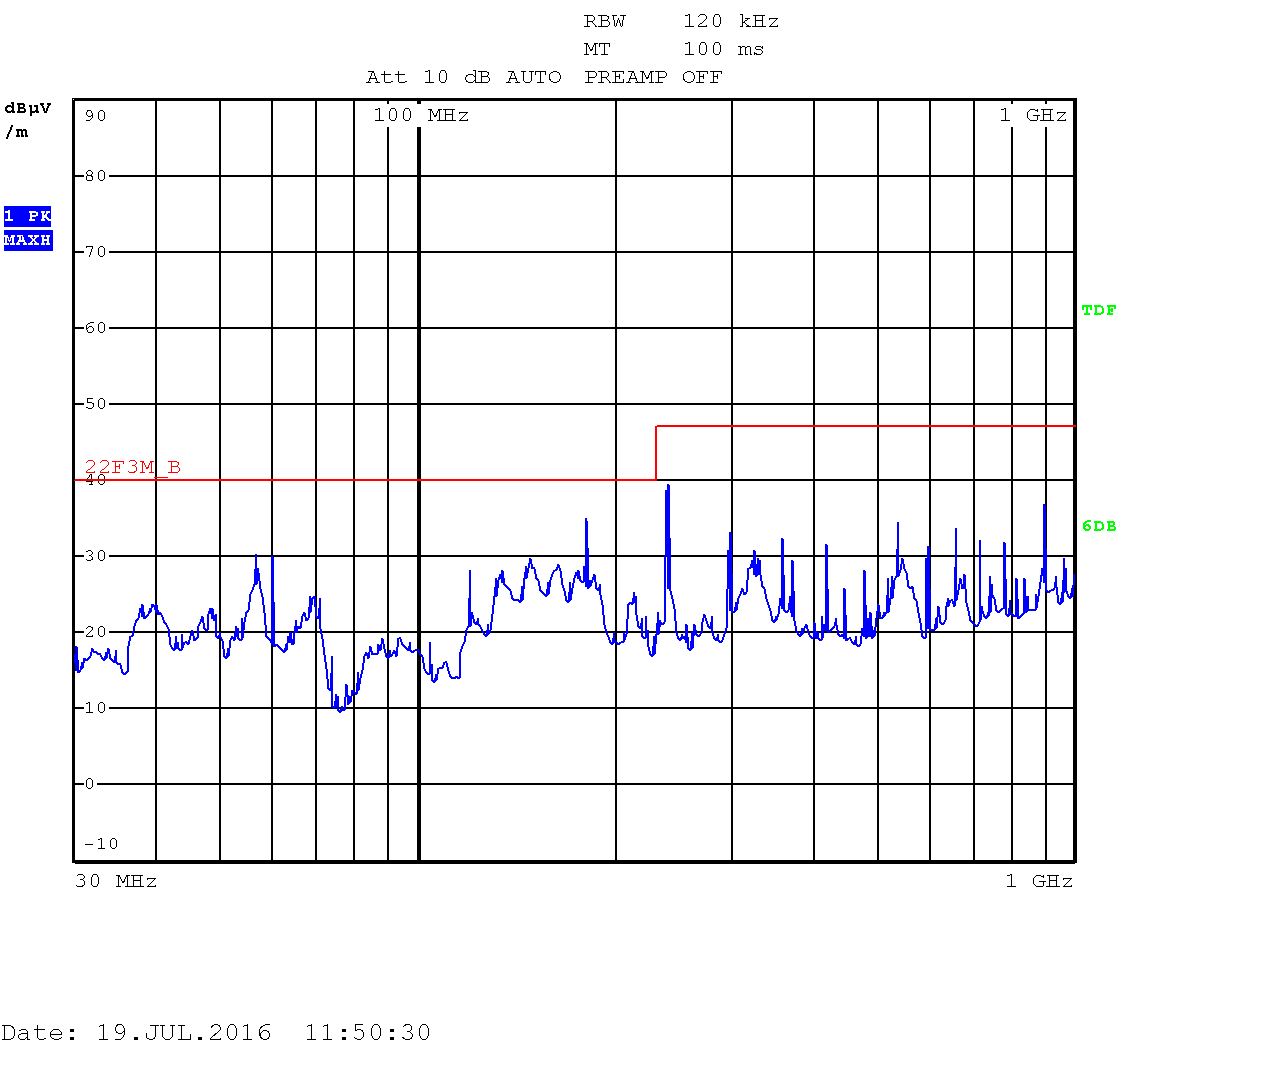
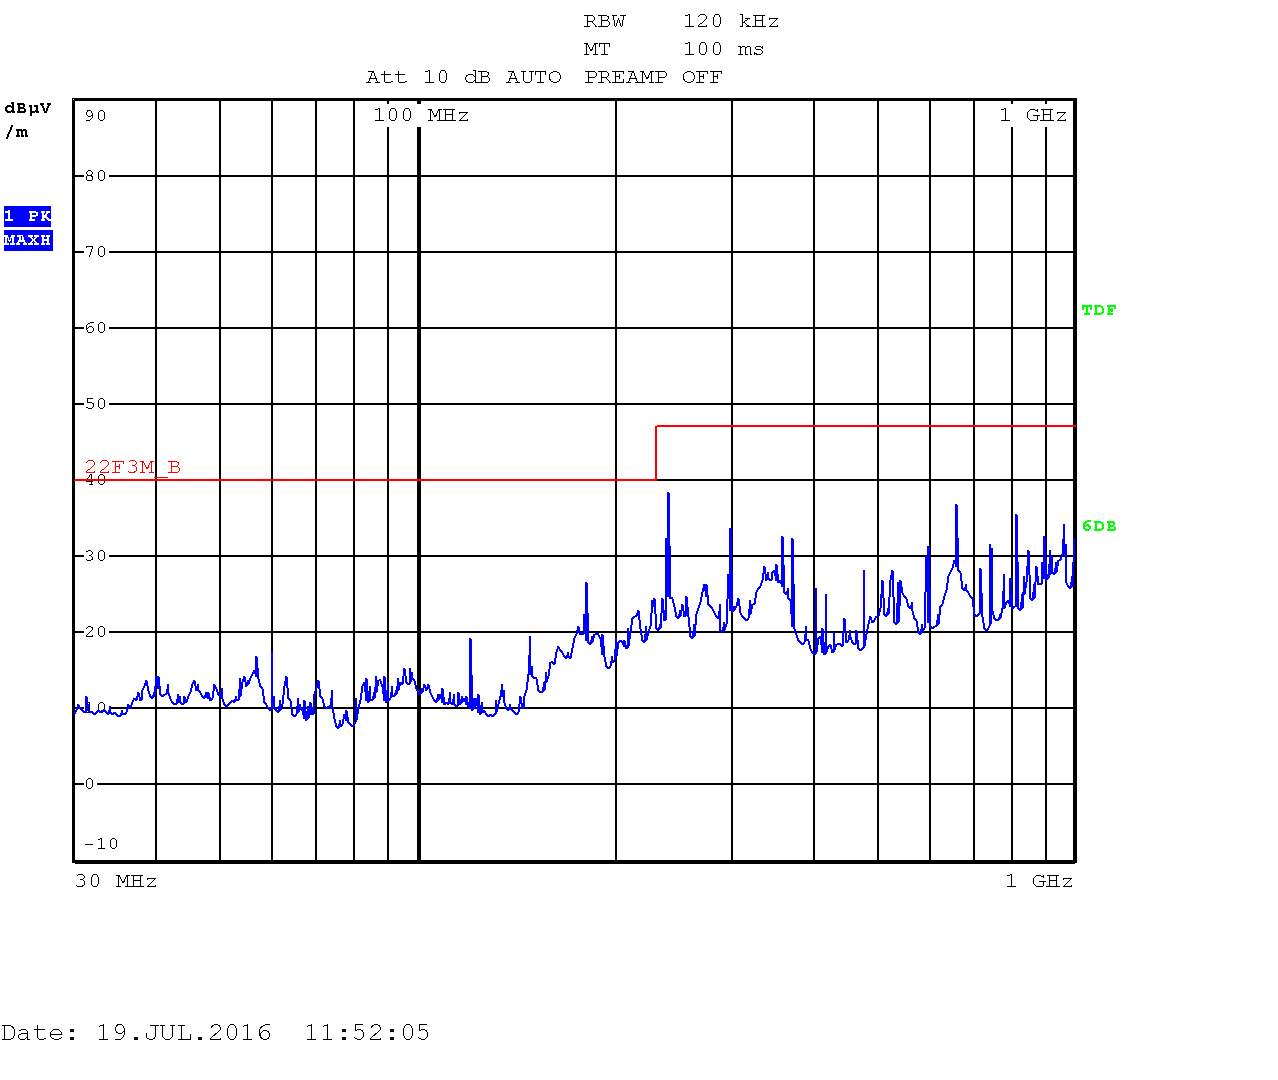
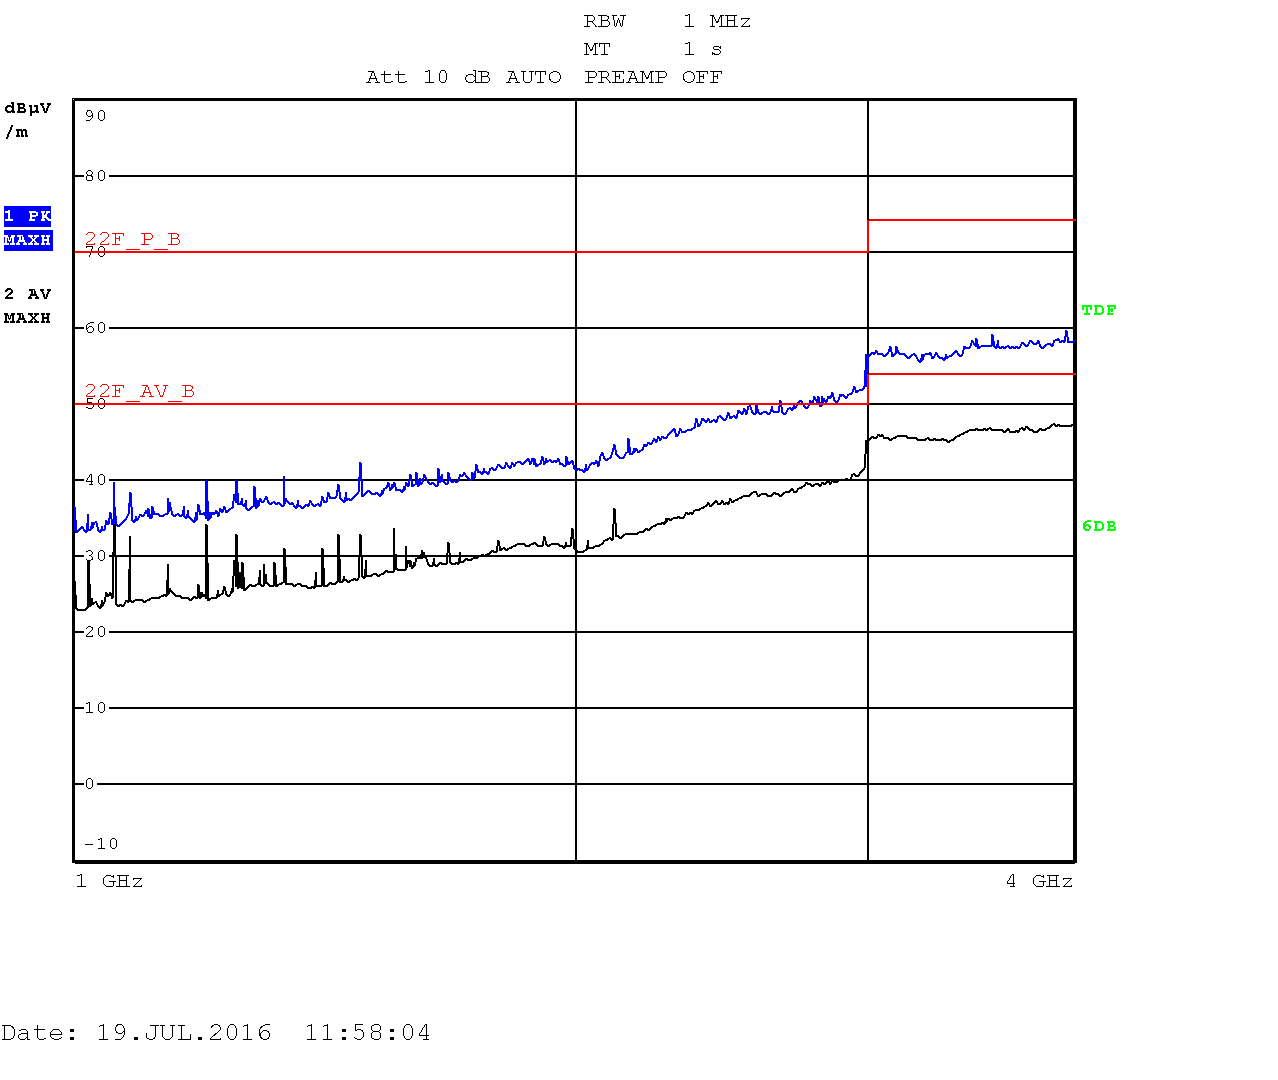
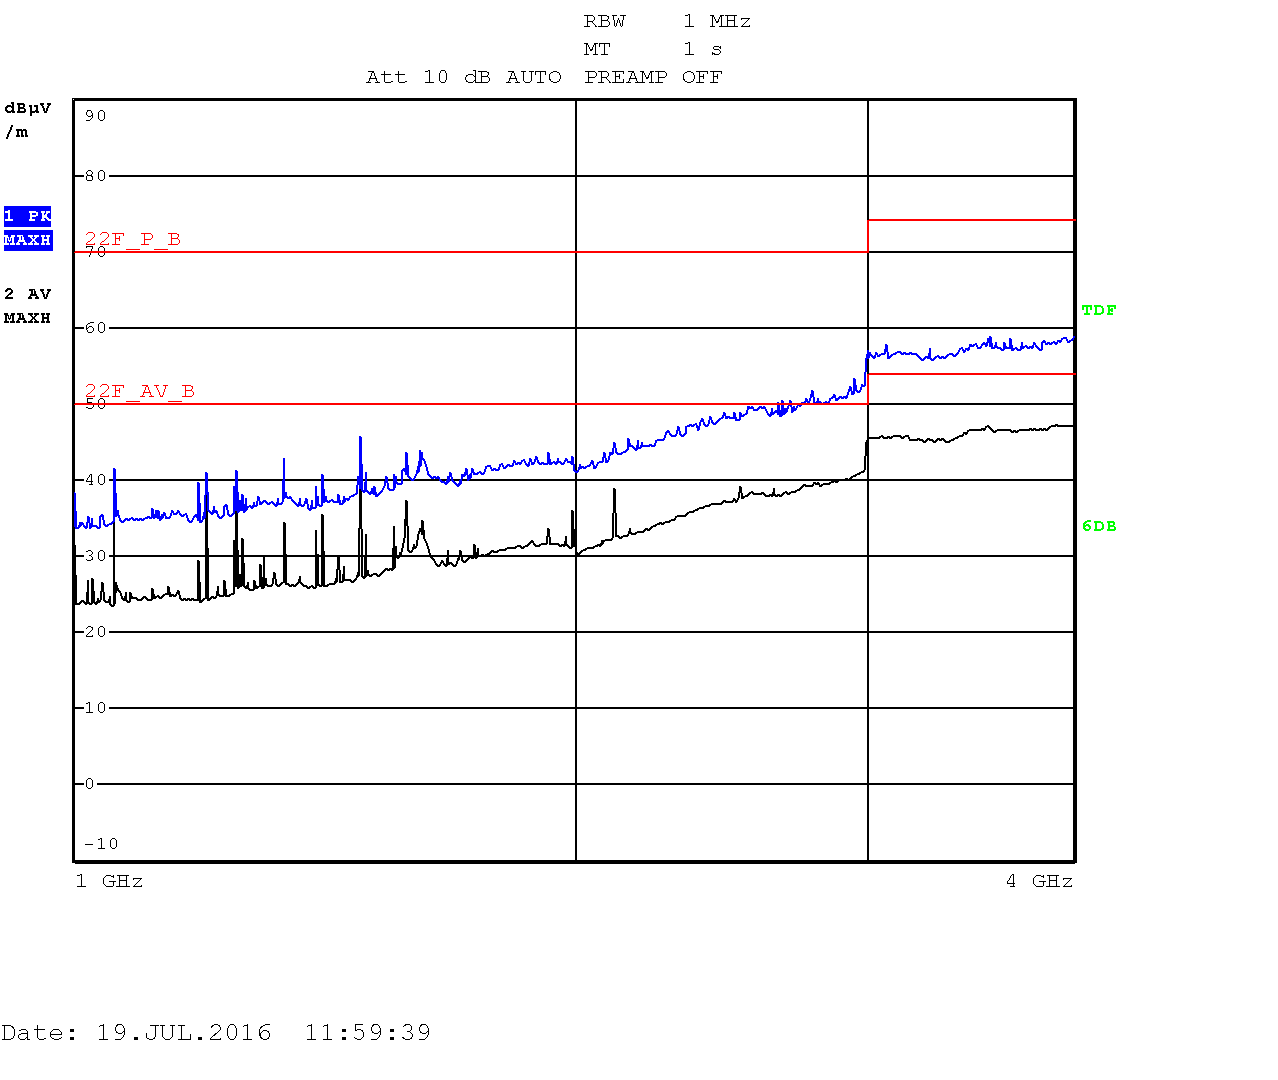
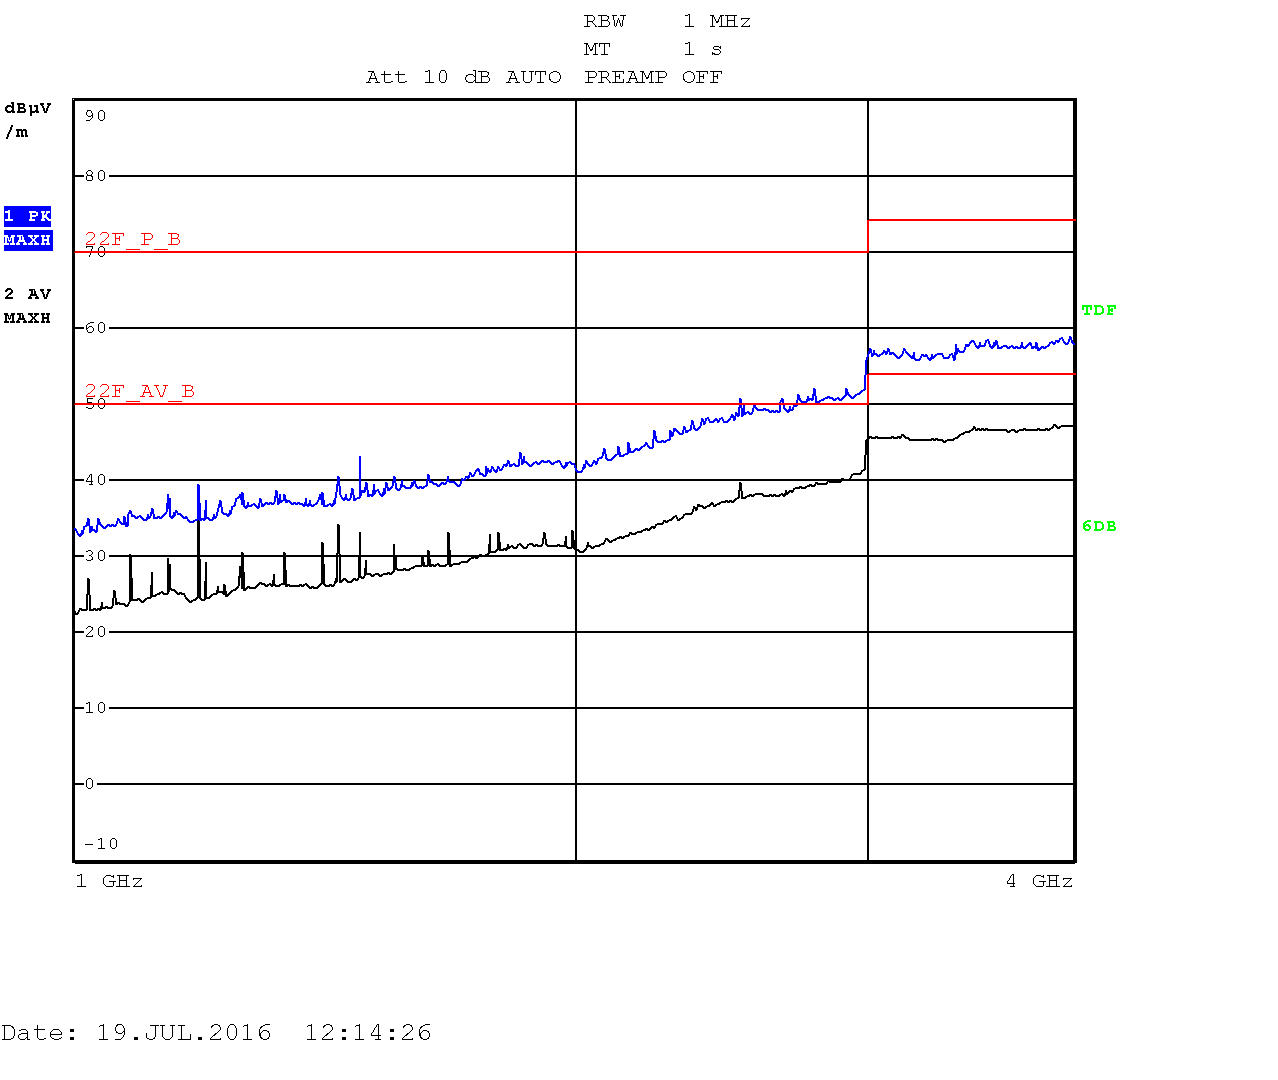
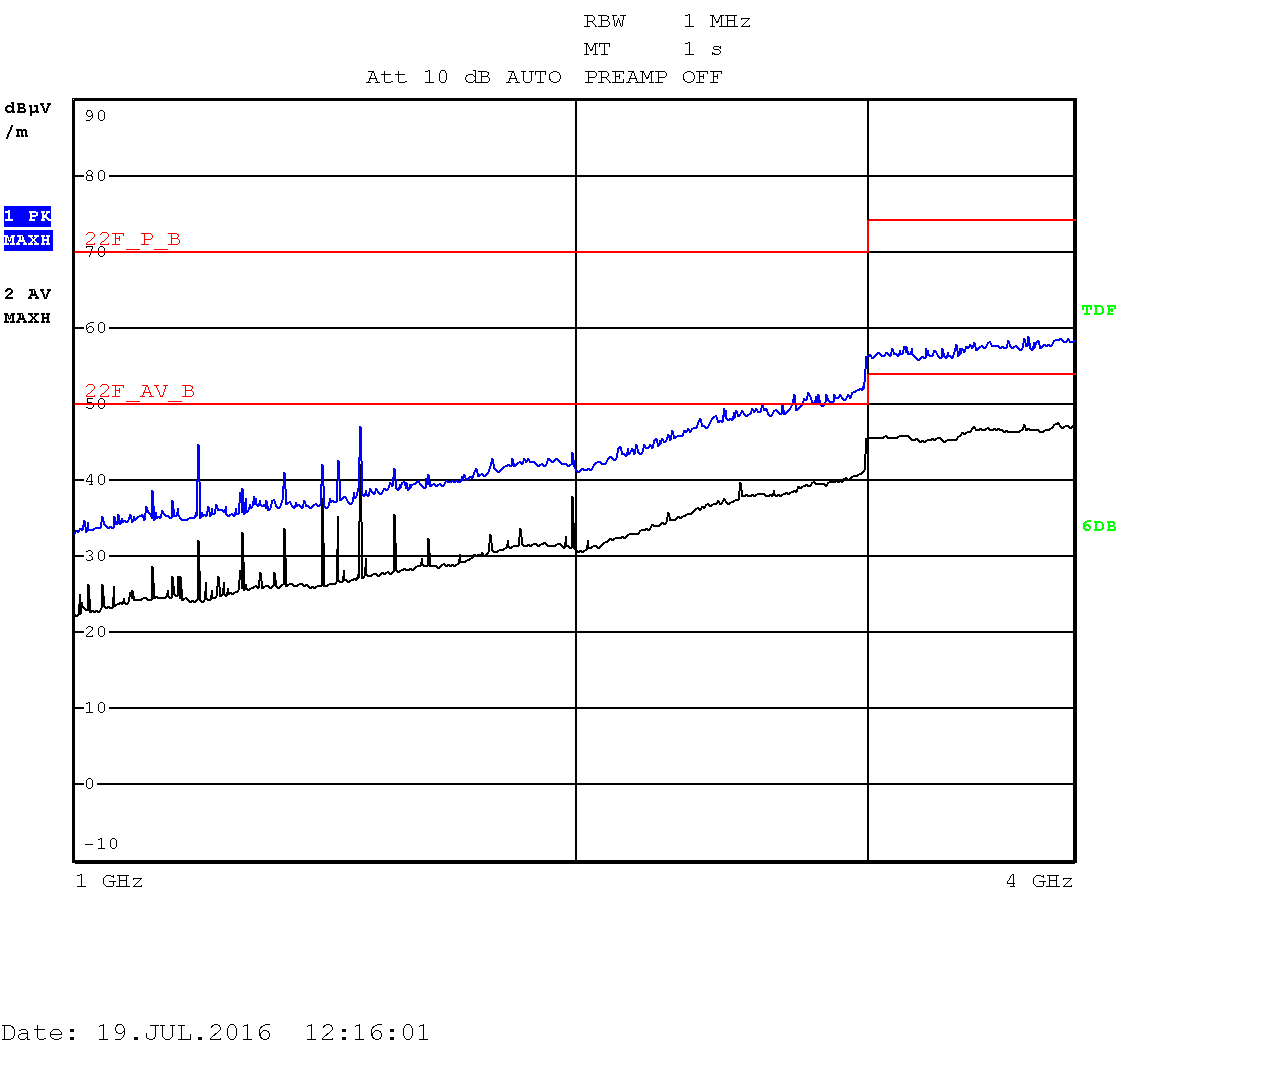
All of our setups passed through FCC CLASS B regulations - the stricter standard which applies to residential environments.The graphs of radiated emissions are displayed as quasi-peak values by default. For the higher band (above 1GHz) there are two plots displaying the power density. The blue curve represents quasi-peak values. The higher limit (22F_P_B) is used for this type of measurement. The lower limit (22F_AV_B) is devoted to average-power measurement (shown with the black curve).
iMX6 TinyRex Max with enclosure
The setup passed through FCC CLASS B running: stressapptest for CPU and memory, Ethernet loopback, running heavy testing script for USB and SD card read/write test, Ethernet SSH session, HDMI input and output both tested with 720p video stream.This setup used HDMI option with separate video input source and monitor.
| Vertical polarization | Horizontal polarization |

iMX6 TinyRex Max: 30kHZ - 1GHz
|
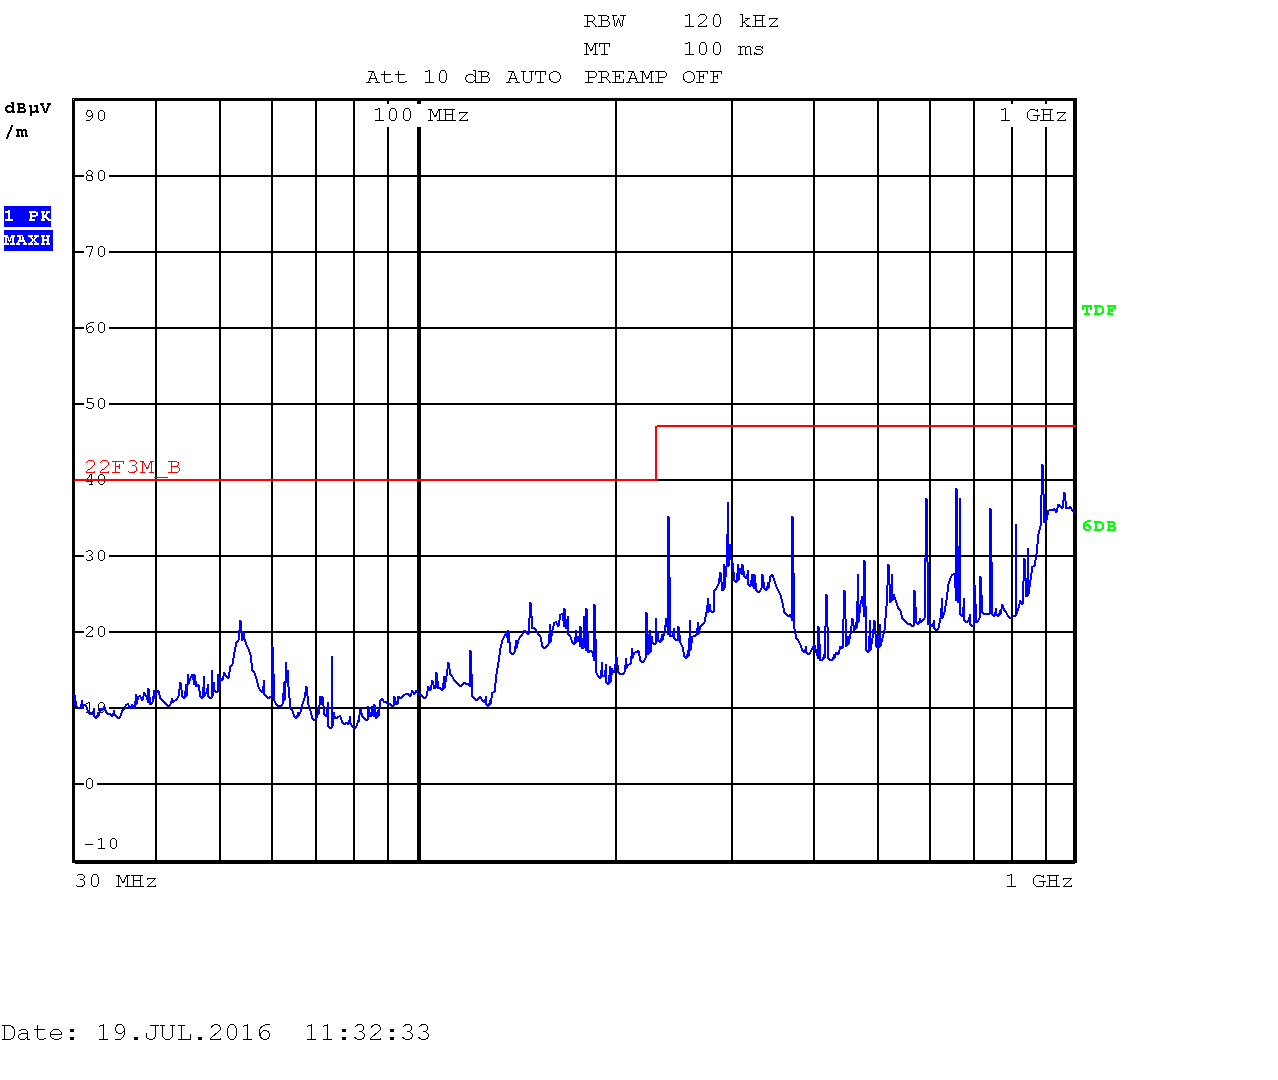
iMX6 TinyRex Max: 30kHZ - 1GHz
|
| Vertical polarization | Horizontal polarization |
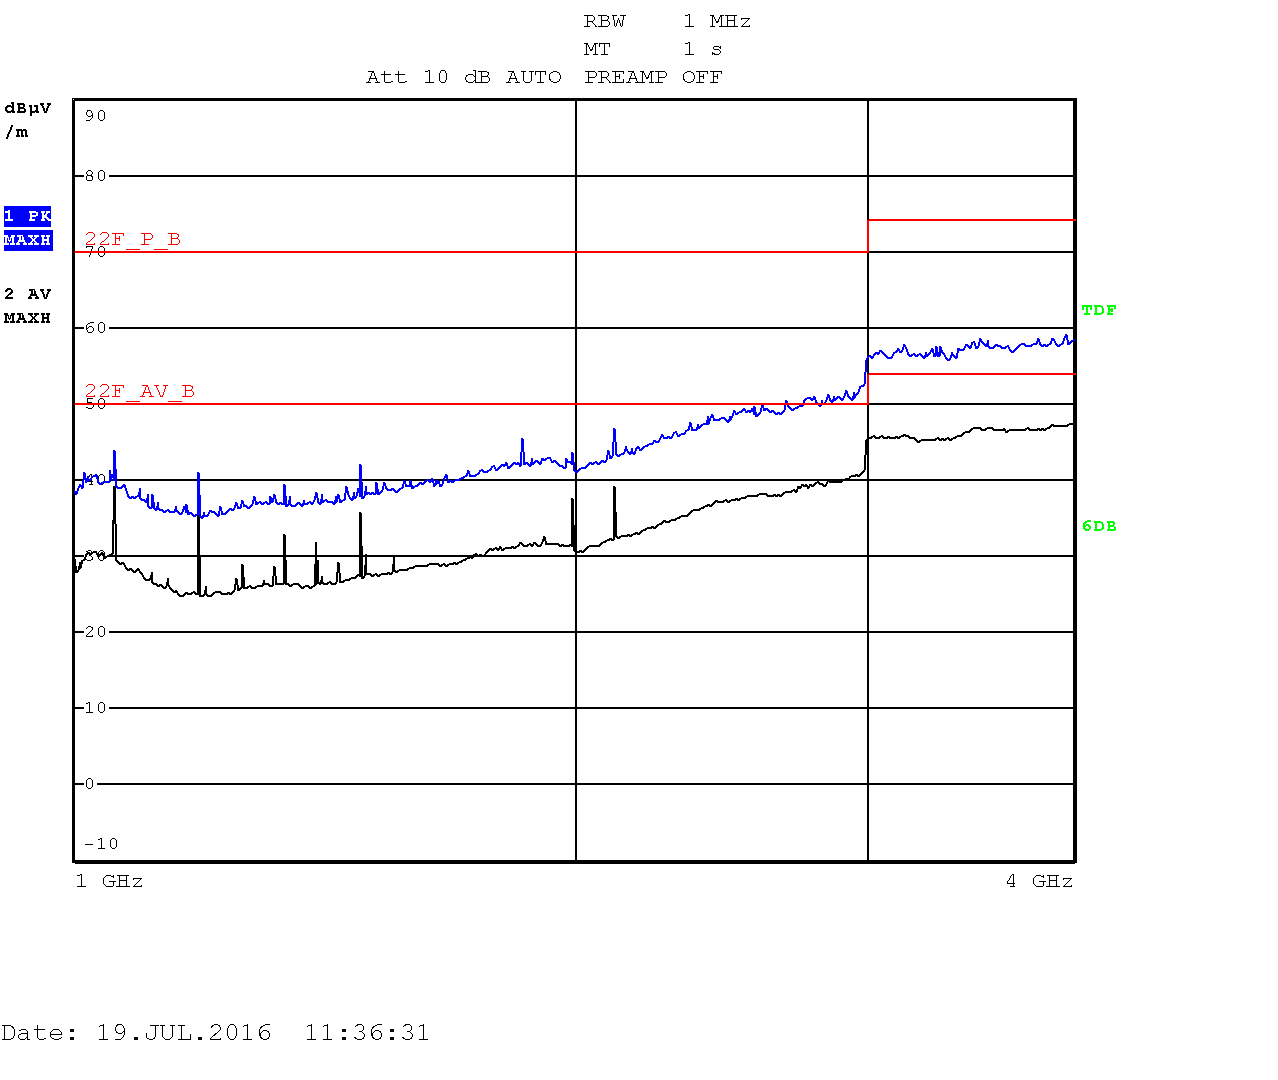
iMX6 TinyRex Max: 1GHZ - 4GHz
|
iMX6 TinyRex Max: 1GHZ - 4GHz
|
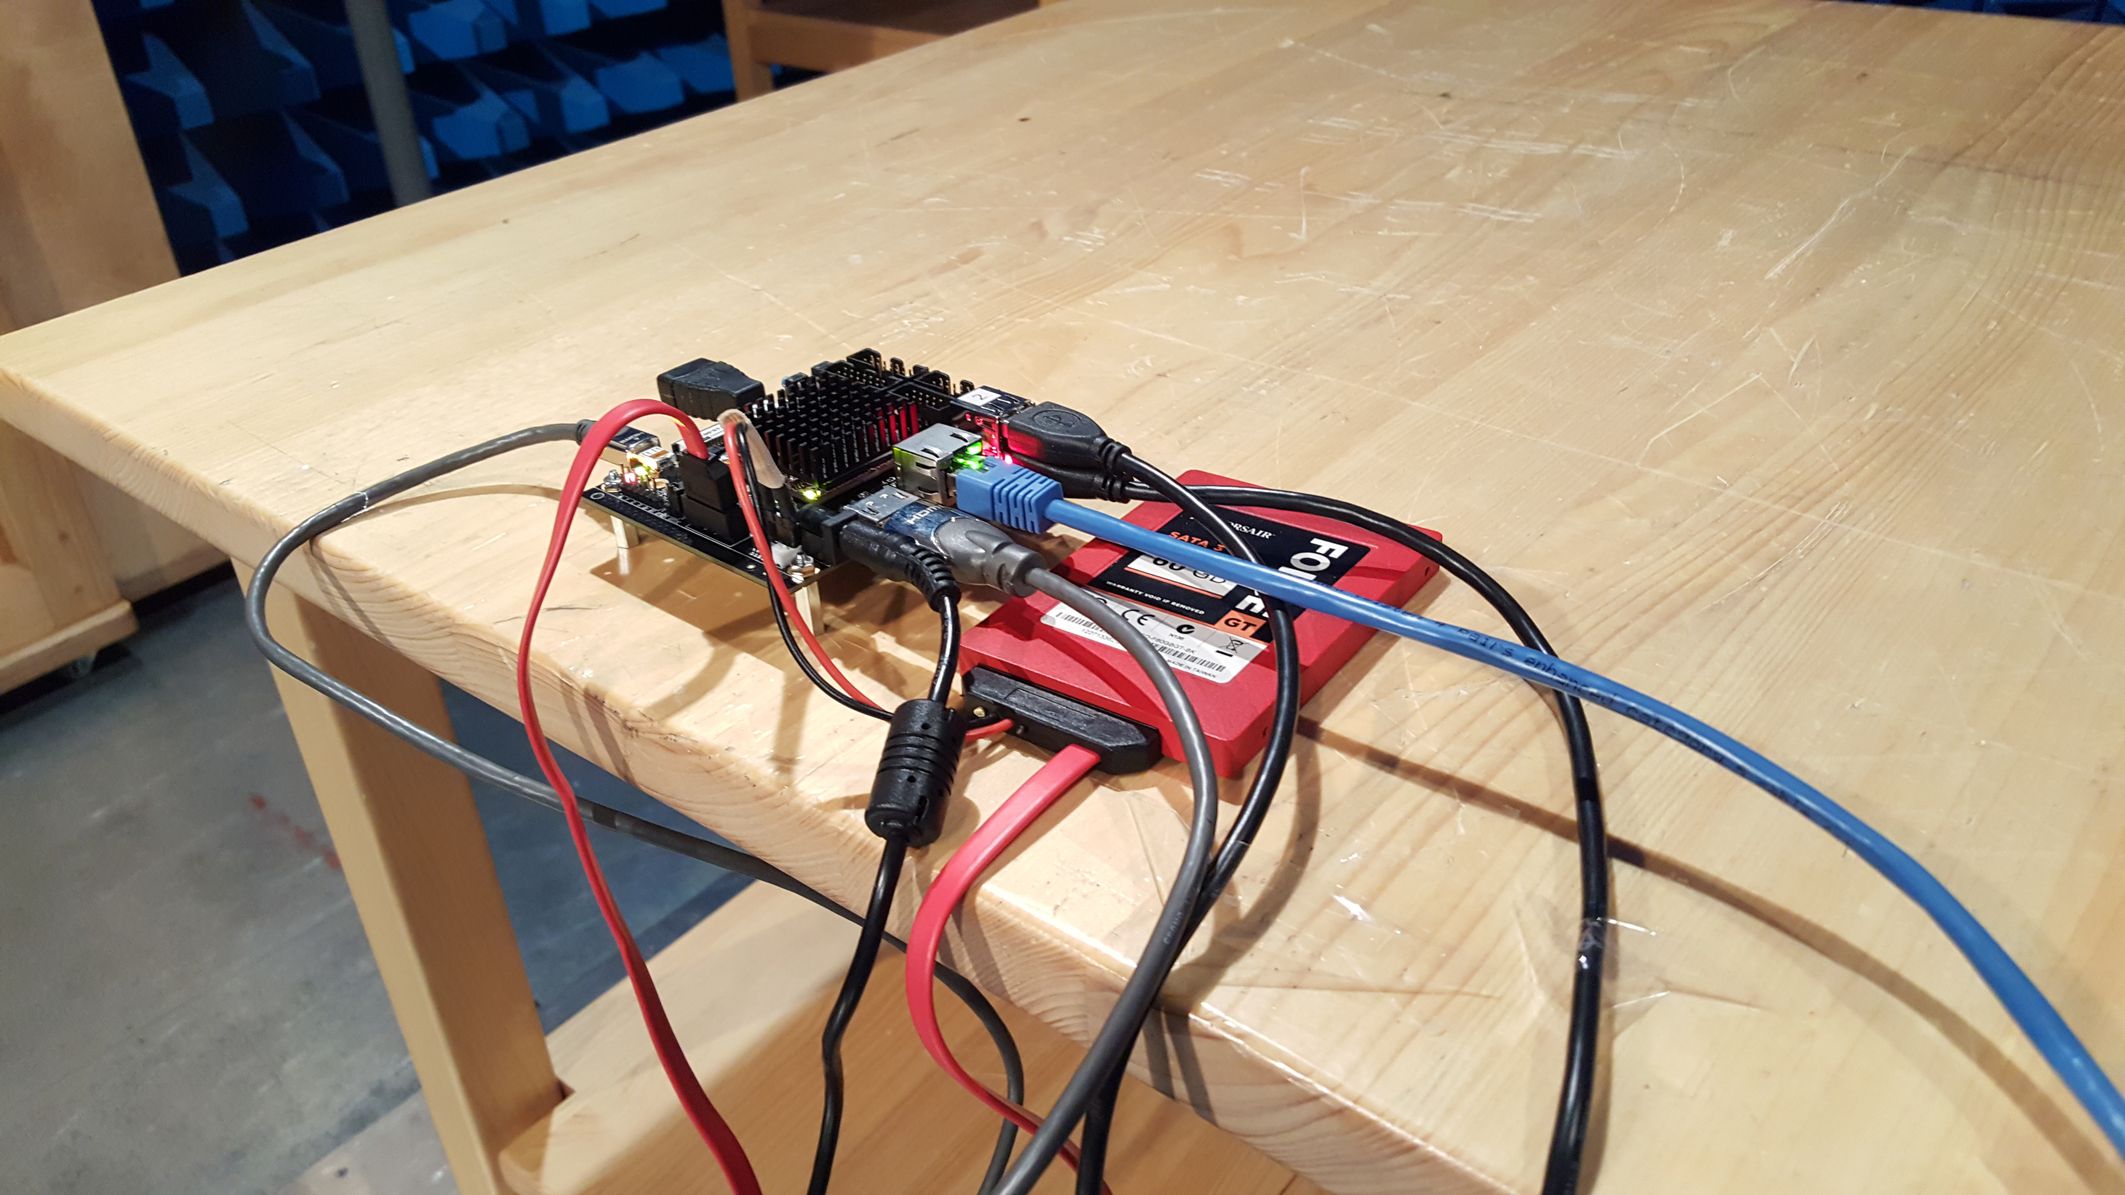
iMX6 TinyRex Max bare board with SATA hard drive
The setup passed through FCC CLASS B running: stressapptest for CPU and memory, Ethernet loopback, running heavy testing script for USB, SATA and SD card read/write test, Ethernet SSH session, HDMI input and output both tested with 720p video stream.This boards test also SATA interface by stress testing connected SATA drive. During this test HDMI loopback option was used.
| Vertical polarization | Horizontal polarization |
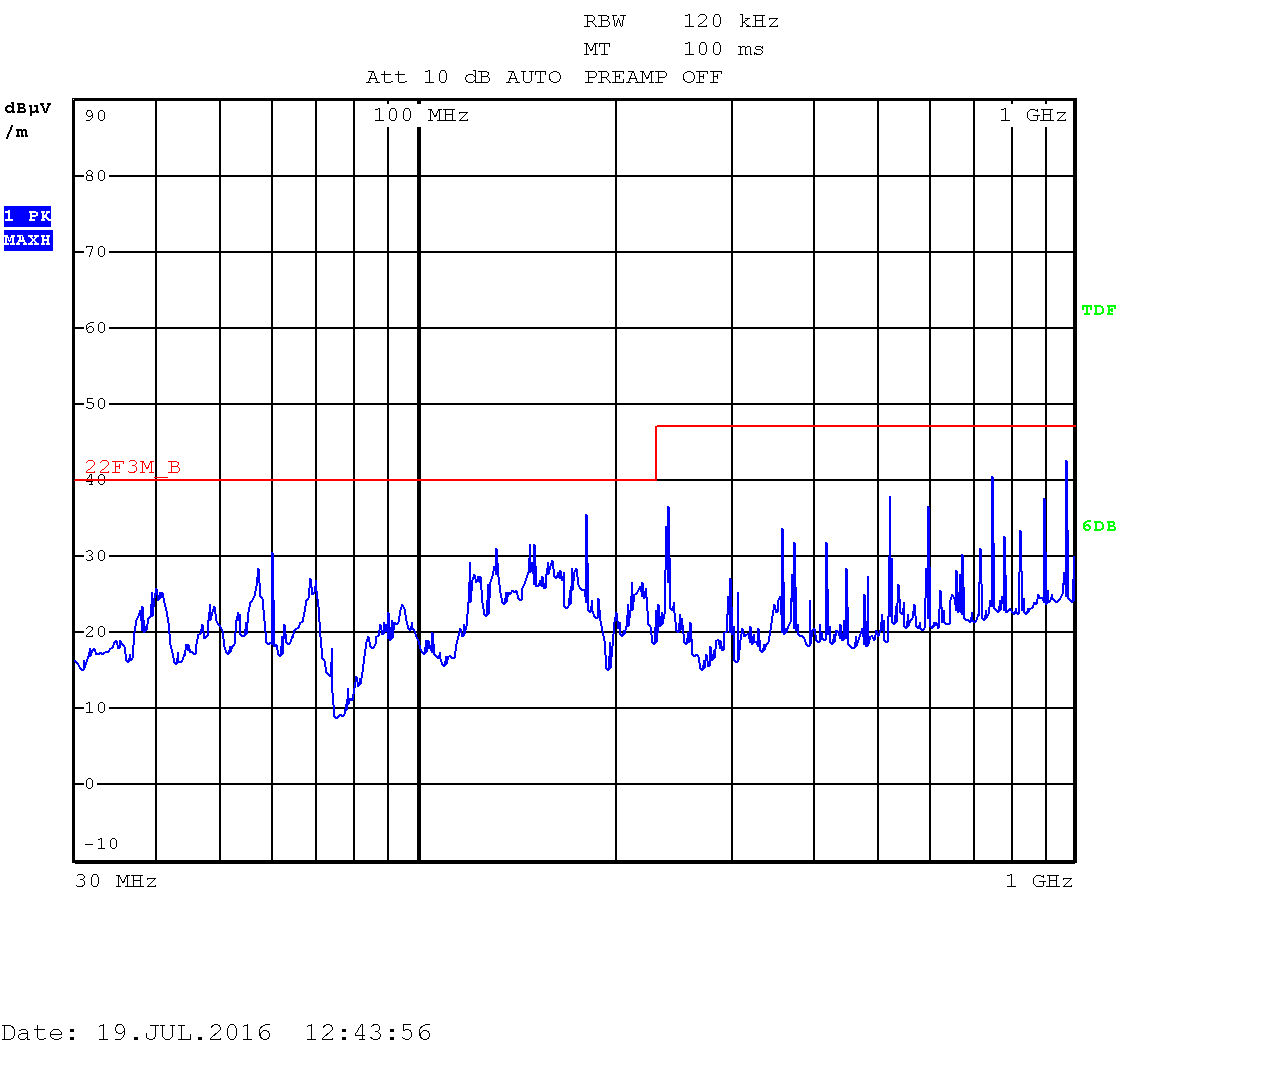
iMX6 TinyRex Max with SATA: 30kHZ - 1GHz
|
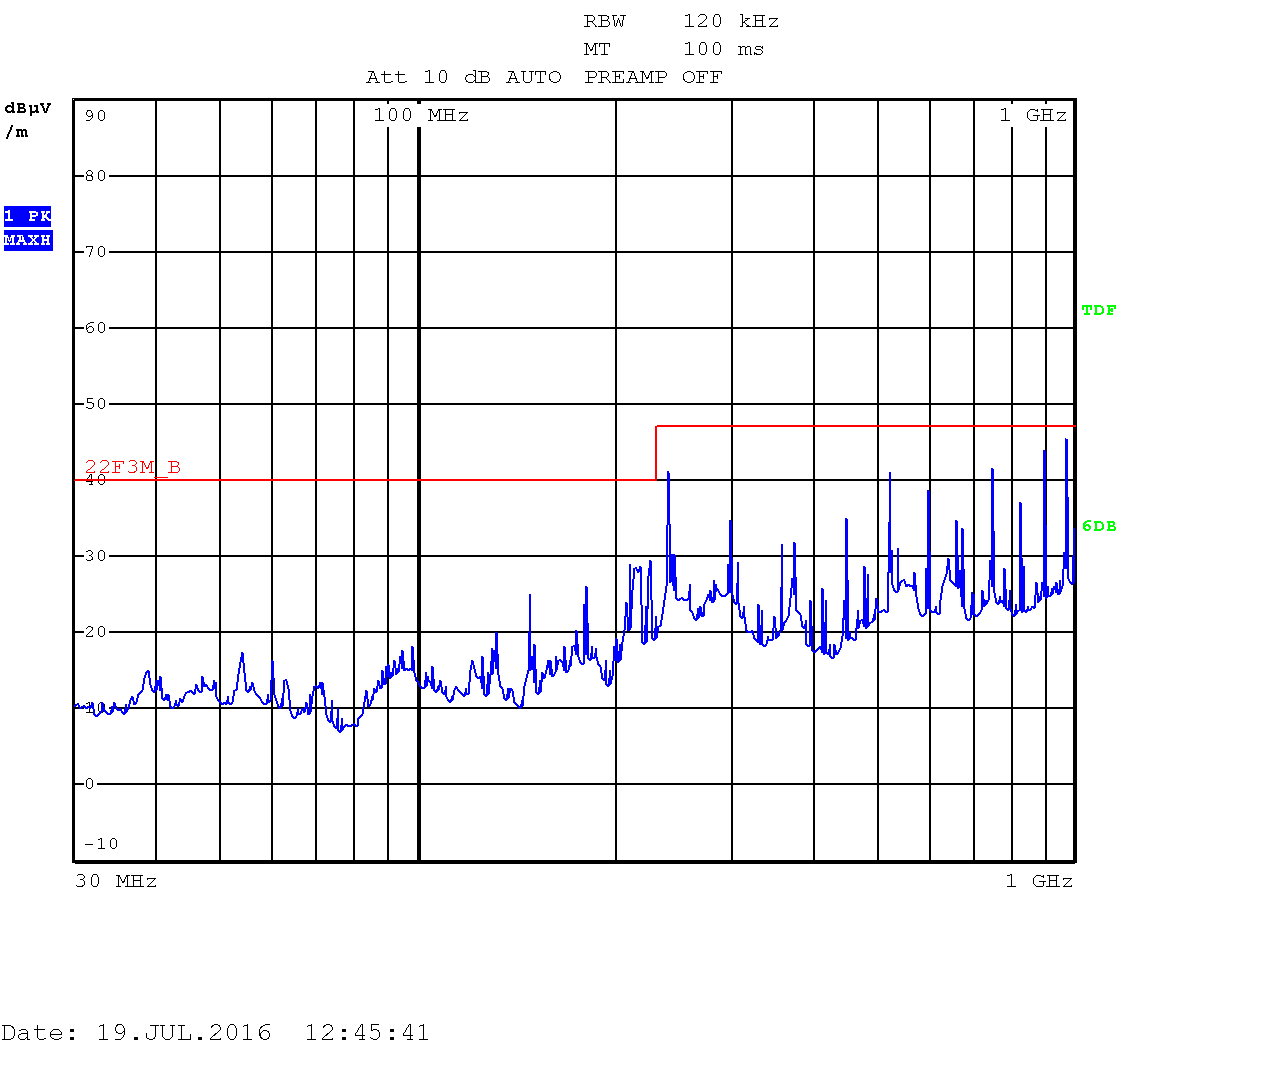
iMX6 TinyRex Max with SATA: 30kHZ - 1GHz
|
| Vertical polarization | Horizontal polarization |
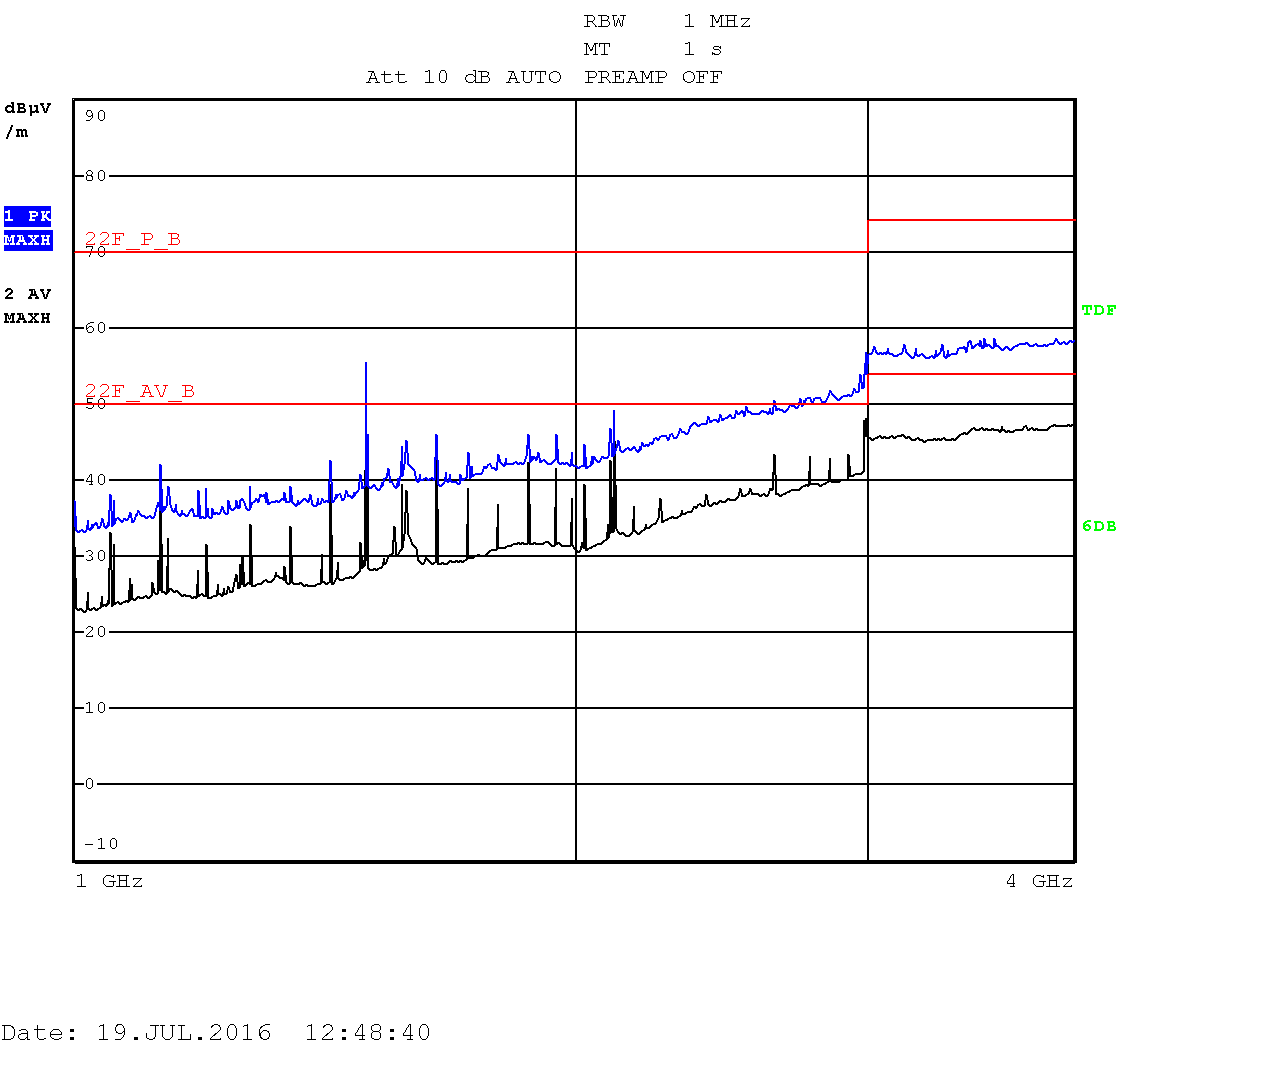
iMX6 TinyRex Max with SATA: 1GHZ - 4GHz
|
iMX6 TinyRex Max with SATA: 1GHZ - 4GHz
|
iMX6 TinyRex Pro with enclosure
The setup passed through FCC CLASS B running: stressapptest for CPU and memory, Ethernet loopback, running heavy testing script for USB and SD card read/write test, Ethernet SSH session, HDMI input and output both tested with 720p video stream.This boards used HDMI loopback and it was placed into a case box.
| Vertical polarization | Horizontal polarization |
iMX6 TinyRex Pro: 30kHZ - 1GHz
|
iMX6 TinyRex Pro: 30kHZ - 1GHz
|
| Vertical polarization | Horizontal polarization |
iMX6 TinyRex Pro: 1GHZ - 4GHz
|
iMX6 TinyRex Pro: 1GHZ - 4GHz
|
iMX6 TinyRex Basic with enclosure
The setup passed through FCC CLASS B running: stressapptest for CPU and memory, Ethernet loopback, running heavy testing script for USB and SD card read/write test, Ethernet SSH session, HDMI input and output both tested with 720p video stream.This boards used HDMI loopback connection and it was mounted into an enclosure.
| Vertical polarization | Horizontal polarization |

iMX6 TinyRex Basic: 30kHZ - 1GHz
|

iMX6 TinyRex Basic: 30kHZ - 1GHz
|
| Vertical polarization | Horizontal polarization |
iMX6 TinyRex Basic: 1GHZ - 4GHz
|
iMX6 TinyRex Basic: 1GHZ - 4GHz
|
Appendix
How to prepare the test
1. Boot device & SoftwareFor all board we used SD cards as a booting device. U-boot settings were used as default with no adjustments. The only change compared to standard software package was use of a multimedia filesystem. To prepare a fresh SD card we will use files from this repository. Here is an example for Max module SD card:
git clone https://github.com/voipac/imx6tinyrex_bin_linux
cd imx6tinyrex_bin_linux/
sudo ./fsl-sdcard-partition.sh -max /dev/mmcblk0
2. Download stressapptest package
We prepared a preistalled file of stressapptest which we used during the testing. Place this file into the same directory, where you will store testing script:
wget http://www.imx6rex.com/download/software/imx6_tinyrex_module_&_baseboard_lite/others/stressapptest3. Start DHCP server
We will set up the board and start the tests mainly through SSH session. Thus it is very useful to have same IP address all the time. The easiest way to do so is to run DHCP server on your controlling laptop.
4. Check if screen command is installed
By default when we unplug Ethernet cable connected to PC, all the processes started within SSH sessions will be terminated. To avoid this behavior we will use screen package. This command keeps tasks running even if cable is unplugged (and Ethernet loopback is plugged right away). Be sure your filesystem includes this command.
5. Run the script
Plug the board into mains and connect to it with SSH session. Now use command screen:
screen -S openrexNavigate to the directory where testing script is located and call it with these parameters:
- first parameter - version of tested board (-max, -pro or -basic)
- second parameter - selects if and how SATA interface will be tested (only copy: -sata_cp, stresstest: -sata_stress)
- third parameter - USB stick 1 location
- fourth parameter - USB stick 2 location
- fifth parameter - SD card location
- sixth parameter (if connected) - SATA drive location
- iMX6 TinyRex Max with SATA stresstesting:
./tinyrex-emc-test.sh -max -sata_stress sdb1 sdc1 mmcblk2p2 sda2 | tee -i trx-emc-testing.log
- iMX6 TinyRex Pro with SATA copying file from/to USB stick:
./tinyrex-emc-test.sh -pro -sata_cp sdb1 sdc1 mmcblk2p2 sda2 | tee -i trx-emc-testing.log
- iMX6 TinyRex basic:
./tinyrex-emc-test.sh -basic -n sda1 sdb1 mmcblk2p2 | tee -i trx-emc-testing.log
#!/bin/sh

# TinyRex EMC testing script

mountDevice() {
  mount /dev/$1 /media/$2
  cat /etc/mtab | grep -F "/dev/$1 /media/$2"
  if [ "$?" -eq "0" ]; then
    echo "$2 mounted"
  else
    echo "$2 not mounted"; exit 2
  fi
}
# prepare files
cd ~
mkdir -p emc-testing/
cd emc-testing/
touch trx-emc-testing.log

echo '\033[9;0]' > /dev/tty1 # disable blanking the display

tinybasic=0
tinypro=0
tinymax=0
case $1 in
  -basic)  tinybasic=1 ;;
  -pro)  tinypro=1 ;;
  -max)  tinymax=1 ;;
  *)
esac

imx6_sata_cp=0
imx6_sata_stress=0
case $2 in
  -sata_cp) imx6_sata_cp=1 ;;
  -sata_stress) imx6_sata_stress=1 ;;
  *)
esac

# mount devices
mountDevice $3 usb0
mountDevice $4 usb1
mountDevice $5 mmc0
if [ "${imx6_sata_cp}" -eq "1" ] || [ "${imx6_sata_stress}" -eq "1" ]; then
  mountDevice $5 sata
fi

updateLogFiles() {
  currentTime=`date +%Y-%m-%d.%H_%M`
  mv trx-emc-testing.log trx-emc-testing.log.$currentTime
}

finish_test_now() {
  echo "$(date +\%Y/\%m/\%d-\%T)($(date +\%Z)) Ctrl+C Detected: End of the test"
  precced=0;
  #kill -INT $vid_pid $str_pid $ping_pid;
  sleep 3;
  test_status=`cat trx-emc-testing.log | grep -i "error" | grep -v -e "0 errors" -e "no corrected errors"`
  if [ -z "$test_status" ]
  then
  echo "$(date +\%Y/\%m/\%d-\%T)($(date +\%Z)) PASS - Script ended without detected errors."
  else
  cat trx-emc-testing.log | grep -i "error" | grep -v -e "0 errors" -e "no corrected errors" -e "List of detected errors:"
  fi
  updateLogFiles
  exit;
}

# kill all processes if Ctrl+C is detected
trap finish_test_now 2

# connect ethernet loopback and force the ethernet to 100Mbit
ethtool -s eth0 speed 100 autoneg off

# play a video stream from HDMI input - testing also HDMI output
gst-launch -q imxv4l2src ! autovideosink &

# stressapptest - one thread CPU, one thread memory
if [ "${tinybasic}" -eq "1" ]; then
  ./stressapptest -s 600000 -M 100 -m 1 -C 1 --printsec 10 &
  str_pid=$!
fi
if [ "${tinypro}" -eq "1" ] && [ "${imx6_sata_stress}" -eq "1" ]; then
  ./stressapptest -s 600000 -M 200 -m 1 -C 1 --printsec 10 &
  str_pid=$!
else
  ./stressapptest -f /media/sata/tmp-file1 -s 600000 -M 200 -m 1 -C 1 --printsec 10 &
  str_pid=$!
fi
if [ "${tinymax}" -eq "1" ] && [ "${imx6_sata_stress}" -eq "1" ]; then
  ./stressapptest -f /media/sata/tmp-file1 -s 600000 -M 500 -m 1 -C 1 --printsec 10 &
  str_pid=$!
else
  ./stressapptest -s 600000 -M 500 -m 1 -C 1 --printsec 10 &
  str_pid=$!
fi

echo "$(date +\%Y/\%m/\%d-\%T)($(date +\%Z)) Starting stressapptest with PID: " $str_pid

ping 192.168.0.160 &
ping_pid=$!
echo "$(date +\%Y/\%m/\%d-\%T)($(date +\%Z)) Starting ping: " $ping_pid

proceed=1
file1="blackbird.wav"
file2="blackbird2.wav"

cp1_from="/media/mmc0/"
cp1_to="/media/usb0/"

if [ "${imx6_sata_cp}" -eq "1" ] || [ "${imx6_sata_stress}" -eq "1" ]; then
  cp2_from="/media/sata/"
  cp2_to="/media/usb1/"
else
  cp2_from="/media/mmc0/"
  cp2_to="/media/usb1/"
fi

#copy files in case they are missing
cp /media/$file1 $cp1_from$file1
cp /media/$file1 $cp1_to$file1
cp /media/$file2 $cp2_from$file2
cp /media/$file2 $cp2_to$file2

while [ $proceed -eq 1 ]
do

  cp1_done=`ps | grep $cp1_pid | grep cp`
  if [ -z "$cp1_done" ]; then # copy finished
    if cmp -s $cp1_from$file1 $cp1_to$file1; then
      echo "$(date +\%Y/\%m/\%d-\%T)($(date +\%Z)) PASS: Copying file from $cp1_from to $cp1_to successful"
    else
      echo "$(date +\%Y/\%m/\%d-\%T)($(date +\%Z)) ERROR: Difference between files on $cp1_from and $cp1_to detected"
    fi
    cp1_temp=$cp1_from # swap destinations
    cp1_from=$cp1_to
    cp1_to=$cp1_temp

    rm $cp1_to$file1 # remove destination file

    cp $cp1_from$file1 $cp1_to$file1 &
    cp1_pid=$!
    echo "$(date +\%Y/\%m/\%d-\%T)($(date +\%Z)) Started copying file from $cp1_from to $cp1_to"
  fi

  cp2_done=`ps | grep $cp2_pid | grep cp`
  if [ -z "$cp2_done" ]; then # copy finished
    if cmp -s $cp2_from$file2 $cp2_to$file2; then
      echo "$(date +\%Y/\%m/\%d-\%T)($(date +\%Z)) PASS: Copying file from $cp2_from to $cp2_to successful"
    else
      echo "$(date +\%Y/\%m/\%d-\%T)($(date +\%Z)) ERROR: Difference between files on $cp2_from and $cp2_to detected"
    fi
    cp2_temp=$cp2_from # swap destinations
    cp2_from=$cp2_to
    cp2_to=$cp2_temp

    rm $cp2_to$file2 # remove destination file

    cp $cp2_from$file2 $cp2_to$file2 &
    cp2_pid=$!
    echo "$(date +\%Y/\%m/\%d-\%T)($(date +\%Z)) Started copying file from $cp2_from to $cp2_to"
  fi

done