
Content
- Hardware configuration
- Test description
- Test results - OpenRex Quad
- Test results - OpenRex Solo
- How to prepare the test
- Test script
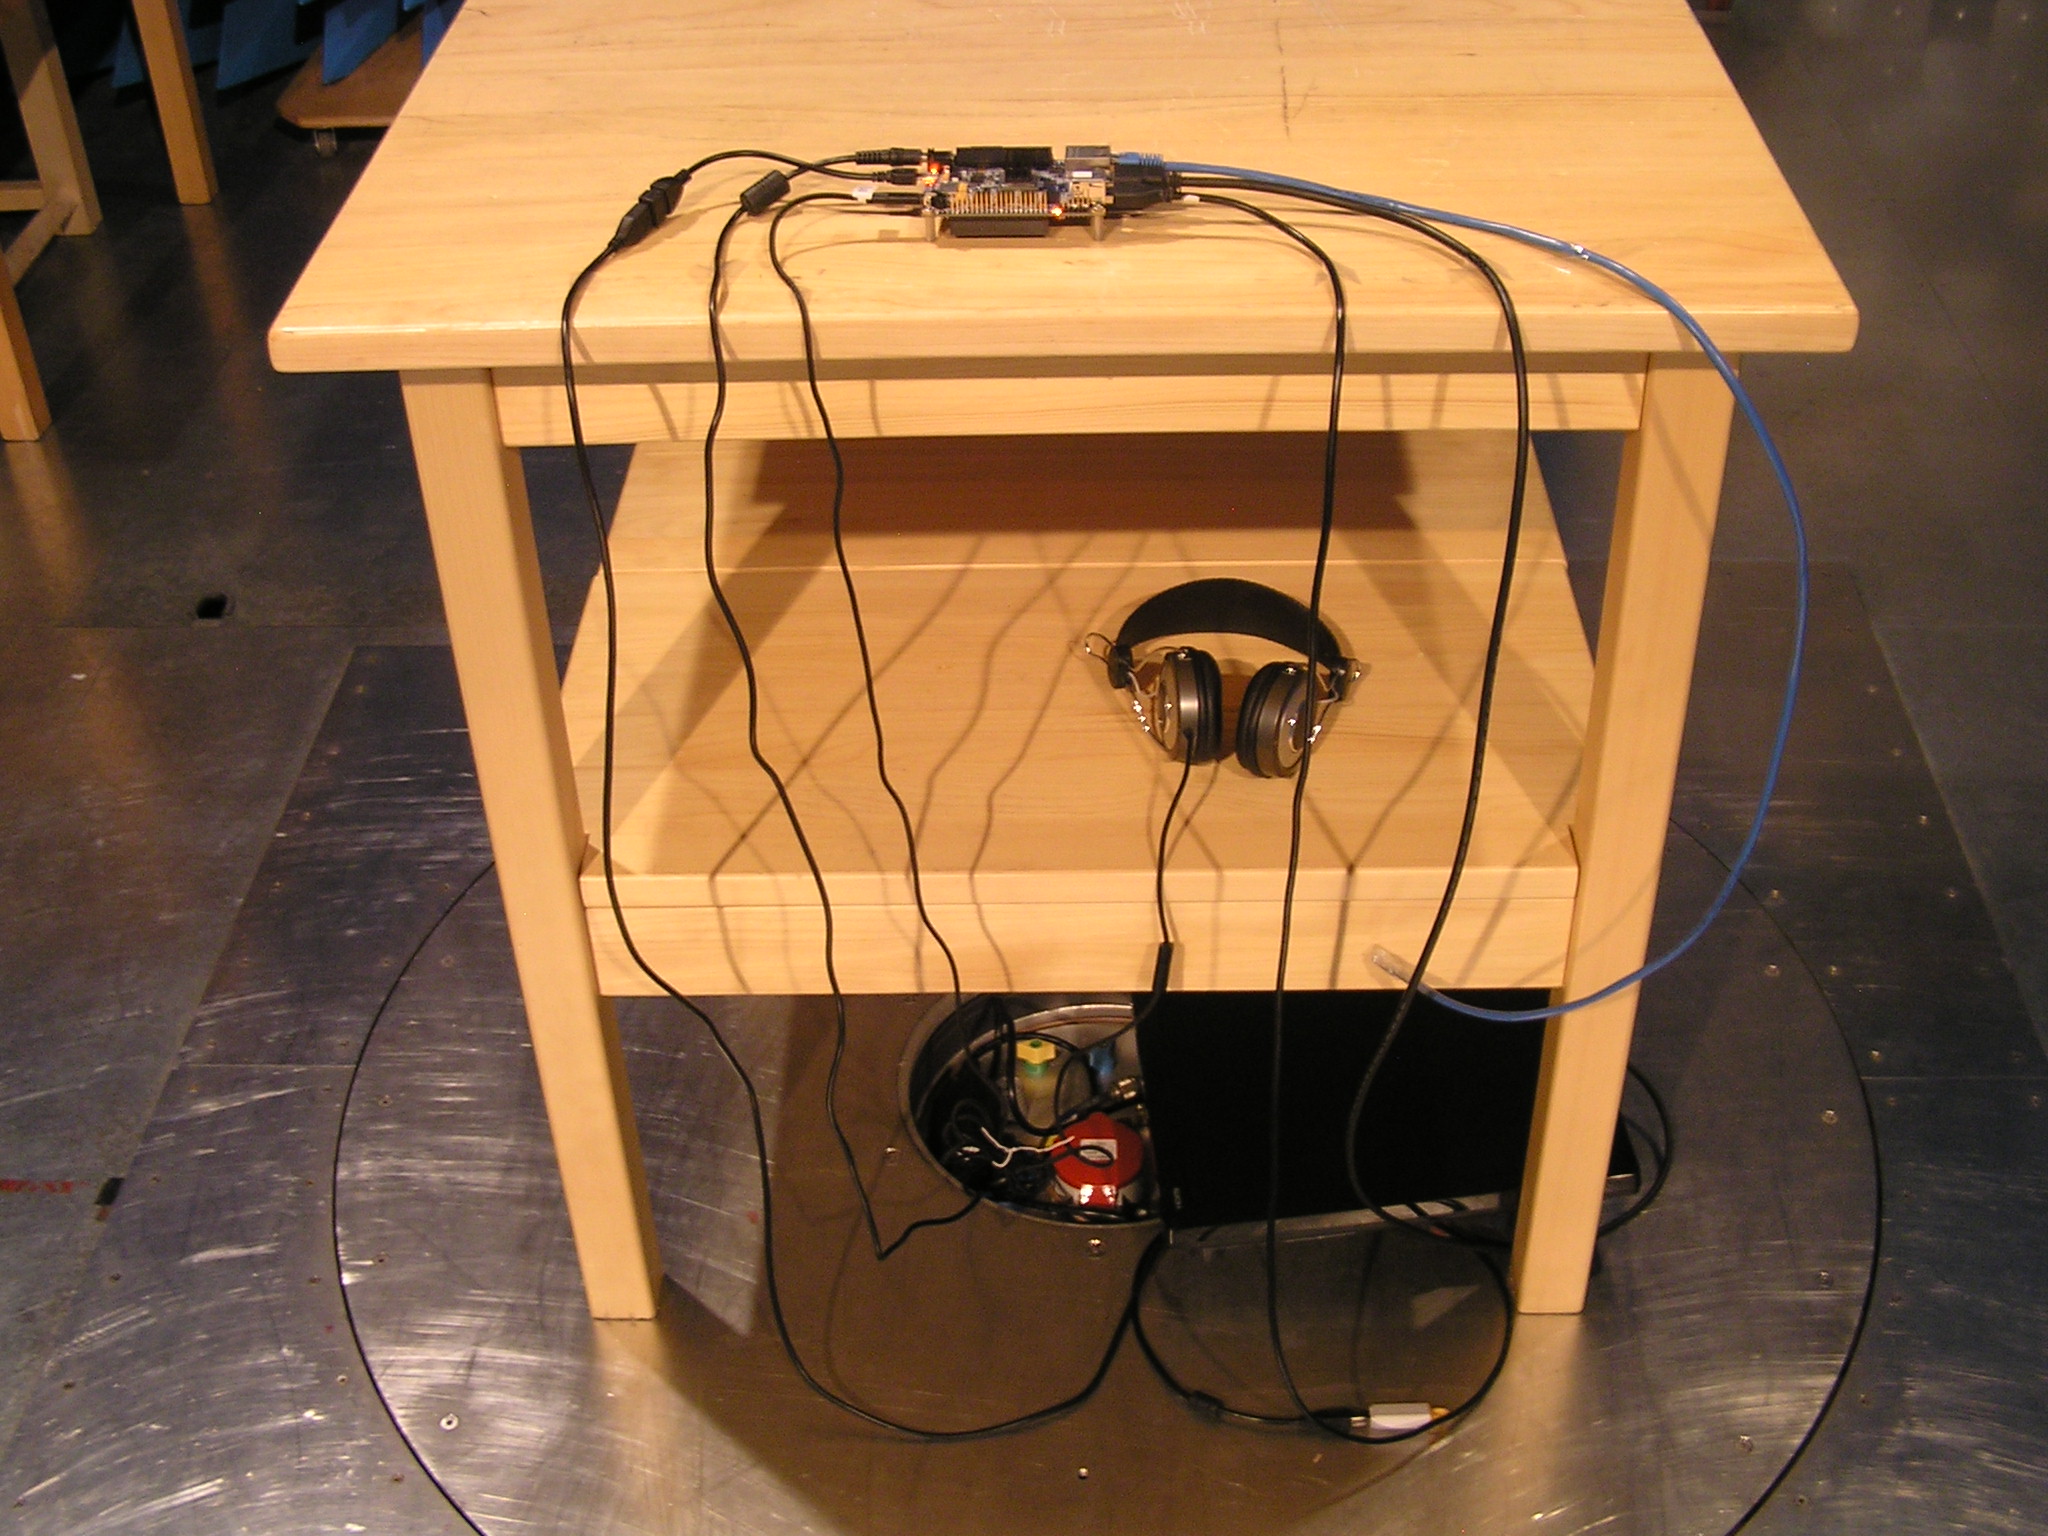
Hardware configuration
 Connected cables and devices
- Power jack: we used this +5V power adapter (you can buy it from Voipac with the OpenRex, or buy it here. The original datasheet can be found here)
- SD card (Sandisk) preloaded with Filesystem, used for booting and for read/write test
- 1m CAT-5E Ethernet: loopback cable connected. Forced to 100Mb and used for ping test or to control the board via SSH session.
- HDMI monitor: connected through 1.8m HDMI cable, but monitor is turned off.
- 2x USB memory stick: each USB memory stick is connected through a 2m long USB extension cable. Both USB memory sticks are used during the read/write test.
- USB micro to USB adapter: USB micro connector is set as a host and it is used during USB memory stick read/write test
- Wifi PCIE mini card: inserted, but not actively used. No antennas connected.
- Debug cable: FTDI TTL-3V3 UART to USB cable, used only to setup the board, not used and not plugged in during the measurements
- Headphones & Microphone: headphones with microphone connected to the 4-pole audio jack
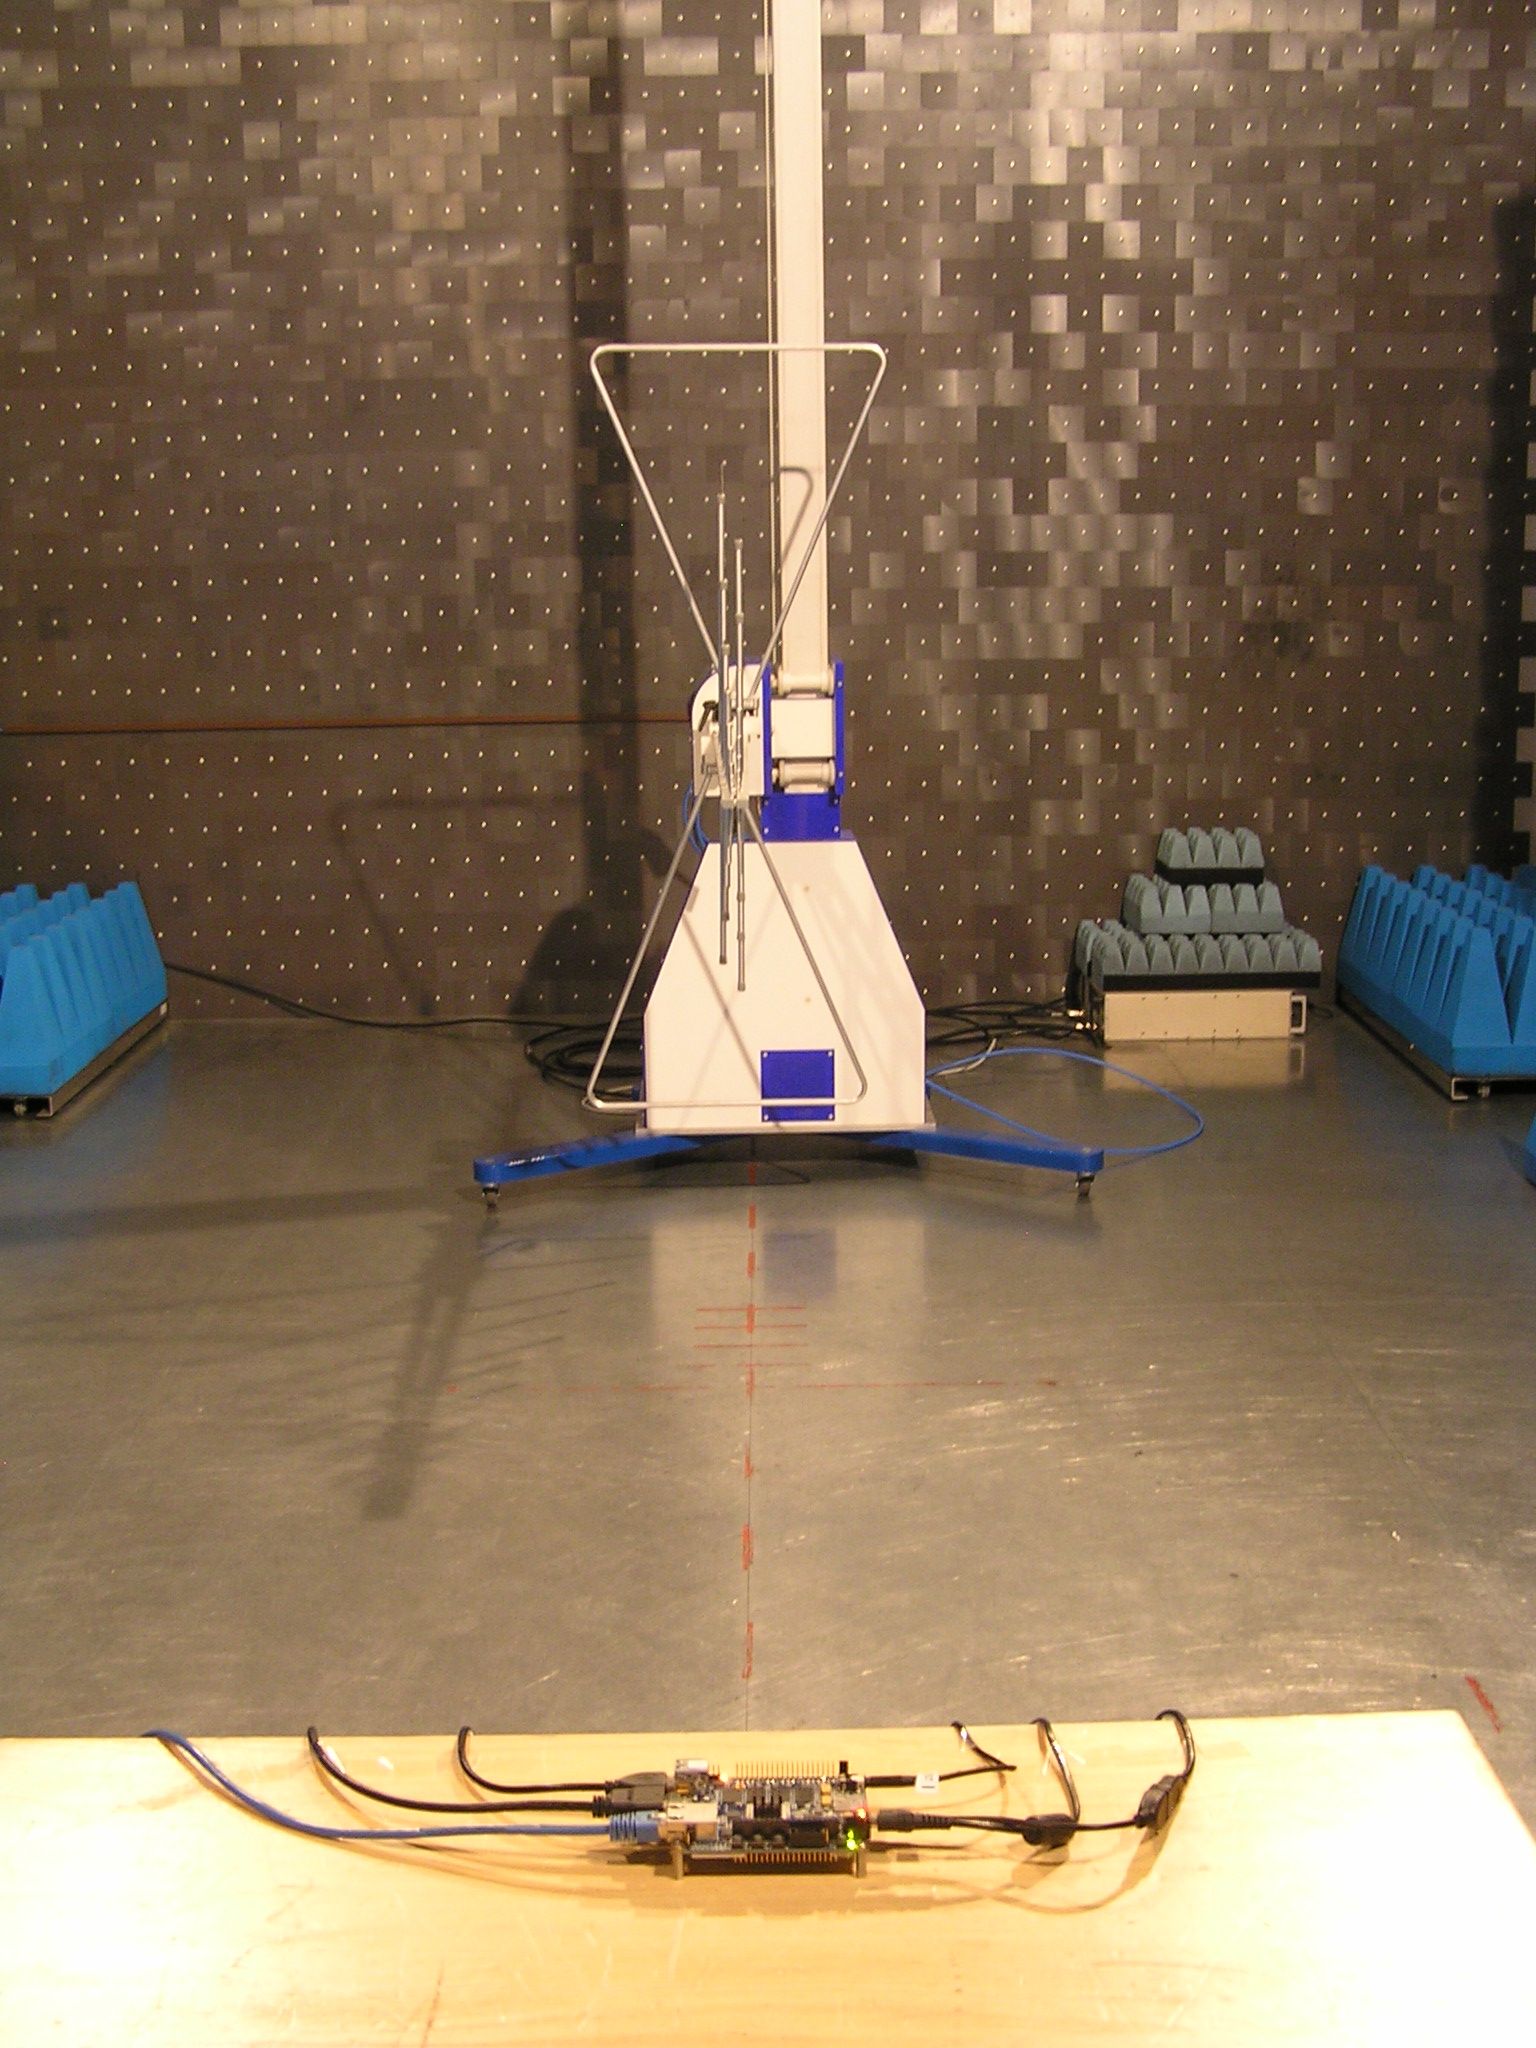
Test description
The goal of this test was to check Radiated emission of OpenRex board while running at very high load. What was running:- CPU stress test
- Memory stress test
- Playing a video file
- Playing an audio file
- SD card test (SD card read & write stress test)
- 2x USB test (USB memory stick read & write stress test)
- Ethernet ping
- Microcontroller running with LED blinking program
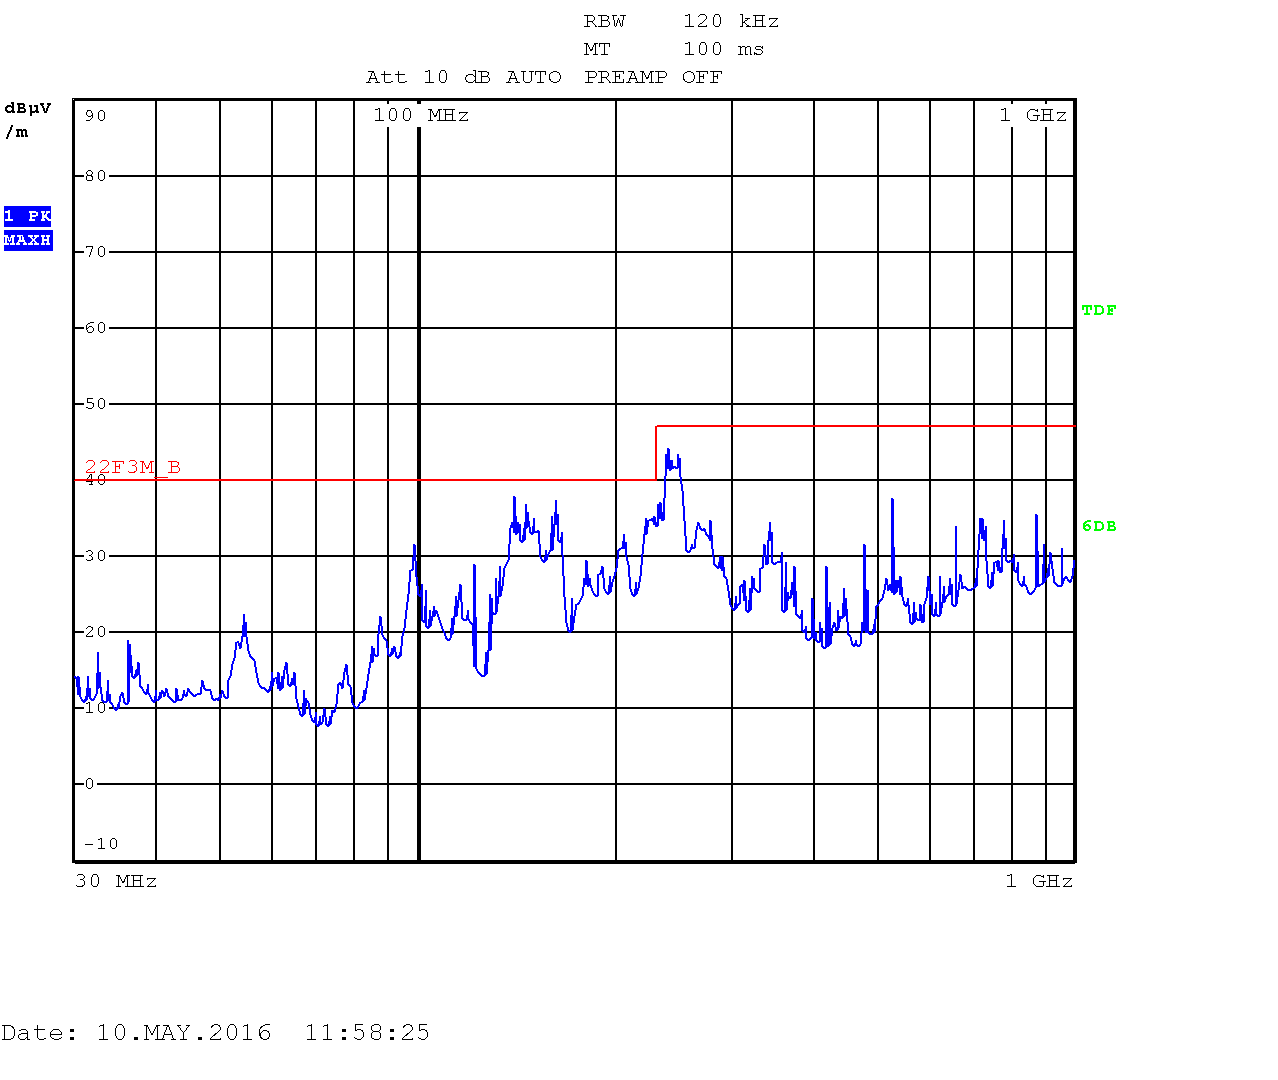
Results
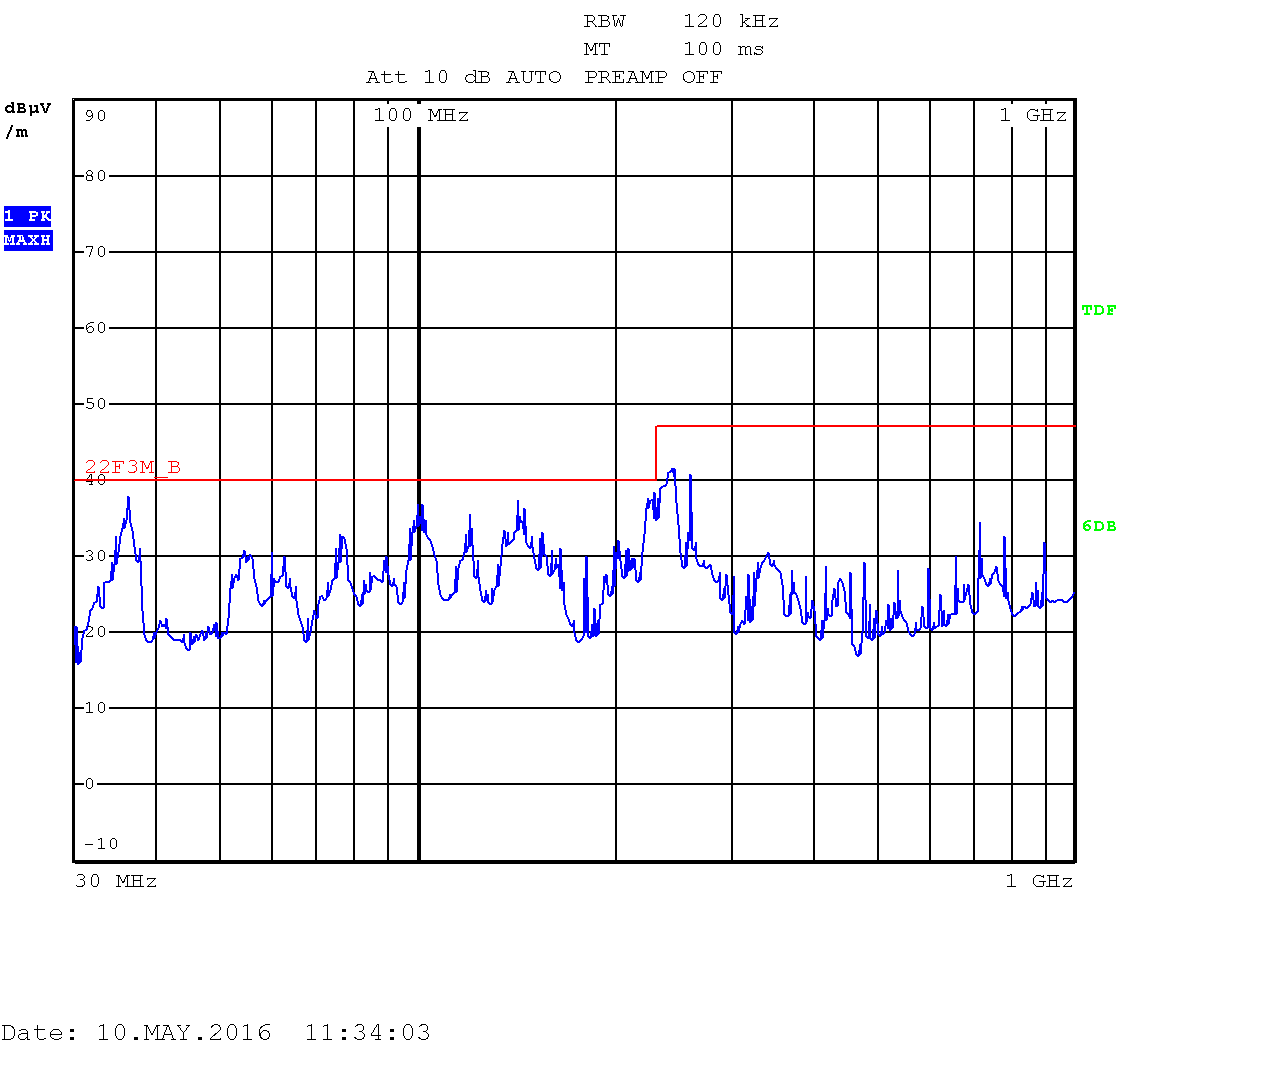
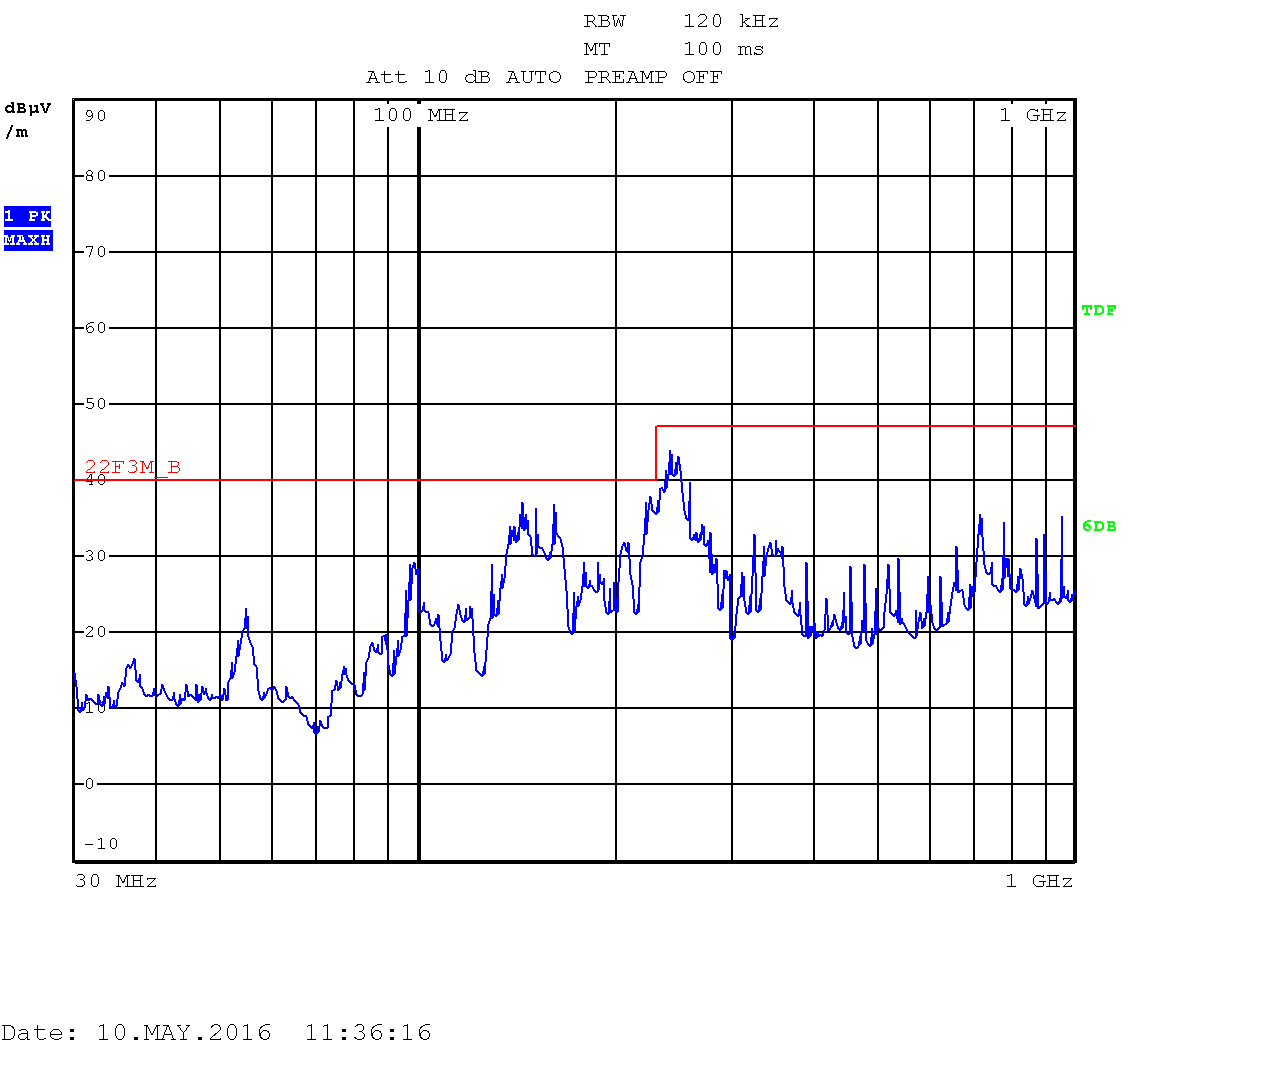
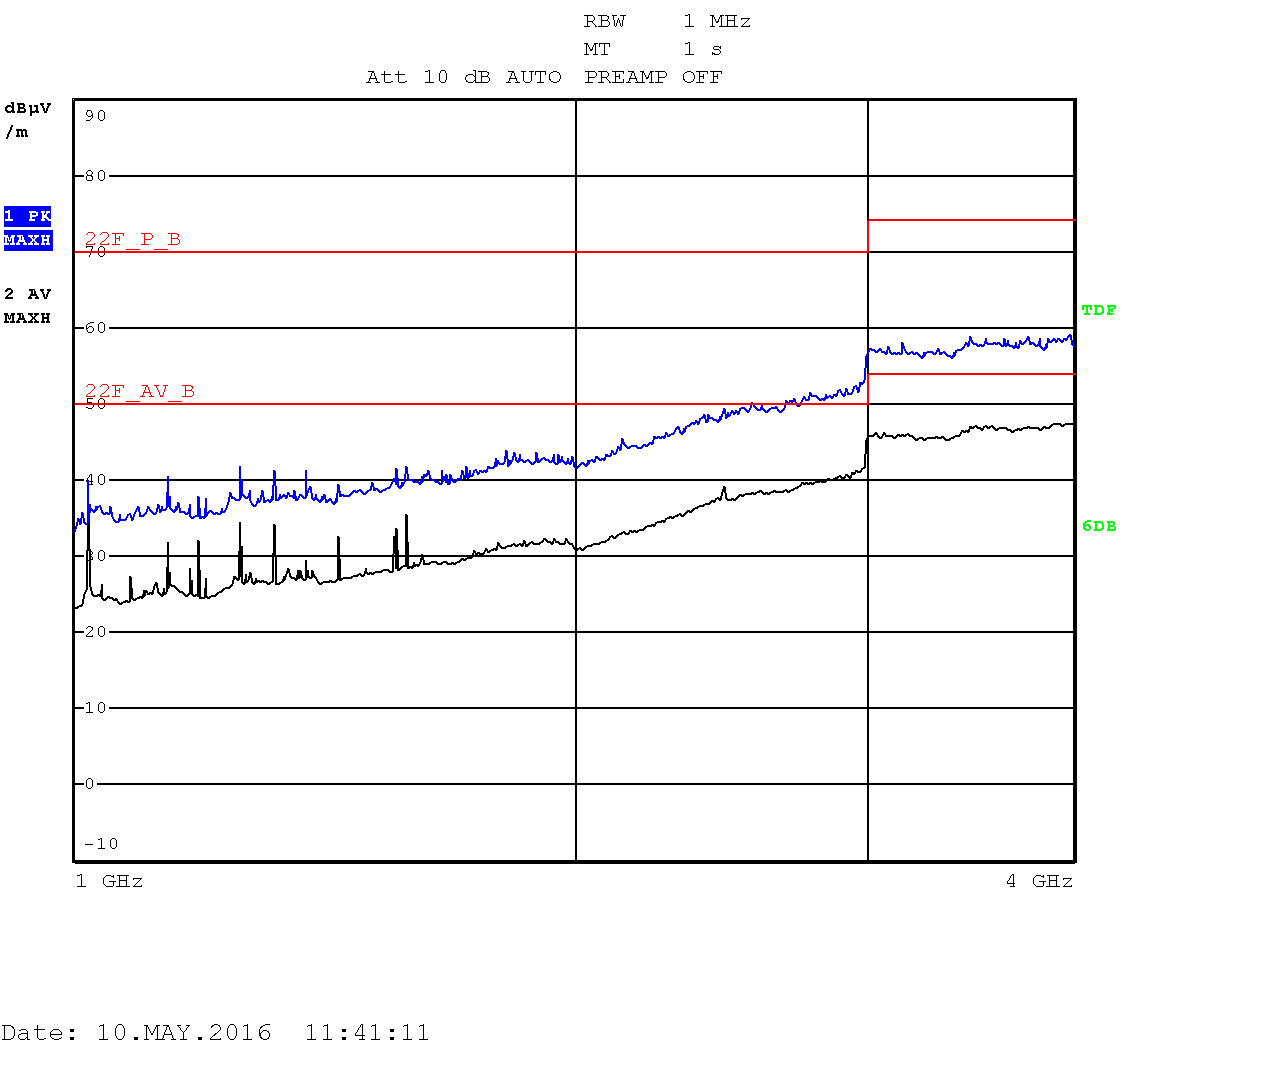
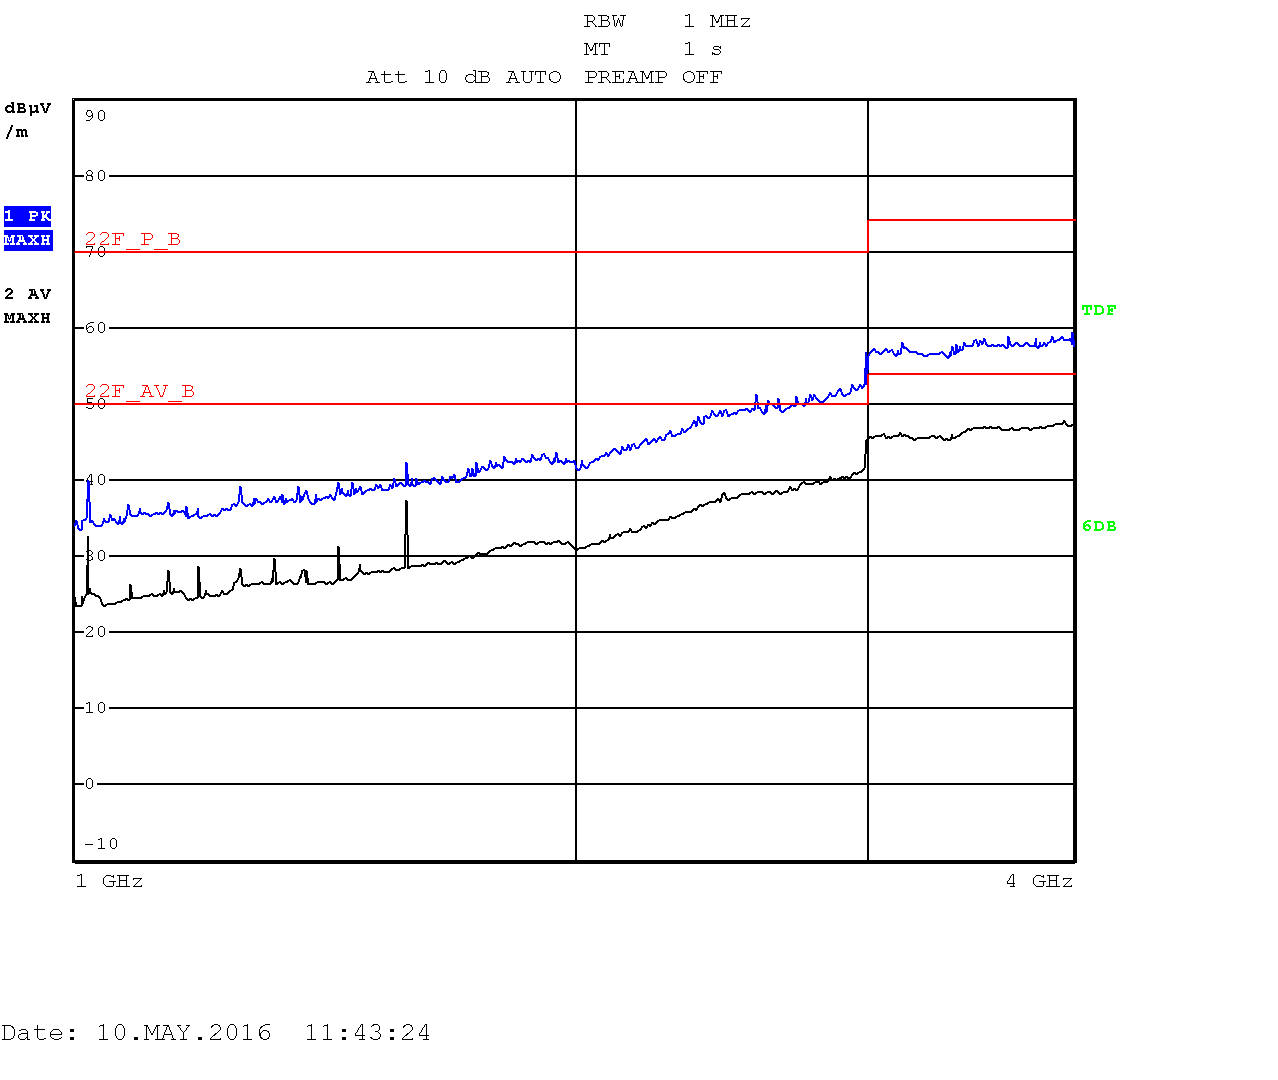
The board, without any enclosure, can easily pass FCC Class B regulations (residential environment limits).The measurements are displayed as quasi-peak value by default. For the higher band (above 1GHz) there are two plots displaying the power density. The blue curve represents the quasi-peak value. The higher limit (22F_P_B) is used for this type of measurement. The lower limit (22F_AV_B) is devoted to average-power measurement (shown with the black curve).
Radiated emissions - OpenRex Quad
| Vertical polarization | Horizontal polarization |
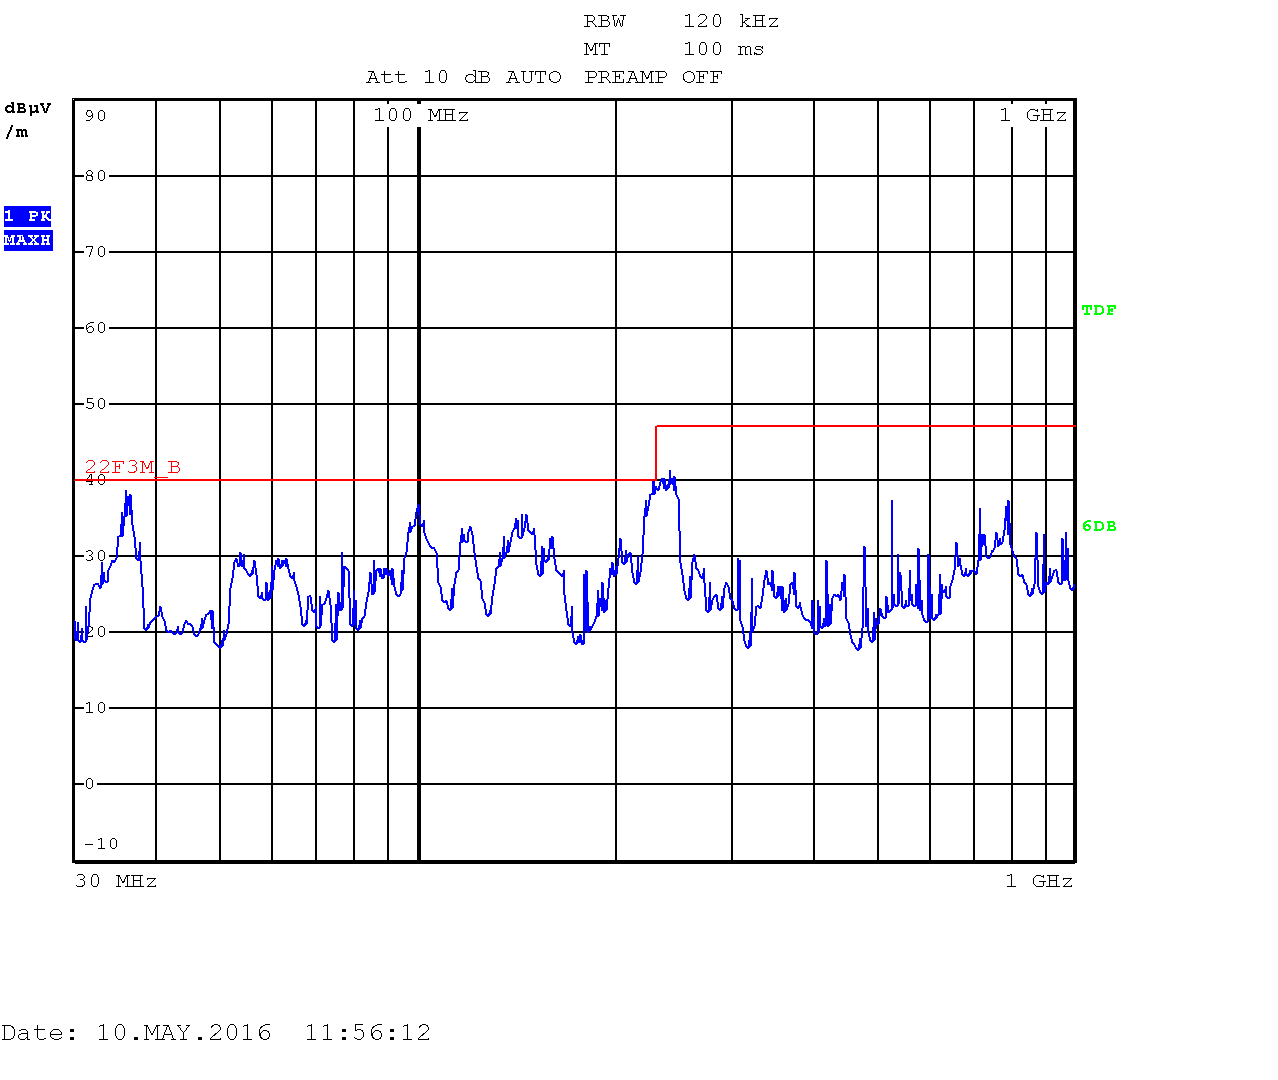
Heavy testing Quad: 30kHZ - 1GHz
|
Heavy testing Quad: 30kHZ - 1GHz
|
| Vertical polarization | Horizontal polarization |
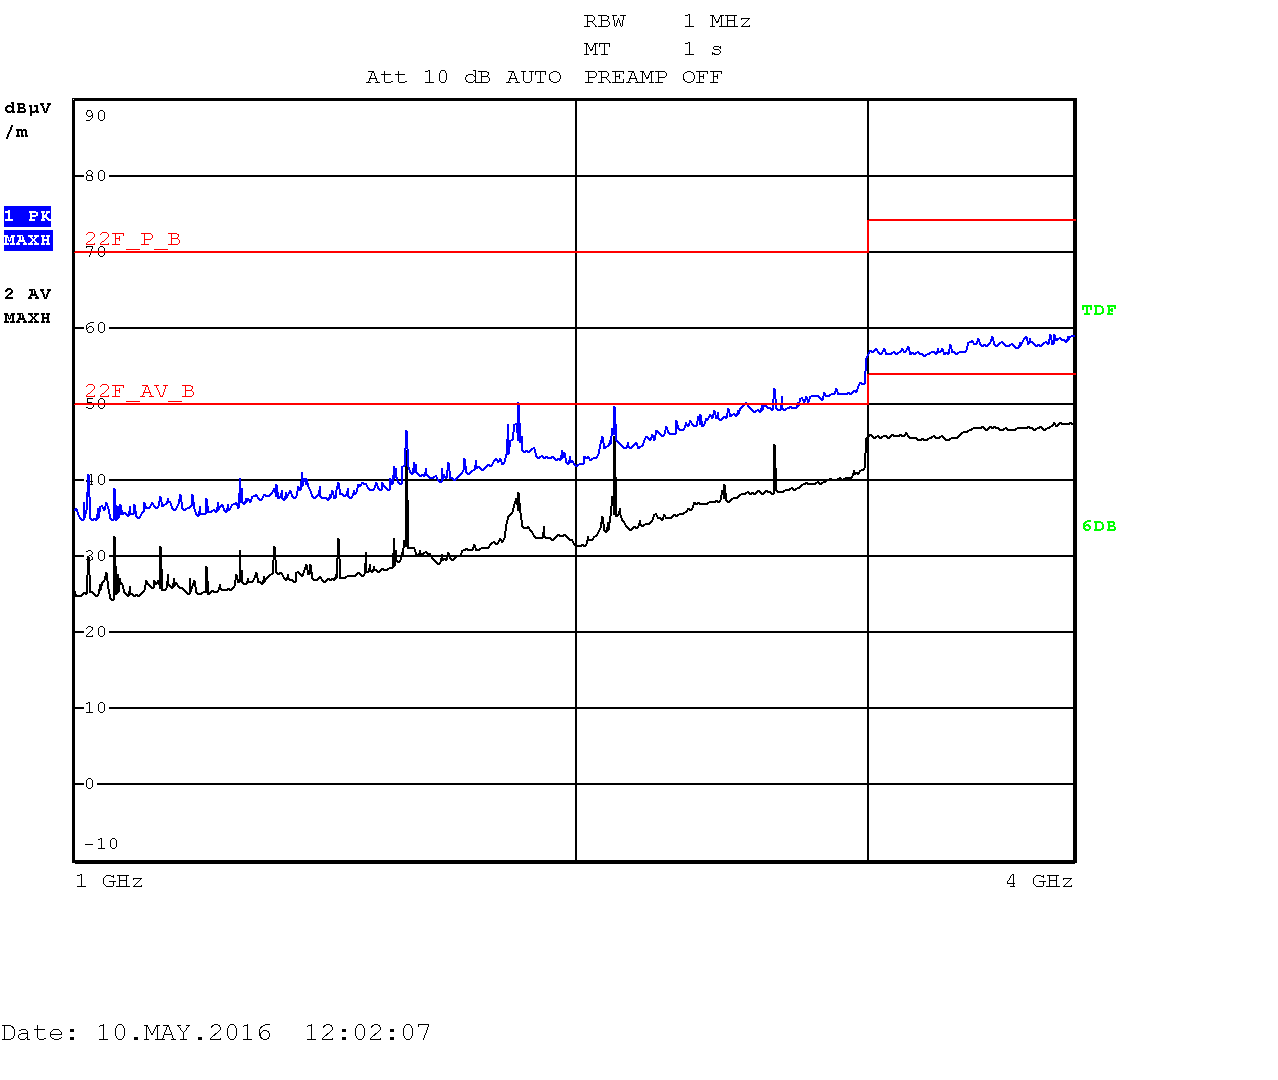
Heavy testing Quad: 1GHZ - 4GHz
|
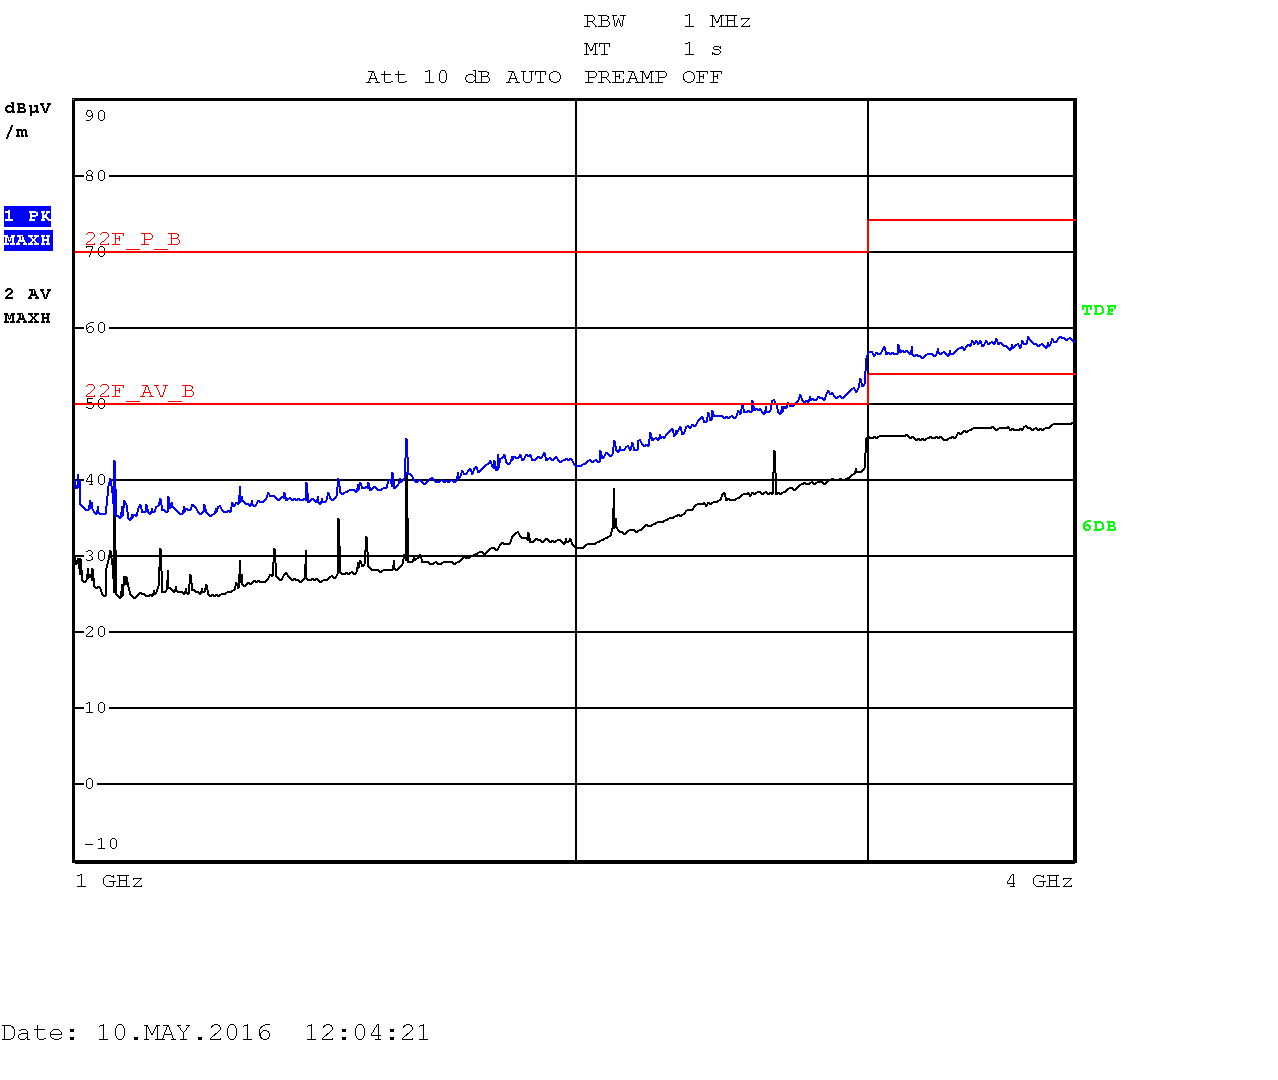
Heavy testing Quad: 1GHZ - 4GHz
|
Radiated emissions - OpenRex Solo
| Vertical polarization | Horizontal polarization |
Heavy testing Solo: 30kHZ - 1GHz
|
Heavy testing Solo: 30kHZ - 1GHz
|
| Vertical polarization | Horizontal polarization |
Heavy testing Solo: 1GHZ - 4GHz
|
Heavy testing Solo: 1GHZ - 4GHz
|
Appendix
How to prepare the test
1. Create a fresh SD cardFollow the process described in How to start with Software page. At the end you should have a SD card which is almost ready to be used for the testing.
Note: When you will be creating SD card for Solo board, do not forget to update all the commands to use files imx6s directory.
For testing we will replace the default Yocto filesystem for our modified Ubuntu filesystem. Download it:
cd
mkdir -p work-temp
wget http://www.imx6rex.com/rex-uploads/imx6rex-xubuntu-13-04-production-04-AUG-2014.tar -P ~/work-temp
Now you can replace it (be sure you use correct partition of SD card - we will use /dev/sdb as in original How to start page):
sudo mount /dev/sdb2 /media/fedevel/
cd /media/fedevel/
sudo rm -r /media/fedevel/*
sudo tar -pxvzf ~/work-temp/imx6rex-xubuntu-13-04-production-04-AUG-2014.tar
cd
sudo umount /media/fedevel
2. Use static IP address
We will set up the board and start the tests mainly through SSH session. Thus it is very useful to have same IP address all the time. We have two option: use a DHCP server on laptop (prefered) or use a static IP in u-boot settings:
setenv mmcargs 'setenv bootargs console=${console},${baudrate} root=${mmcroot} ${video_args} ip=192.168.0.160:::255.255.255.0';saveenv
3. Install screen packageBy default when we unplug ethernet cable connected to PC, all the processes started within SSH sessions will be terminated. This command keeps tasks running even if cable is unplugged (and ethernet loopback is plugged right away).
sudo apt-get install screen4. Program microcontroller
MCU needs to be flashed before we started test (in your own lab). Follow these steps to program microcontroller with a blinking example.
5. Copy files needed for testing
cd /media
wget http://www.imx6rex.com/download/files-from-internet/openrex/vi1i/software/blackbird.wav
cp blackbird.wav blackbird2.wav
wget http://www.imx6rex.com/download/software/openrex/others/openrex-emc-test.sh
6. Run the test
Start the board and connect to it with SSH session. Now use command screen:
screen -S openrexRun the test:
- for OpenRex Quad
./openrex-emc-test.sh -quad sda1 sdb1 mmcblk1p2 | tee -i orx-emc-testing.log
./openrex-emc-test.sh -solo sda1 sdb1 mmcblk1p2 | tee -i orx-emc-testing.logNow press Ctrl+A followed by Ctrl+D to terminate openrex terminal. Disconnect ethernet cable and plug loopback cable instead. Measure radiated emissions.
If you would like to invoke screen terminal after the measurement is done, connect PC with the board and use:
screen -rS openrex
The testing script
#!/bin/sh

# OpenRex EMC  testing script

# Example QUAD without SATA:
#  ./openrex-emc-test.sh -quad sda1 sdb1 mmcblk1p2 | tee -i orx-emc-testing.log
# Example QUAD with SATA copying files:
#  ./openrex-emc-test.sh -quad_sata_cp sdb1 sdc1 mmcblk1p2 sda1 | tee -i orx-emc-testing.log
# Example QUAD with SATA strestest:
#  ./openrex-emc-test.sh -quad_sata_stress sdb1 sdc1 mmcblk1p2 sda1 | tee -i orx-emc-testing.log
# Example SOLO:
#  ./openrex-emc-test.sh -solo sda1 sdb1 mmcblk1p2 | tee -i orx-emc-testing.log

mountDevice() {
  mount /dev/$1 /media/$2
  cat /etc/mtab | grep -F "/dev/$1 /media/$2"
  if [ "$?" -eq "0" ]; then
    echo "$2 mounted"
  else
    echo "$2 not mounted"; exit 2
  fi
}
# prepare files
cd /home/ubuntu/
mkdir -p openrex/
cd openrex/
mkdir -p emc-testing/
cd emc-testing/
touch orx-emc-testing.log

echo '\033[9;0]' > /dev/tty1 # disable blanking the display

imx6solo=0
imx6quad=0
imx6quad_sata_cp=0
imx6quad_sata_stress=0
case $1 in
  -solo)  imx6solo=1 ;;
  -quad)  imx6quad=1 ;;
  -quad_sata_cp) imx6quad_sata_cp=1 ;;
  -quad_sata_stress) imx6quad_sata_stress=1 ;;
  *)
esac

# mount devices
mountDevice $2 usb0
mountDevice $3 usb1
mountDevice $4 mmc0
if [ "${imx6quad_sata_cp}" -eq "1" ] || [ "${imx6quad_sata_stress}" -eq "1" ]; then
  mountDevice $5 sata
fi

updateLogFiles() {
  currentTime=`date +%Y-%m-%d.%H_%M`
  mv orx-emc-testing.log orx-emc-testing.log.$currentTime
}

finish_test_now() {
  echo "$(date +\%Y/\%m/\%d-\%T)($(date +\%Z)) Ctrl+C Detected: End of the test"
  precced=0;
  #kill -INT $vid_pid $str_pid $ping_pid $aud_pid;
  sleep 3;
  test_status=`cat orx-emc-testing.log | grep -i "error" | grep -v -e "0 errors" -e "no corrected errors"`
  if [ -z "$test_status" ]
  then
  echo "$(date +\%Y/\%m/\%d-\%T)($(date +\%Z)) PASS - Script ended without detected errors."
  else
  cat orx-emc-testing.log | grep -i "error" | grep -v -e "0 errors" -e "no corrected errors" -e "List of detected errors:"
  fi
  updateLogFiles
  exit;
}

# kill all processes if Ctrl+C is detected
trap finish_test_now 2

# connect ethernet loopback and force the ethernet to 100Mbit
mii-tool -F 100baseTx-HD

# stressapptest - one thread CPU, one thread memory
if [ "${imx6solo}" -eq "1" ]; then
  stressapptest -s 600000 -M 100 -m 1 -C 1 --printsec 10 &
  str_pid=$!
fi
if [ "${imx6quad}" -eq "1" ] || [ "${imx6quad_sata_cp}" -eq "1" ]; then
  stressapptest -s 600000 -M 500 -m 1 -C 1 --printsec 10 &
  str_pid=$!
fi

if [ "${imx6quad_sata_stress}" -eq "1" ]; then
  stressapptest -f /media/sata/tmp-file1 -s 600000 -M 500 -m 1 -C 1 --printsec 10 &
  str_pid=$!
fi
echo "$(date +\%Y/\%m/\%d-\%T)($(date +\%Z)) Starting stressapptest with PID: " $str_pid

# play a video file in an infinite loop
echo 0 > /sys/class/graphics/fb0/blank
mplayer -vo fbdev2:/dev/fb0 -quiet -vf scale -zoom -loop 0 -xy 1024 /home/ubuntu/Clouds.avi < /dev/null &
vid_pid=$!
echo "$(date +\%Y/\%m/\%d-\%T)($(date +\%Z)) Starting video file playback with PID: " $vid_pid

# ping
ping 192.168.0.160 &
ping_pid=$!
echo "$(date +\%Y/\%m/\%d-\%T)($(date +\%Z)) Starting ping: " $ping_pid

# play a audio file
mplayer -loop 0 -really-quiet /home/ubuntu/blackbird.wav &
aud_pid=$!

proceed=1
file1="blackbird.wav"
file2="blackbird2.wav"

cp1_from="/media/mmc0/"
cp1_to="/media/usb0/"

if [ "${imx6solo}" -eq "1" ] || [ "${imx6quad}" -eq "1" ]; then
  cp2_from="/media/mmc0/"
  cp2_to="/media/usb1/"
fi

if [ "${imx6quad_sata_cp}" -eq "1" ] || [ "${imx6quad_sata_stress}" -eq "1" ]; then
  cp2_from="/media/sata/"
  cp2_to="/media/usb1/"
fi

#copy files in case they are missing
cp /media/$file1 $cp1_from$file1
cp /media/$file1 $cp1_to$file1
cp /media/$file2 $cp2_from$file2
cp /media/$file2 $cp2_to$file2

while [ $proceed -eq 1 ]
do
  cp1_done=`ps cax | grep $cp1_pid | grep cp`
  if [ -z "$cp1_done" ]; then # copy finished
    if cmp -s $cp1_from$file1 $cp1_to$file1; then
      echo "$(date +\%Y/\%m/\%d-\%T)($(date +\%Z)) PASS: Copying file from $cp1_from to $cp1_to successful"
    else
      echo "$(date +\%Y/\%m/\%d-\%T)($(date +\%Z)) ERROR: Difference between files on $cp1_from and $cp1_to detected"
      cp /media/$file1 $cp1_to$file1
      echo "$(date +\%Y/\%m/\%d-\%T)($(date +\%Z)) File copied from /media/ to $cp1_to"
    fi
    cp1_temp=$cp1_from # swap destinations
    cp1_from=$cp1_to
    cp1_to=$cp1_temp

    rm $cp1_to$file1 # remove destination file

    cp $cp1_from$file1 $cp1_to$file1 &
    cp1_pid=$!
    echo "$(date +\%Y/\%m/\%d-\%T)($(date +\%Z)) Started copying file from $cp1_from to $cp1_to"
  fi

  cp2_done=`ps cax | grep $cp2_pid | grep cp`
  if [ -z "$cp2_done" ]; then # copy finished
    if cmp -s $cp2_from$file2 $cp2_to$file2; then
      echo "$(date +\%Y/\%m/\%d-\%T)($(date +\%Z)) PASS: Copying file from $cp2_from to $cp2_to successful"
    else
      echo "$(date +\%Y/\%m/\%d-\%T)($(date +\%Z)) ERROR: Difference between files on $cp2_from and $cp2_to detected"
      cp /media/$file2 $cp2_to$file2
      echo "$(date +\%Y/\%m/\%d-\%T)($(date +\%Z) File copied from /media/ to $cp2_to"
    fi
    cp2_temp=$cp2_from # swap destinations
    cp2_from=$cp2_to
    cp2_to=$cp2_temp

    rm $cp2_to$file2 # remove destination file

    cp $cp2_from$file2 $cp2_to$file2 &
    cp2_pid=$!
    echo "$(date +\%Y/\%m/\%d-\%T)($(date +\%Z)) Started copying file from $cp2_from to $cp2_to"
  fi

done